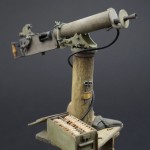
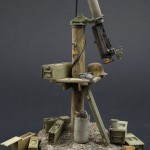
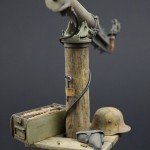
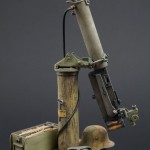
German MG08 FLAMGA Set – Flieger Abwehr MG Abteilung
- Scale / Maßstab: 1:16
- Material: Resin (model plaster base / Modell-Gips – synethetische, kunststoffveredelte Gießmasse)
- Parts: See Below
- Infosheet / Infoblatt: English
- Code: 05SP
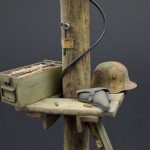
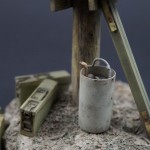
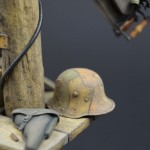
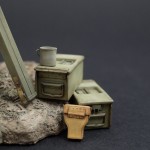
Contents MG08 FLAMGA / Inhalt MG08 FLAMGA:
- MG08 (8 parts) / MG08 (8 Teile)
- Prismatic Optical Sight Model ZF 12 (2 parts) / Zielfernrohr ZF 12 (2 Teile)
- Leather Case for ZF 12 Sight / Futteral zum ZF 12
- MG Water Jacket Shield / MG Mantelpanzer Vorne
- Trench Mount for MG08 (12 parts) / Hilfslafette oder Grabenlafette für MG08 (12 Teile)
- Steam Condensing Can old type (3 parts) / Kühlwasserbehälter alter Art (3 Teile)
- Steam Hose (2 parts) / Dampf-Schlauch (2 Teile)
- Double-Ended Metal Spare Barrel Container for MG08 / Ersatzlaufbehälter für 2 Rohre MG08
- 2 x Ammunition Boxes M1911 / 2 x Patronenkasten M1911
- Ammunition Box M1911 – Open (6 parts) / Patronenkasten M1911 – Offen (6 Teile)
- 2 x Ammunition Boxes M1915 / 2 x Patronenkasten M1915
- Wooden Ammunition Box M1901 – Open (3 parts) / Patronenkasten aus Holz M1901 – Offen (3 Teile)
- Wooden Ammunition Box M1901 / Patronenkasten aus Holz M1901
- Empty Ammunition Cases / Leere Patronenhülsen
- Steel Helmet M1916 / Stahlhelm M1916
- Luger Pistol 01 / Pistole 01 (oder P01)
- Metal Cup M1916 / Tasse M1916
- Tree Trunk for mounting MG (2 parts) / Baumstam zum MG montieren (2 Teile)
- Model Base / Modell-Sockel
- Spare Parts for MG-Mount, MG & MG-Fixing Assembly / Ersatzteile für Grabenlafette, MG & MG-Befestigung
Maxim Machine Gun 08 / Maxim Maschinengewehr 08:
Germany’s heavy machine gun the Maxim 08 stems from Sir Hiram Maxim’s original invention and was manufactured initially under license by the Berlin based Deutsche Waffen & Munitionsfabriken (DWM) as the MG01 in 1901. By 1903 a total of 13 independent Machine Gun Detachments / Maschingewehr-Abteilungen had been formed, each with six horse-drawn MGs and supporting elements. In 1908 the MG was adopted by the German Army along with the unique sled mount – hence the MG08. By 1913 a total of 100 MG Companies had been formed, incorporated directly within the infantry regiments (the 13th company of a 12 company regiment). At the outbreak of war in September 1914 every active infantry regiment had its own MG Company, leaving some Reserve and most of the Landwehr Units without. MG companies would take on the uniform of their parent unit.
The MG was water cooled and could fire up to 400 rounds per minute using the 250-round fabric belts up to a maximum range of 4,400 yards. Although originally intended as a quick reaction weapon and attached to cavalry divisions, it was in the defence roll, when dug-in a trench system that the weapon proved to be most deadly.
The steam condenser hose attachment, which fits on the front left side of water jacket. The attachment has been modelled with both the hose and jacket connections together as they would appear when the hose is attached.
MG Water Jacket Front Shield (sometimes called Face Plate): the front jacket shield was the most commonly seen part of the MG’s set of armour. This fitted over the off-set post sight and around the muzzle. The bottom fold in the plate is to allow the attachment of the steam condenser hose. A full set of MG08 jacket armour with gunner’s shield is also available from the JSM range.
Colour: the handle grips are hard dark wood (may well have been somewhat lighter when first issued). The steel parts to the MG08 were treated in the bluing process (German – Brünieren) primarily as a protection against rust. This gave a blue-black appearance. In some instances only the water jacket was painted a grey-green as this was the only part of the MG visible when dug in or installed within a bunker. The muzzle section (flash cone, booster), which was also applied the bluing process, were during longer periods of action additionally covered in soot.
The different camouflaged patterns, more associated with the German steel helmets was later applied on occasion to the lighter MG08/15, but to date I have not come across an original WWI photo of this paint scheme to the MG08.
Tips:
Keep the gun handles on the casting block whilst removing the excessive resin / mould lines.
The separate crank handle is to be attached to the rear right hand side of the MG block. This can be achieved by drilling out the attachment hole (1mm drill) and inserting the crank to move freely if required (during firing the handle moves in a half cycle backwards and forwards).
Using a small drill and a knife it is possible to hollow out the space inside the breach block, allowing an ammunition belt to be placed into the opening if required – here the resin has been cast as thin as possible. This can also be applied to the trigger assembly at rear of MG before attaching the handle grips. Below the actual trigger is a ring, which can be drilled out. On these early / wartime MG08s there is also a hole directly behind the ring, going into the rear of the MG block – this can likewise be drilled out (this allowed the barrel to be cleaned without removing it from the water jacket).
The small armoured front shield should be fixed to the gun before the muzzle assembly is added.
The flash cone has already been cast with an opening at the front. This can if required be drilled out further and the inner cone wall thinned out.
The flash shield will slide over the cone and sit on a round lip behind.
Under the rear site slide bar on the main MG block there is a small casting web – this should be removed.
Prismatic Optical Sight ZF12 / Zielfernrohr ZF12: The standard sight for the wartime MG08s. Under the ZF12 sight mount there is a casting web around the fixing lever – this needs to be removed. The protection lens cap for optic was attached to the sight housing with a small leather strap. The sight housing was of steel, with the upper lens and adjustment wheel in brass, these were issued with a field grey or green application.
Leather Case for ZF12 / Lederköcher für ZF12: The leather holder for the ZF12 has been supplied as an extra and would normally be carried by the gunner. Colour – brown leather.
MG08 Trench Mount / MG08 Hilfslafette:
The trench mount was essentially an auxiliary device to allow this heavy MG to be mounted either on a wooden board with gripping spikes for ground targets (also available from the JSM range) or to a tree stump / post in the anti-aircraft role or FLAMGA (Flieger Abwehr Maschinengewehr Abteilung). The standard sled mount or Schlitten 08 was too large and cumbersome to be affixed in this way (there is however photo evidence of the sled mounted MG08s incorporated onto wooden frame works or upturned wagon wheels for this purpose). Curiously, when the MG is mounted onto the rear AA position, it does not allow for horizontal fire, due to the cooling jacket being wider than the gap between the mount sides. However, there are photos showing alterations to the top half of these mount sides i.e. bent outwards, presumably carried out at local or Unit level. The mount base plate would be bolted to the trunk / post or wooden board with the mount rotating freely over the bolts. When the lighter MG 08/15 appeared in sufficient numbers from 1916, these trench mounts, at least in the ground-fire role gradually disappeared. Colour: field grey or green.
On each side of the mount are 2 locking bolts – here there are casting webs attached and require removing. This is quite a complicated contraption in this scale model and care should be taken before fixing the parts together. Some online photos of trench mounts in museums or private collections are unfortunately showed with various parts affixed wrongly. One should seek original WW1 photographs or check out www.mg08.de (German language) – here there are accurate photos of this piece of equipment as well as other MG08 & MG 08/15 accessories.
Note: the 2 x fixing hooks fit onto the bottom clamp axle on each side, allowing the gun to elevate freely. The clamp screws then fit over the top, joining both clamps. The fixing hook openings face to the rear on the FLAMGA MG mount version and to the front on the ground target version. The 2 x locking fasteners then hold the hooks in place.
Spare Parts for Mount & MG Fixing Assembly: Due to the partly complicated type of model this MG08 presents, a small bag of spare parts is also supplied with this kit. The extra parts are mainly associated with the MG trench mount and fixing section to the gun, which maybe misplaced or broken during construction.
Cylindrical Water Condenser 1st Model for MG08 / Wasserkessel (1. Modell zum MG 08): Named the water bucket / Wassereimer by the German MG crews and used to collect the condense steam generated by the sustained firing of the MG and to refill the cooling jacket afterwards. The steam hose end had to be submerged in to at least ¼ of the can’s contents, otherwise the steam would vaporize. The spout could be locked in the upwards position by the handle or folded down and locked underneath when not in use. Today these cans are amongst some of the rarest items for any MG08 collector. Colour: the spout, ball valve and filling screw cap were of brass on these early models (later in steel), condenser can – gun metal or painted grey.
The water container handle can be carefully thinned out and fitted into the attachment-holes at the top of can. Both holes should be drilled out beforehand (0.5 mm).
Rubber Steam Hose: The 2 m rubber steam hose is attached onto the hose-attachment on the front underside of water jacket and is to extract the vaporized water, which is then collected within the water container / can. The end of the hose would be placed in the opening under the filling screw cap (not on the spout end, which is too small). Firing from a trench, or fixed position the MG crews, provided that they had a sufficient water supply, were instructed in the MG08 hand book to dig a small whole and bury the end of the hose to one side of the gun, thus avoiding the rising white plume of steam giving their exact position away. Colour: varied in colour from grey to dark matt coloured rubber – not quite black.
Wooden Ammunition Box M1901 / Holz Patronenkasten M1901: The wooden ammunition box held a 250 round woven cotton belt with brass spacer and was used for both the MG08 and the MG08/15. A push-in fastener held the lid closed with the metal handle folding into the crevice of the lid. Early models had brass handles, hinge fittings etc., later these were produced in steel. Colour: The boxes, which I had looked at, had been painted originally in grey-green, with of cause the edges to the boxes quite worn. Stenciled on the lid in black were sometimes a single arrows, indicating the direction that the box should be placed next to the MG.
One ammo box supplied has a detachable lid – the strip of ammunition can be painted separately and placed inside the open box afterwards. Plywood was used in making the original master ammunition box in order to maintain the wood grain surface structure.
Ammunition Box 11 / Patronenkasten 11: the double belt ammunition box produced in galvanized sheet metal. As on the PK 15, the metal carrying handles were widened where the hand would grip to give added ease whilst carrying. The handles all fold back snug within the lid and side inlets. Colour – outer: green / grey. Inner: galvanized steel. These ammo boxes showed often a battered appearance on original photos with the corners and tops particularly worn.
Ammunition Box 15 / Patronenkasten 15: as in the Ammunition Box 11, but for single belt only. Colour – outer: green / grey. Inner: grey.
MG08 FLAMGA Model Base: the base has been designed to either stand alone or fit together as one small vignette with the JSM Bavarian Gunner figure. The ground work is littered with spent cartridges, partly trampled into the surface. There are two indents within the base to accommodate the small type M 15 ammunition boxes if wished.
On the finished base I mixed in brass painted spent cartridges to the applied mud (a mixture of plaster, dried filter coffee and modelling paint). I added more cartridges during the final phase of painting.
When working with modelling plaster it is always advised to file and sand rather than cut or clip as this could lead to larger parts breaking off.
Tree Trunk: To mount the MG in the anti-aircraft position a steady fixture would have been required. A suitable tree trunk or post would have been dug into the ground. The metal ring at the top was to stop the trunk from splitting and would have been fitted locally. The trunk / post can only be fitted in a certain direction into the base.
Wooden Shelf: Built locally by the MG crew or Unit Carpenter and is to allow the placing of ammunition boxes closer to the gun. Some of the nails are still visible and one or two have not been hammered in correctly into the wooden planks and are now bent over. There will of cause be the odd oil stain etc. on the shelf from maintenance of the gun and spillage. Colour: most wood types if untreated will eventually turn grey.
The shelf will slip over the post from the top and rest on the attachment plugs set on the tree trunk. The shelf is intended to have a slight slant to one side.
MG Cartridge Retrieval Tongs: attached to the trunk, behind a strip of nailed on metal is the cartridge tongs to enable a quick removal of any jammed cartridges within the MG breech during a stoppage.
I have seen these tongs attached to the posts on an original photo of two FLAMGA / AA MGs mounts.
Empty 7.92 mm Cartridges / Leere 7.92mm Patronen: these can be placed on the ground as wished. Colour: brass.
Steel Helmet M16 / Stahlhelm M.16: This helmet, which first entered service in 1916 during the initial stages of the battle of Verdun was designed by Professor Friedrich Schwerd and made from high quality chrome-nickel steel. Weighing between 950 and 1200g, depending on size – more heavier than the Allied helmets, but giving a better protection to the face, ears and neck. The horn venting bolts on each side enabled the fitting of an extra armoured shield over the helmet (also available in 120mm scale from Jon Smith Modellbau) for sentries, MG troops, snipers or other particularly exposed / dangerous employment. This weighing around 2000g was seldom used; although a total of 50000 were supposedly produced.
Colour: issued in field- grey, which would reflect in sun light and proved unsatisfactory. Various trials were carried out, but it was not until July 1918 that an official camouflage scheme in brown and green sharp-edged irregular patens, all outlined in black was introduced. These were carried out by unit maintenance workshops (other weapons and equipment, particularly artillery pieces and MGs were also rendered in the same way). It seems that helmets were re-painted by individuals or units in a variety of colour schemes before the official order and items with red- brown, ochre (brownish- yellow), green and blue- grey, all outlined in black were common. Helmets were also covered using the light brown sandbag material, or the issued helmet-covers, seen particularly in the later war period.
The M.17 & 18 helmets followed with only slight differences to the inside padding and chin strap fasteners. The last model to see service during the war, if only in small numbers was the M.18 Ohrenausschnitt, or Helmet M.18 with ear cut-outs (also available in 120mm scale from JSM), more commonly (and stubbornly) known as the Cavalry or Telegraph Helmet. The cut-outs were in fact a further design feature of the M.18 to improve the hearing ability of the wearer and avoid the hissing noise experienced by troops.
The resin chin strap supplied (a 2nd reserve strap is also supplied) can be formed around a figure’s head if required by using the application of heat (either hot water or hairdryer, holding of cause with tweezers etc.). One may want to thin out the strap before application. The length of strap will need shortening, using the finished head / helmet already completed.
Metal Cup / Tasse: The early-type aluminium cap, which was later replaced by the more common enamelled steel version Tasse M1916 (production was discontinued in October 1914 due to lack of aluminium). The cup can be fixed to one of the bread bag fastening straps at the rear of figure. The opposite end to the handle is a small indent in the rim to allow the cup to be used as a small jug. The official place for this cup was inside the bread bag. Colour: light olive green or field-grey.
 An deutschsprachige Interessenten:
Sie können mich per eMail oder Telefon auch gerne auf deutsch kontaktieren. Ortsbesuch ist nach Absprache möglich.
