


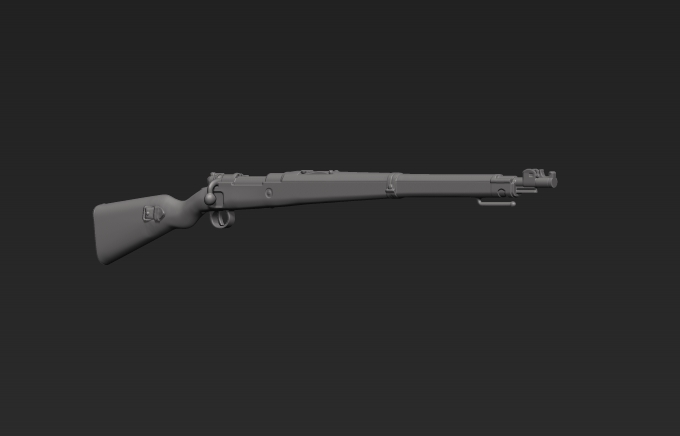
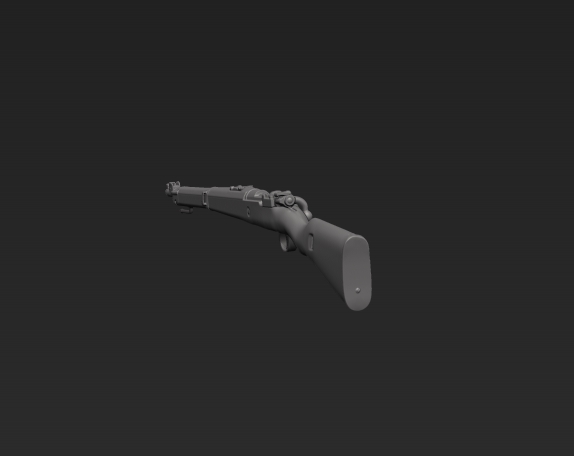
German 13mm Anti-Tank Rifle Mauser M1918 Set
- Scale / Maßstab: 1/16th (120mm)
- Material: Resin
- Parts / Teile: 32
- Infosheet / Infoblatt: English
- Code / Artikel-Nr.: 03SP
- Attention: Not a toy. Model kit or model making accessories – not suitable for children under 14 years of age. / Achtung: Kein Spielzeug. Modellbauzubehör – nicht für Kinder unter 14 Jahren geeignet
GPSR Data / Angaben
- Manufacturer / Hersteller: Jon Smith Modellbau
- Responsible Person / Verantwortliche Person
- Address: Hannoverstr. 68, 29664 Walsrode, Germany
- Contact / Kontakt: info@jonsmith-modellbau.com
- Tel: +49 (0)5161 8255
Contents / Inhalte:
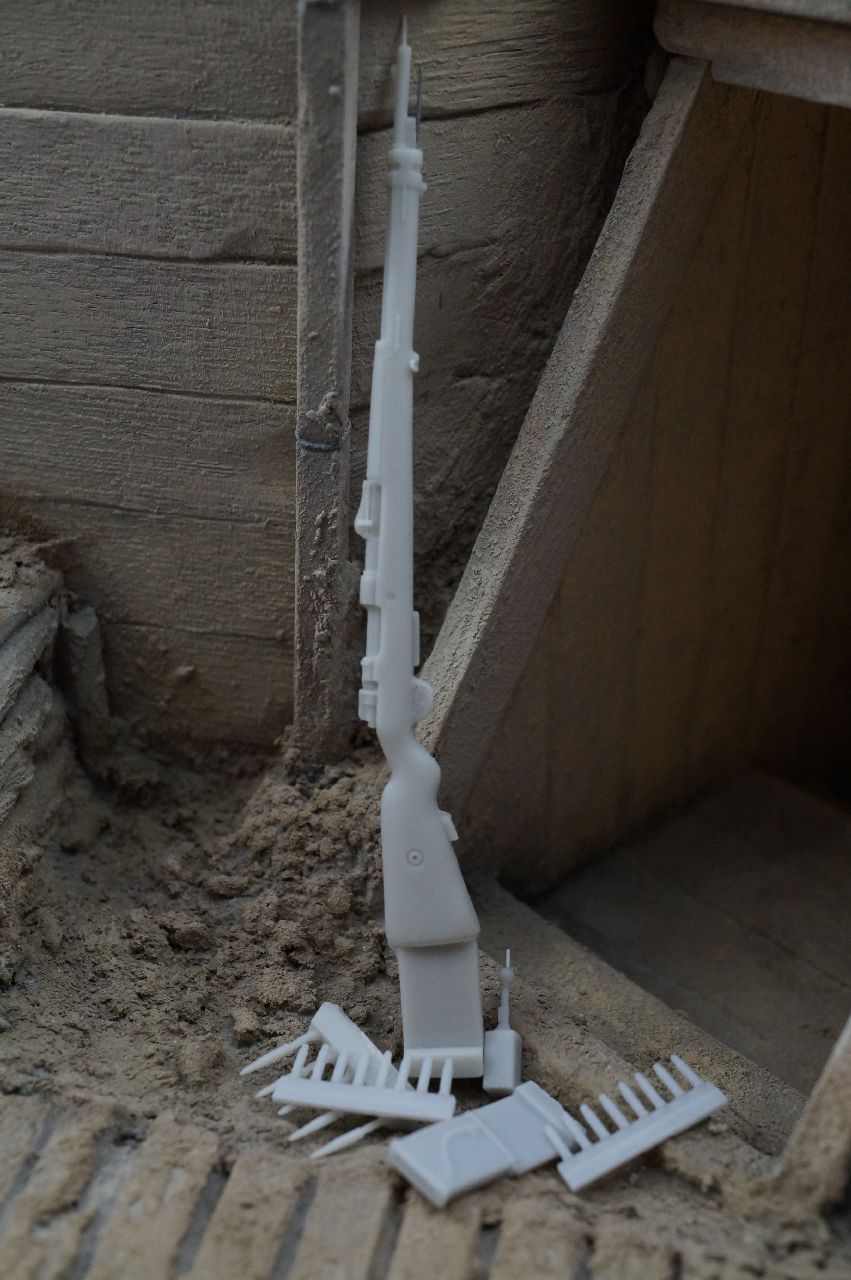
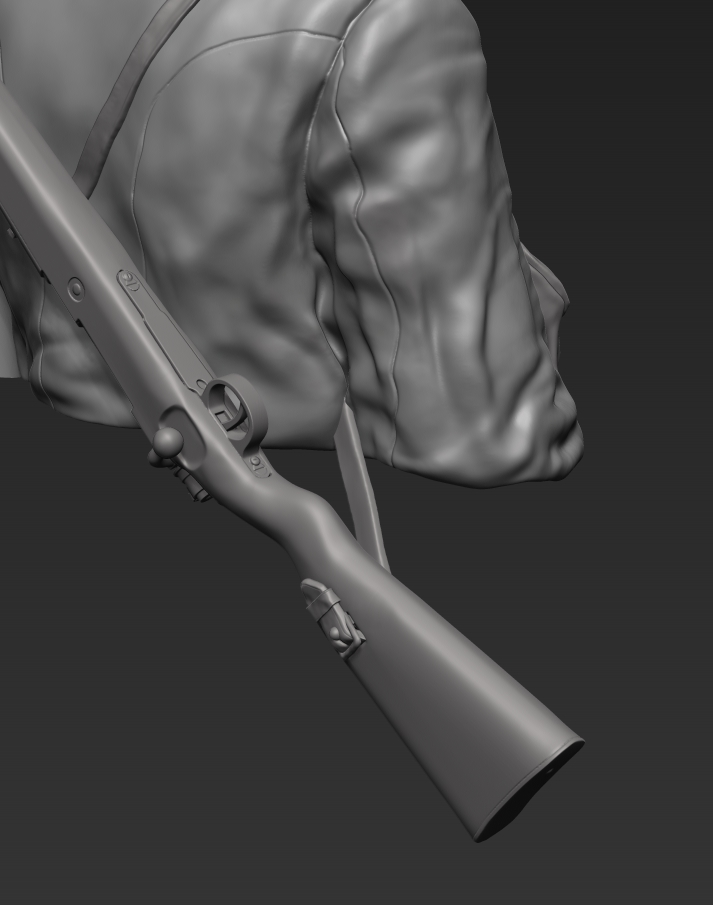
- Mauser Tank Rifle (3 parts) / Mauser Tankgewehr M1918 (3 Teile)
- Standard MG 08/15 Bipod / MG08/15 Zweibein
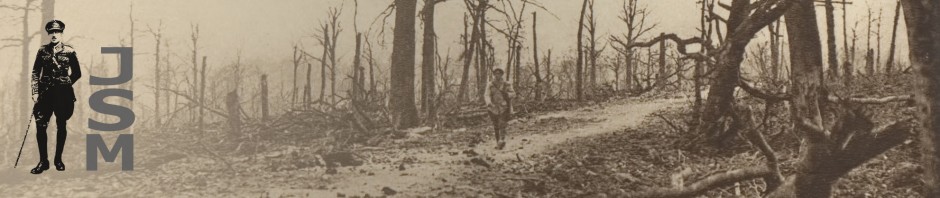
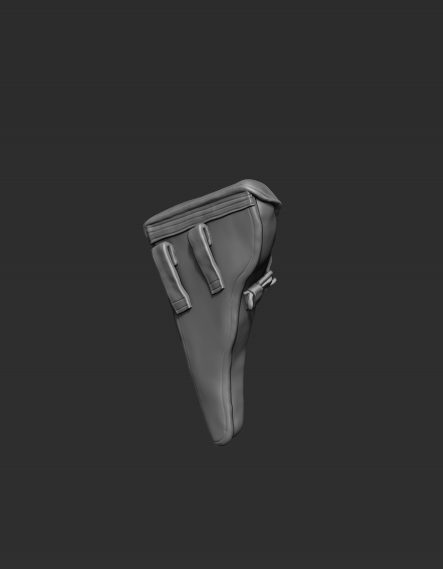
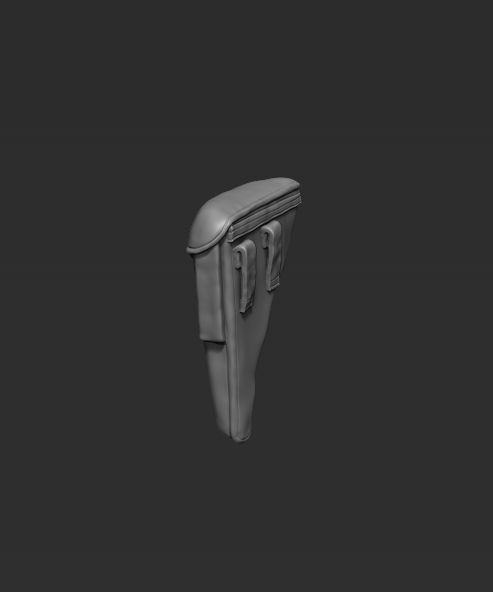
- 2 x Ammunition Holders / 2 x Munitionstaschen
- 6 x 13mm Mauser T-Gewehr Cartridges / 6 x 13mm Mauser T-Gewehr Patronen
- 6 x Empty 13mm Mauser T-Gewehr Cartridges / 6 x Leere 13mm Mauser T-Gewehr Patronen
- Mauser C96 Pistol
- 2 x Ball Grenades M 1913 / 2 x Kugelhandgranaten M 1913 a. A. (alte Art – old type)
- 2 x Stick Grenades / 2 x Stielhandgranaten M.15
- Multi Charge Grenade (2 parts) / Geballte-Ladung (2 Teile)
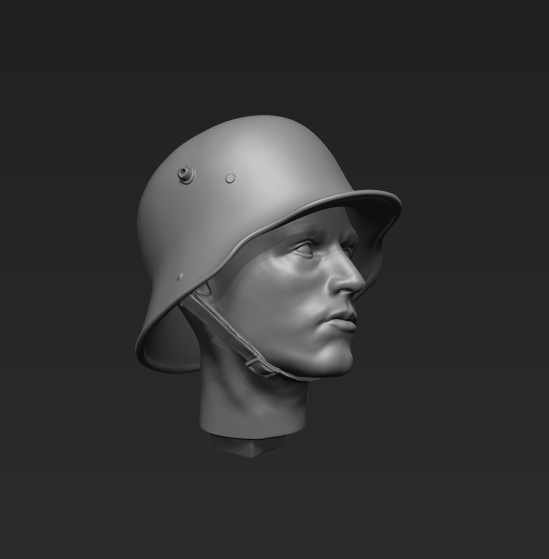
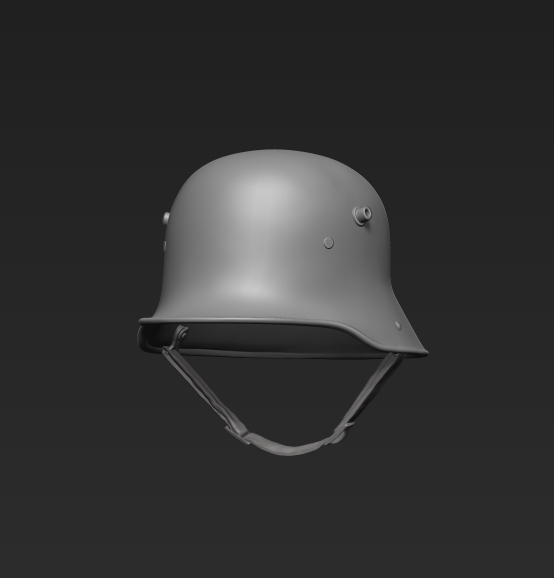
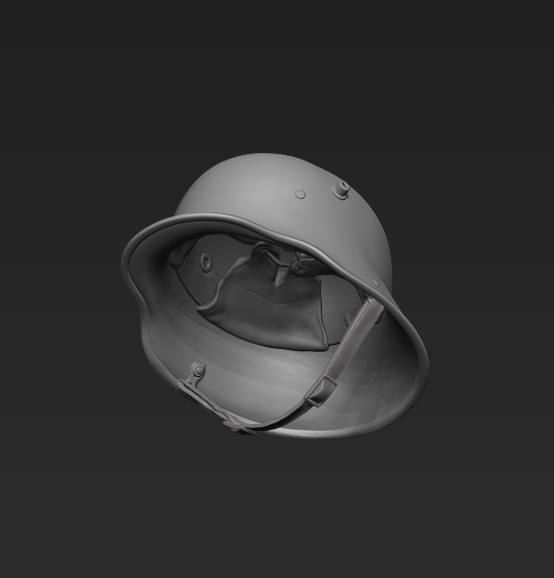
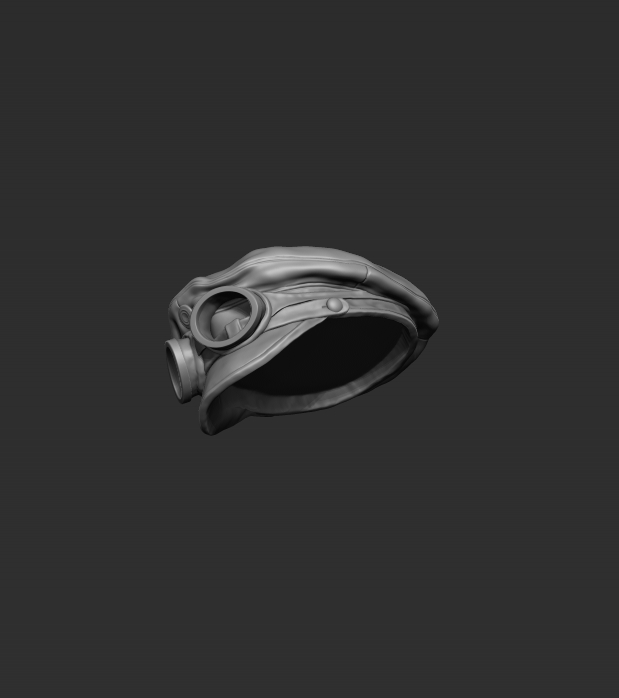
- Steel Helmet M.16 / Stahlhelm M.16
Extracts from the Infosheet with this kit:
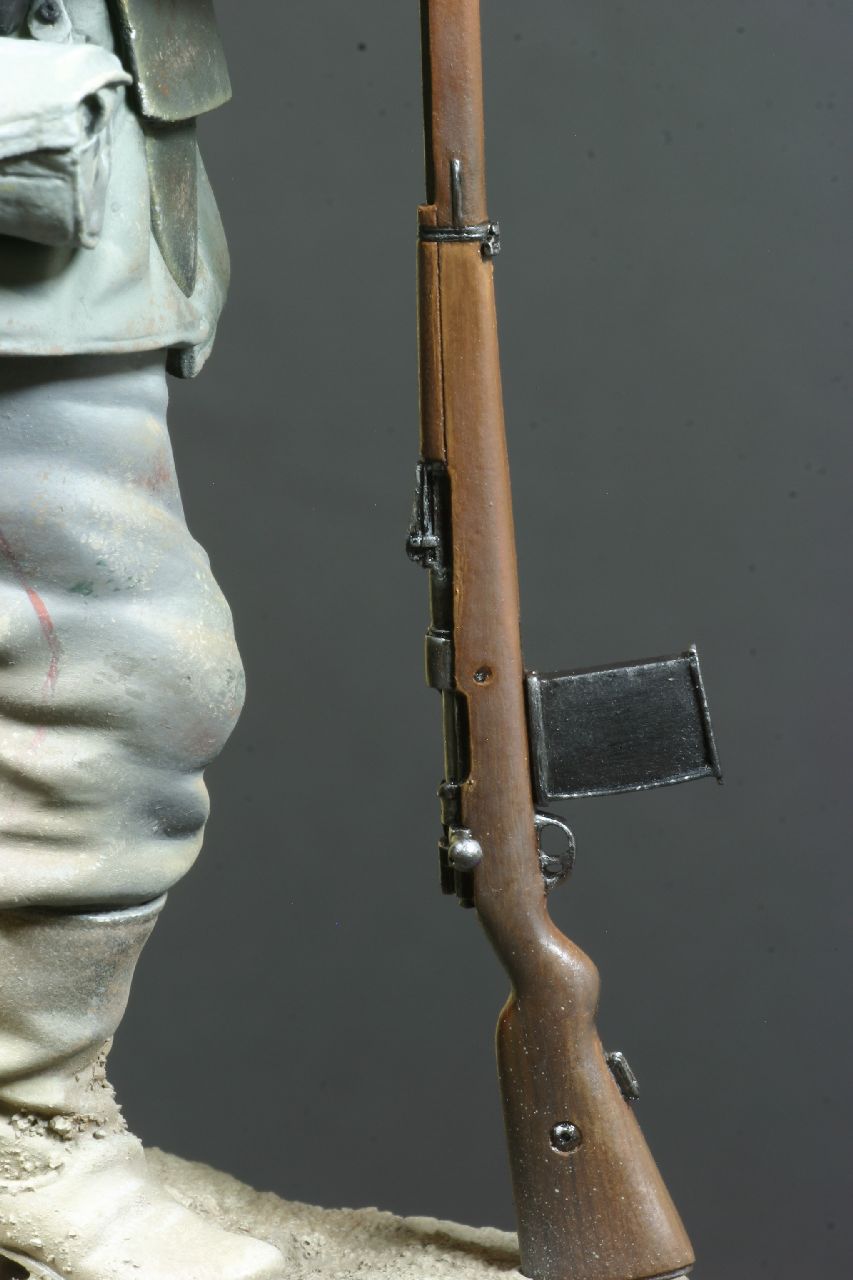
Mauser Tank Rifle / Tankgewehr Mauser M1918: Designed and produced in the Mauser factory at Oberndorf as a short-term answer to the new tank problem on the Western Front. This single shot bolt-action weapon was the world’s first anti-tank rifle. Total length approx. 170 cm, weight together with the 08/15 MG bipod attached 17.1 Kg. Nicknamed the Elefantenbüchse, or Elephant-rifle at the Mauser factory this weapon was too heavy, the recoil too strong and the penetration when used against armour insufficient. (Most of the allied tanks were stopped by direct or indirect artillery fire).
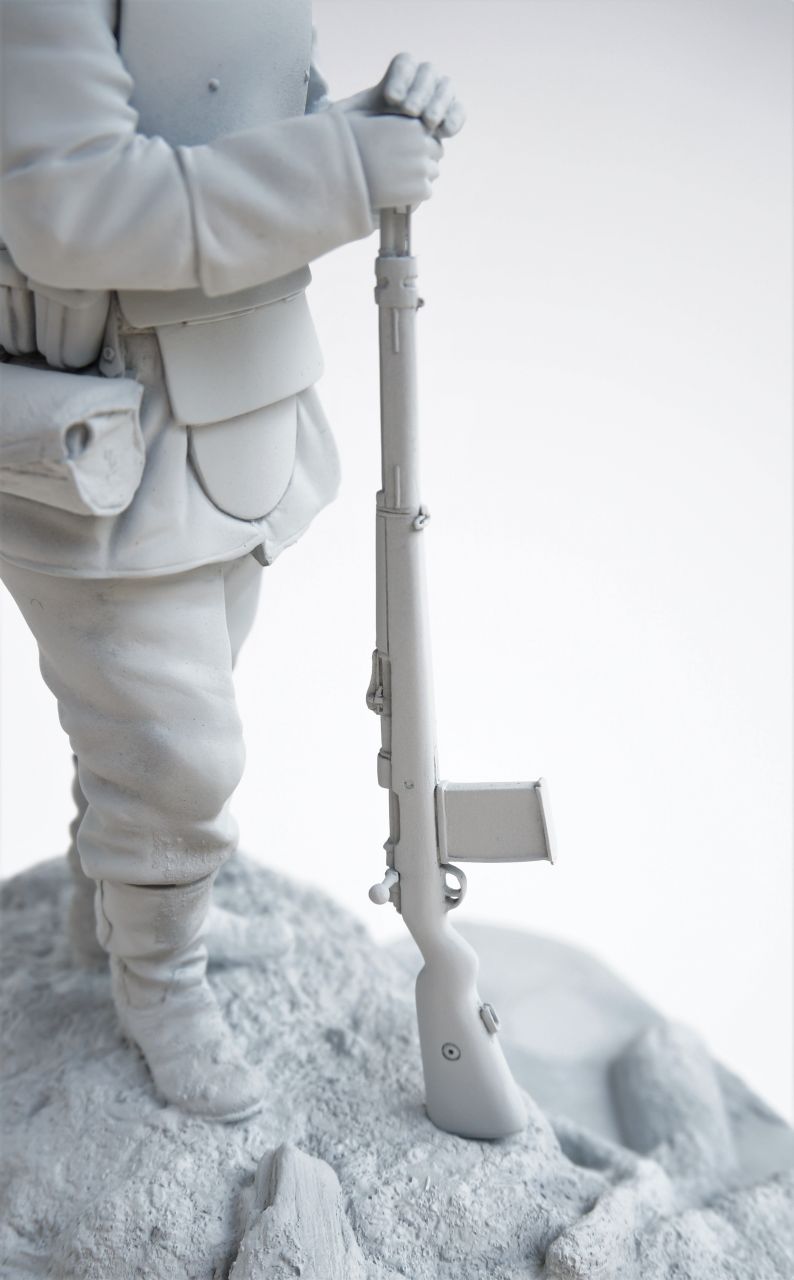
In action these rifles were used either with the 08/15 MG bipod (the original bipod designed for this weapon was seldom employed) or mainly without, the rifle being placed on top of the trench wall/parapet. Due to the considerable recoil and when practical the gunners would change over roles after every 2 – 3 rounds, engaging the enemy armour at as close a range as possible.
In the German Army instruction manual for the rifle it is stated that both the gunner No. 1 and 2 should be chosen for their size and strength. They should be determined, cool-headed and also good shots. The employment of the T-Gewehr in groups of 3 or individually depends on the tactical situation and lay of the ground. The use of the T-Gewehr in combination with the MG 08 or MG 08/15 using special armoured piercing SmK (SmK – Stahlmantel mit Kern) rounds increases the chances of success. At the front end of the bolt are the 3 discharge vents, which enabled excess gasses to be released during firing. Colour: the wooden stock and pistol grips were of a dark wood. All other parts were a dark gun- metal. The bolt, especially the handle were generally shinier. 13mm case – brass. Bullet head – dark copper.
Note: a common characteristic on original guns are the small indents/damages on the left hand side of the wooden butt (just behind the narrow part), caused by the rim of the gunner’s steel helmet denting the rifle on recoil – this has been reproduced on the model rifle. The separate bolt can either be built in the open or closed position. Either separate the bolt and fix accordingly, or even better, drill out the rear part of the breech (2mm hand drill) – here a small central indent has been placed for assistance. If possible and if the drill bit is long enough, drill up into the rear of the barrel a few mms as well. This will enable the bolt to function as in the original. The 13mm rounds supplied with the set will in fact fit into the breach.
Tip: in order to achieve a smoother function of the bolt moving in and out of the chamber, one can apply some sanded down pencil lead with an old paintbrush. This will not only lubricate the parts, but also give it a natural shiny appearance, just like the original.
Loose 13mm Anti-Tank Ammunition / Leere 13mm Mauser T-Gewehr Patronen: The empty cartridges can be displayed within a diorama, best on the right hand side of gun. Colour: Brass with copper heads.
Standard MG 08/15 Bipod / MG08/15 Zweibein: This entirely new pressed-steel lightweight bipod was to replace the large and heavy sled mounts used with the MG 08 and allowed for a 180° traverse. It had a universal attachment fitting, which could be fitted to the Mauser T-Gewehr – Mauser anti-tank rifle. Colour: dark green.
Note: this should fit to the bipod attachment underneath the rifle. Under the release leaver (top rear of bipod) there is a small casting web – this should be removed before painting etc.
Mauser C96 Pistol / Mauser Pistole C96: At the outbreak of hostilities the 08 Luger Pistol long barrel version (the Germans never called this weapon the Luger – this is an anglicised name) could not be issued quickly enough to artillery and auxiliary units, so the German Army purchased a large number of C96s, which also had the extended wooden butt. Although originally put through trials 1 year before the war, the C96 was not taken on. The calibre is 7.63, with a 10 round capacity in the magazine, which was later changed by the Mauser Company in 1916 to the standard 9mm. In order to avoid mix-ups with different ammunition, a figure 9 was carved into the pistol grip and painted out in red. The tool on the side of the leather holster is the cleaning rod with a wooden handle. The small pocket at the front holds a spare ammunition strip. Normally, the pistol is carried attached to the belt, on the left hand side. A sling was also supplied to enable the person to wear the pistol over the left shoulder with the weapon resting on the right hip.
Although originally intended for issue to artillery units these pistols found their way into many other parts of the army and were particularly popular with soldiers and NCOs serving in the front line units (officers would normally have smaller pistols). Also, these pistols were well liked with Stormtrooper units for their reliability and robustness. Colour: leather supporting rig – natural leather, wooden shoulder stock/holster – brown wood, gunmetal – dark metal colour.
Note: the small ring attached to the bottom of the pistol grip can be hollowed out.
Stick Grenade / Stielhandgranate M.15: The second type of German stick grenade to be issued (in greater numbers from 1916 onwards). The turned wooden handle would have the fuse duration stamped on one side, along with the makers name and production date. This grenade had the advantage of a screw cap, covering the porcelain ball and pulls cord igniter-system inside, keeping it dry and free from dirt. Most stick grenades were set with a 5.5 or 7-second time delay. The cap crown has 8 knurled indents to enable a better grip in wet/muddy conditions, or when wearing cloves. The metal clip on the side of the explosive charge is for attaching to equipment etc. On some original photos it can be seen that the screw caps have already been removed, ready for instant use if needed. The original master model was made using a fine grain wood to reproduce the surface of the handle. Colour: Metal parts – green/grey. Wooden stick/handle – untreated wood starts turning grey after a length of time when exposed to the elements.
Note: with a bit of care and a thin, sharp blade it is possible to hollow out the gap behind the clip and the explosive charge, not forgetting to leave the bottom part of the clip still attached.
Multi Charge Grenade / Geballte-Ladung: Made out of 7 stick grenades and generally used against enemy dugouts and strongpoints. These multi charges were made by the troops themselves at the front. Original photos show the middle grenade surrounded with 6 grenade heads without the handles, secured by several loops of wire, tied under the metal belt clips. The shape of the grenade heads means that they do not sit snug together on account of the protruding bottom rim. Due to moulding techniques the areas in between the grenade heads are filled out. Colour: Metal parts – green/grey. Wooden stick/handle – untreated wood starts turning grey after a length of time exposed to the elements.
Note: with a bit of care and a thin, sharp blade it is possible to hollow out the gaps behind the clips and the explosive charge heads, not forgetting to leave the bottom part of the clip still attached.
Ball Grenade M 1913 / Kugelhandgranate M 1913 a. A. (alte Art – old type): This grenade was made out of cast-iron with large external fragmentation segments. The friction delay fuse was activated by pulling the twisted priming wire – for this there was an extra wrist lanyard with a snap hook. Later types of Kugelhandgranatn had a more simplified outer casing and were sometimes issued painted green. Colour: Grenade – mainly black. Fuse – brass. A twisted priming wire can be constructed using a thin wire or similar and inserted into a small hole drilled at the top of the fuse.
Germen Water Bottle M1915/17 (Late War Production) / Feldflasche M1915/17 (Spätkriegsprojuktion)
- Scale / Maßstab: 1/16th (120mm)
- Material: Resin
- Parts / Teile: 1
- Code / Artikel-Nr.: IS39
- Attention: Not a toy. Model kit or model making accessories – not suitable for children under 14 years of age. / Achtung: Kein Spielzeug. Modellbauzubehör – nicht für Kinder unter 14 Jahren geeignet
GPSR Data / Angaben
- Manufacturer / Hersteller: Jon Smith Modellbau
- Responsible Person / Verantwortliche Person
- Address: Hannoverstr. 68, 29664 Walsrode, Germany
- Contact / Kontakt: info@jonsmith-modellbau.com
- Tel: +49 (0)5161 8255
Contents / Inhalte:
- Germen Water Bottle M1915/17 (Late War Production) / Feldflasche M1915/17 (Spätkriegsprojuktion)


Mauser Rifle 98 with Trench Magazine / Mauser Gewehr 98 mit Grabenmagazin
- Scale / Maßstab: 1/16th (120mm)
- Material: Resin
- Parts / Teile: 7
- Infosheet / Infoblatt: English
- Code / Artikel-Nr.: IS22
- Attention: Not a toy. Model kit or model making accessories – not suitable for children under 14 years of age. / Achtung: Kein Spielzeug. Modellbauzubehör – nicht für Kinder unter 14 Jahren geeignet
GPSR Data / Angaben
- Manufacturer / Hersteller: Jon Smith Modellbau
- Responsible Person / Verantwortliche Person
- Address: Hannoverstr. 68, 29664 Walsrode, Germany
- Contact / Kontakt: info@jonsmith-modellbau.com
- Tel: +49 (0)5161 8255
Contents / Inhalte:
- Mauser Rifle / Gewehr 98
- Bolt / Kammerstängel
- Cleaning Rod (fixed) / Putzstock (montiert)
- Trench Magazine / Ansteckmagazin (Grabenmagazin)
- 24 x Empty 7.92 Cartridges / 24 x Leere 7.92 Patronen
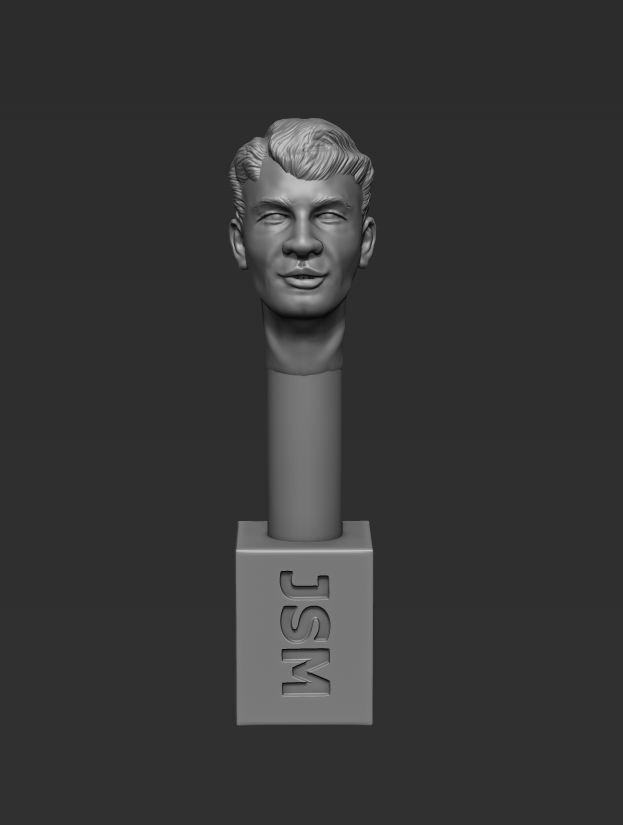


- Contents / Inhalte: 1/35th Bare Head / Nackter Kopf – New
- Scale / Maßstab: 1/35th
- Material: Resin
- Parts / Teile: 1
- Code / Artikel-Nr.: SSH79
- Attention: Not a toy. Model kit or model making accessories – not suitable for children under 14 years of age. / Achtung: Kein Spielzeug. Modellbauzubehör – nicht für Kinder unter 14 Jahren geeignet
GPSR Data / Angaben
- Manufacturer / Hersteller: Jon Smith Modellbau
- Responsible Person / Verantwortliche Person
- Address: Hannoverstr. 68, 29664 Walsrode, Germany
- Contact / Kontakt: info@jonsmith-modellbau.com
- Tel: +49 (0)5161 8255


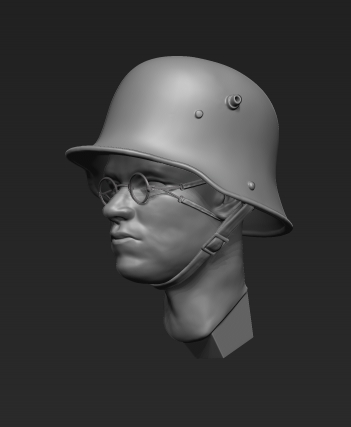
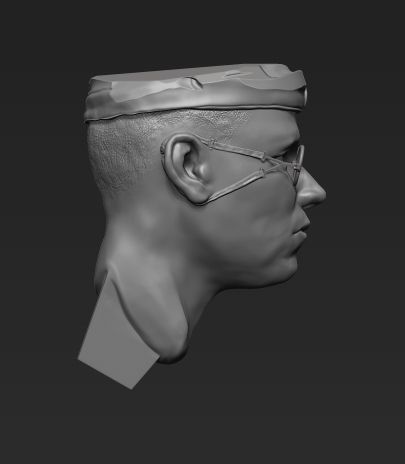
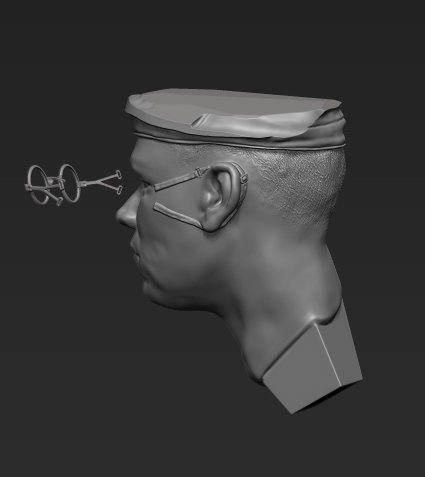
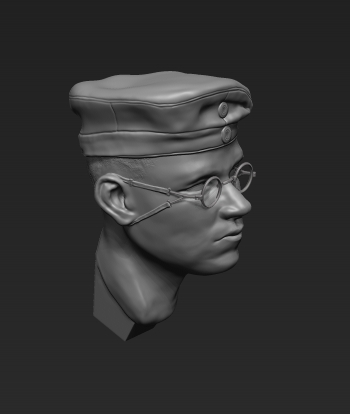
Above are photos from German figure painter Maks Hof of the using this head (in 1/32nd scale) for a WW1 subject.
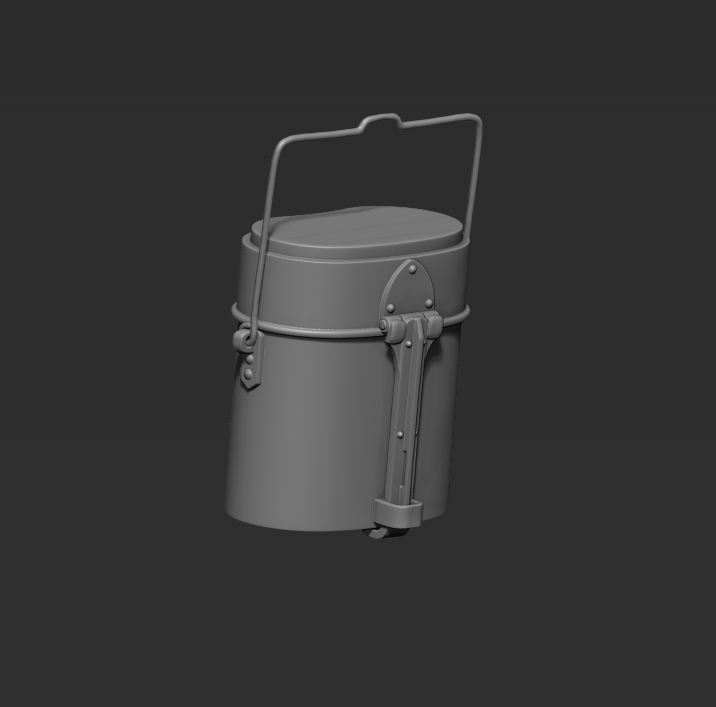
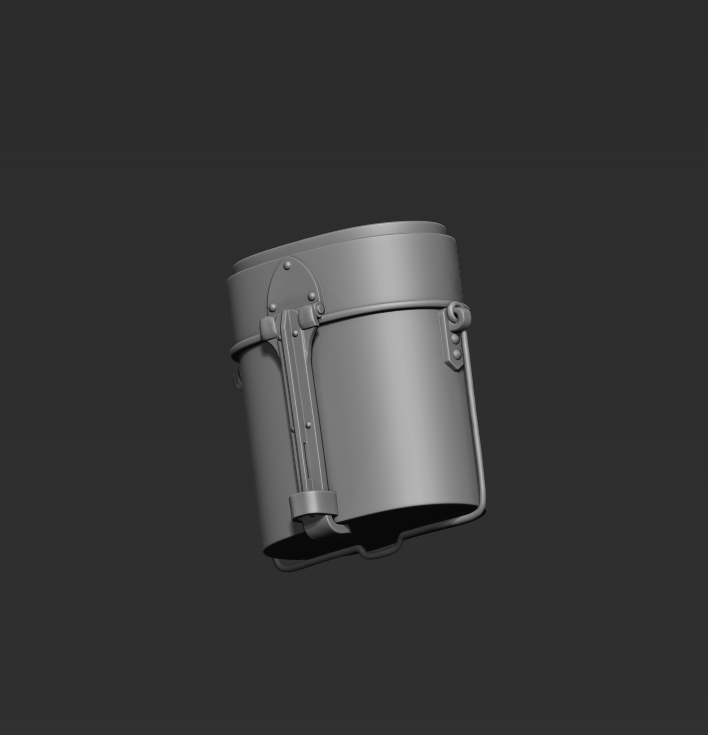
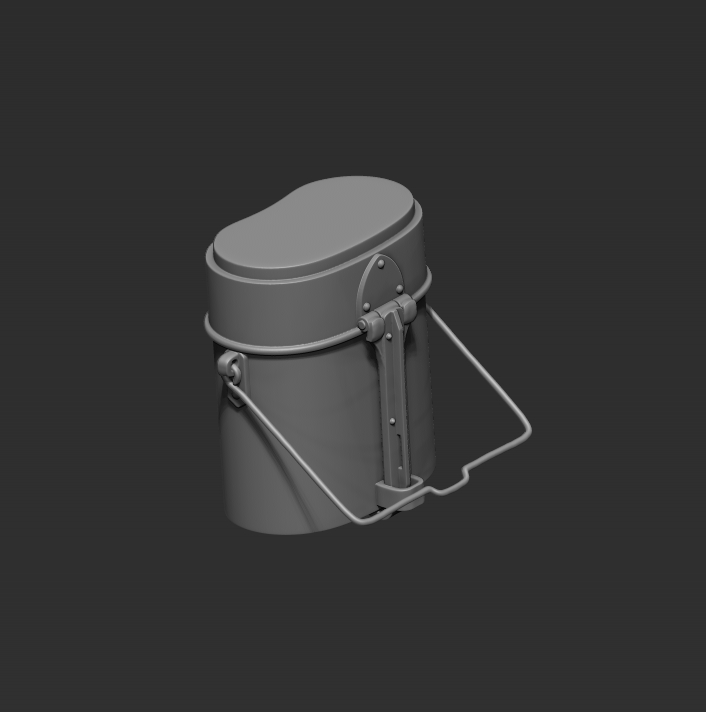
German M1910 Mess Tin / Dt. Kochgeschirr M1910
- Scale / Maßstab: 1/32nd (54mm)
- Material: Resin, Copper wire / Kupferdraht
- Parts / Teile: 2
- Code / Artikel-Nr.: SFF27
- Attention: Not a toy. Model kit or model making accessories – not suitable for children under 14 years of age. / Achtung: Kein Spielzeug. Modellbauzubehör – nicht für Kinder unter 14 Jahren geeignet
GPSR Data / Angaben
- Manufacturer / Hersteller: Jon Smith Modellbau
- Responsible Person / Verantwortliche Person
- Address: Hannoverstr. 68, 29664 Walsrode, Germany
- Contact / Kontakt: info@jonsmith-modellbau.com
- Tel: +49 (0)5161 8255
Contents / Inhalte:
- German M1910 Mess Tin / Dt. Kochgeschirr M191
- Wire for Handle / Draht für Gestell / Henkel
Note: the handle is made using the supplied piece of wire.

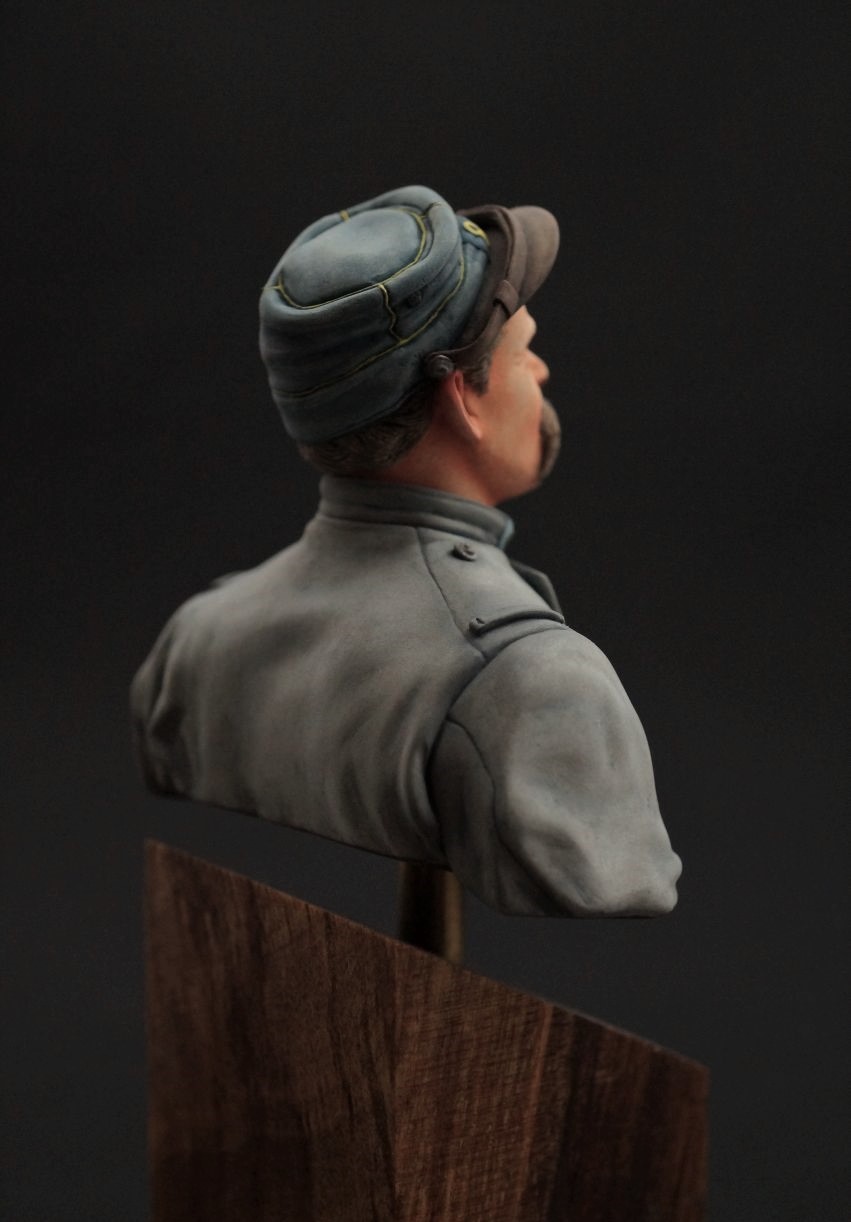
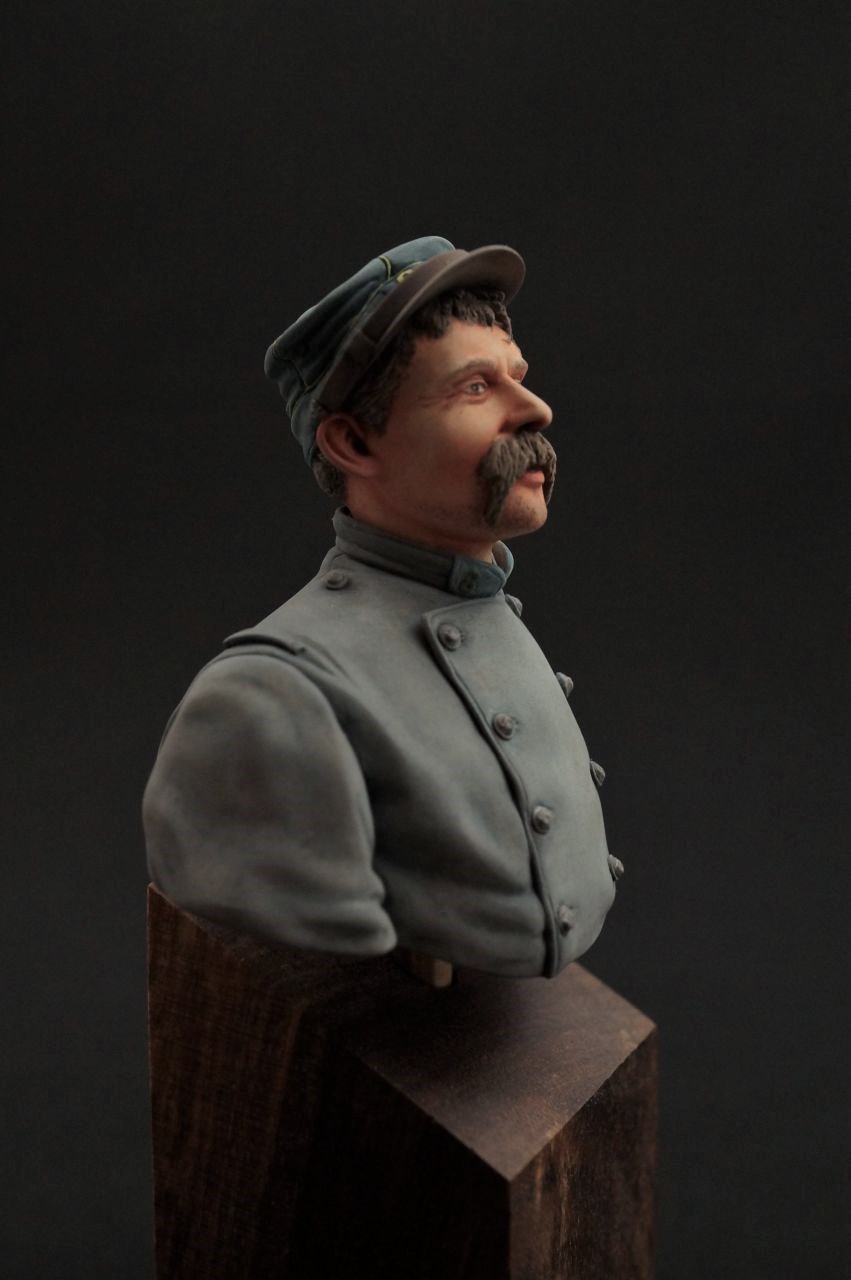
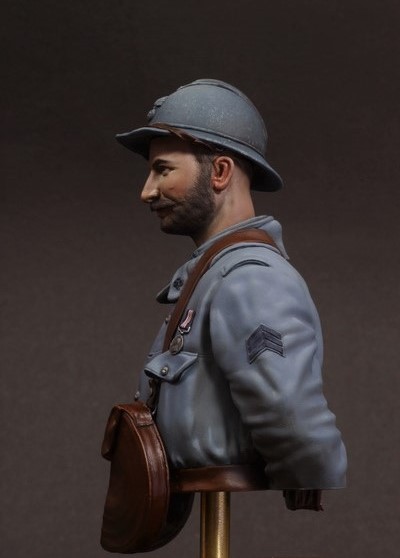
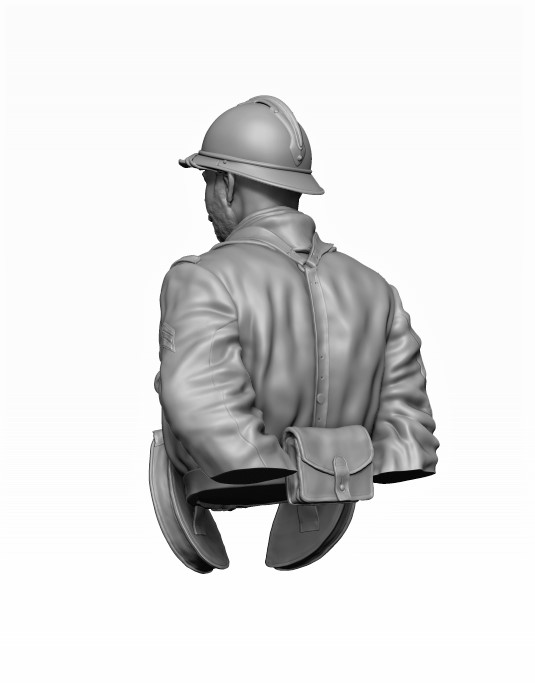
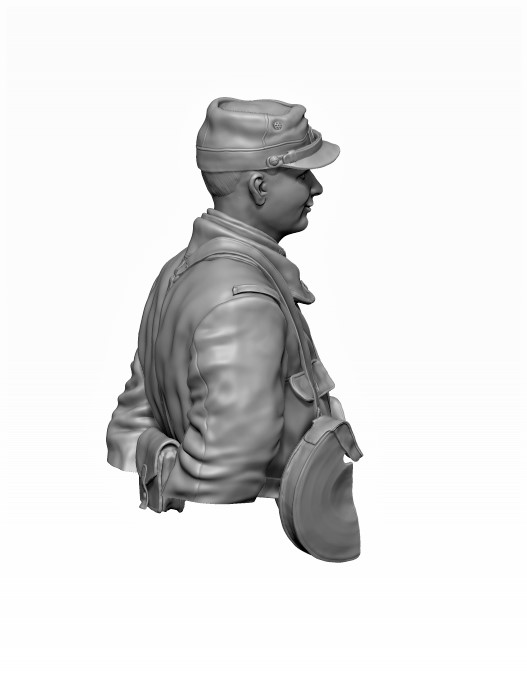
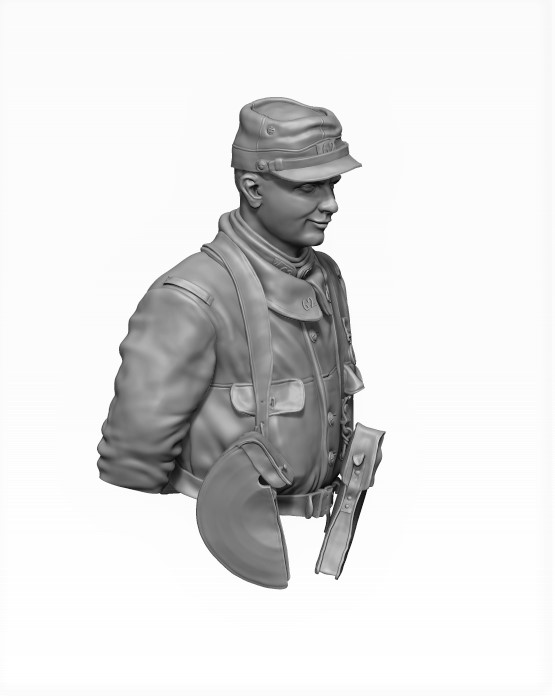
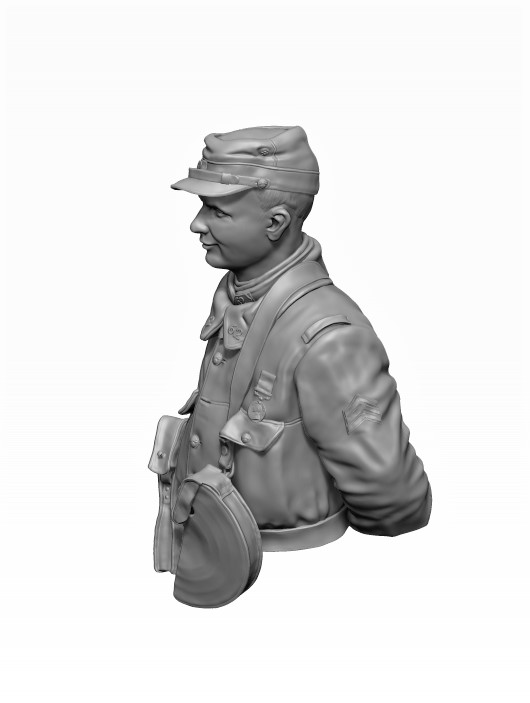
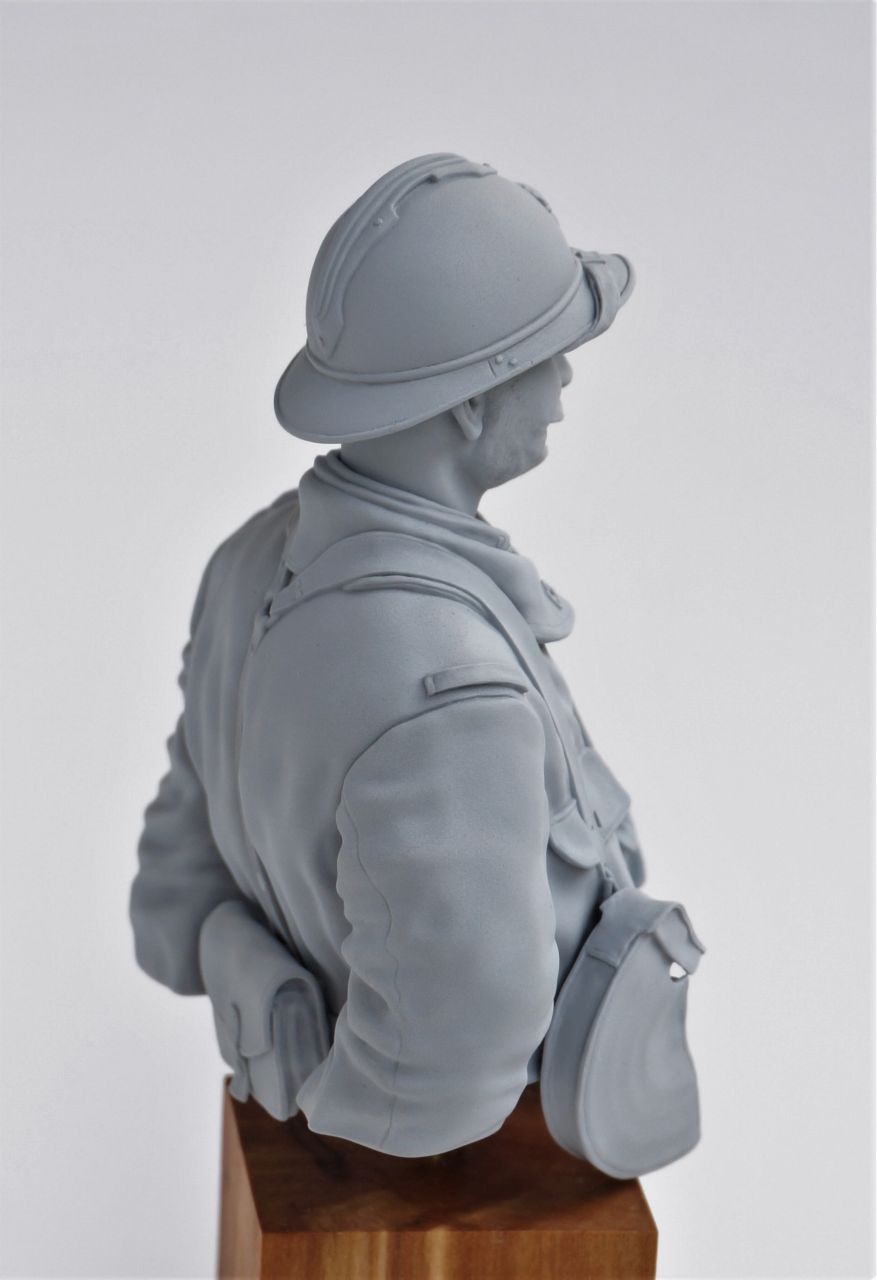
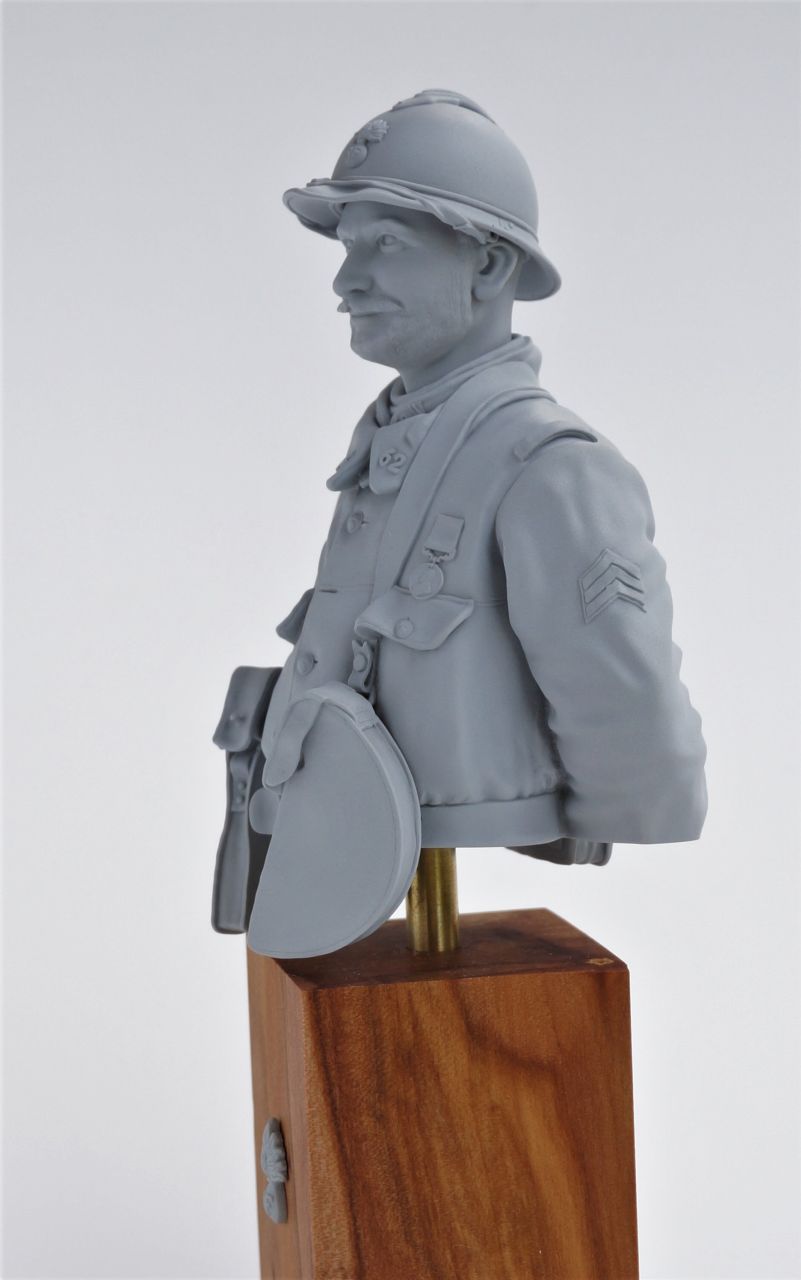
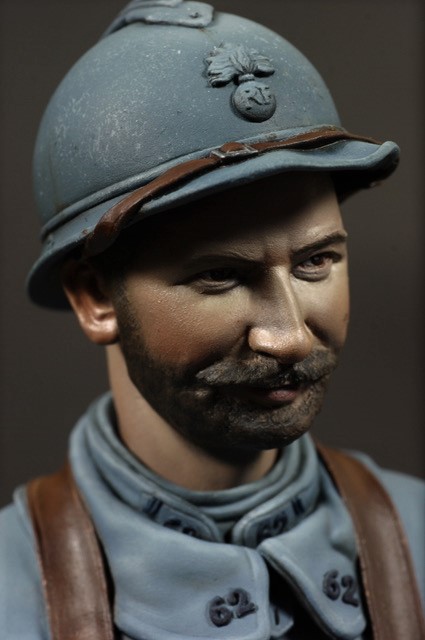
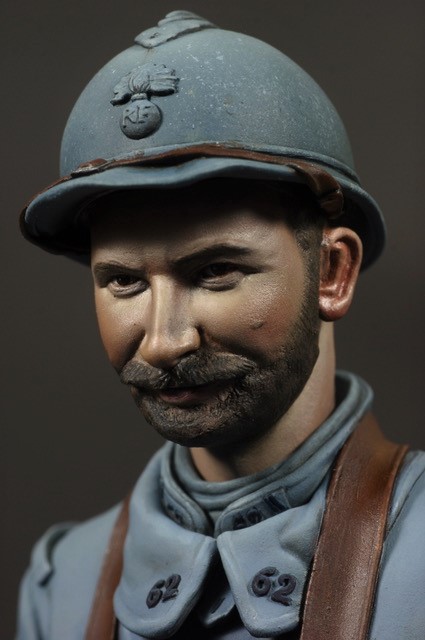
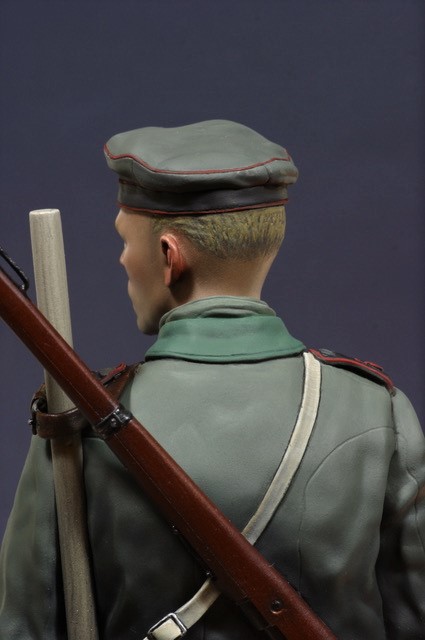
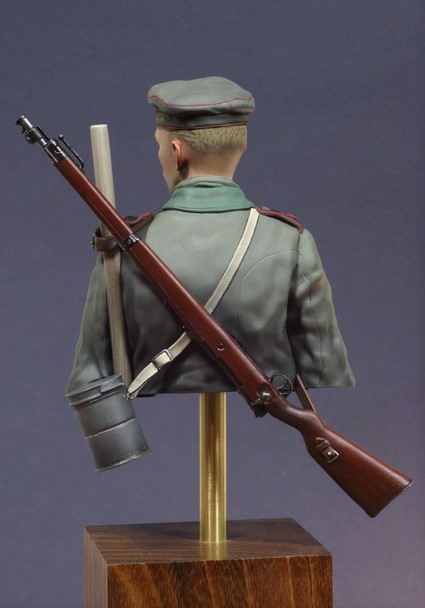
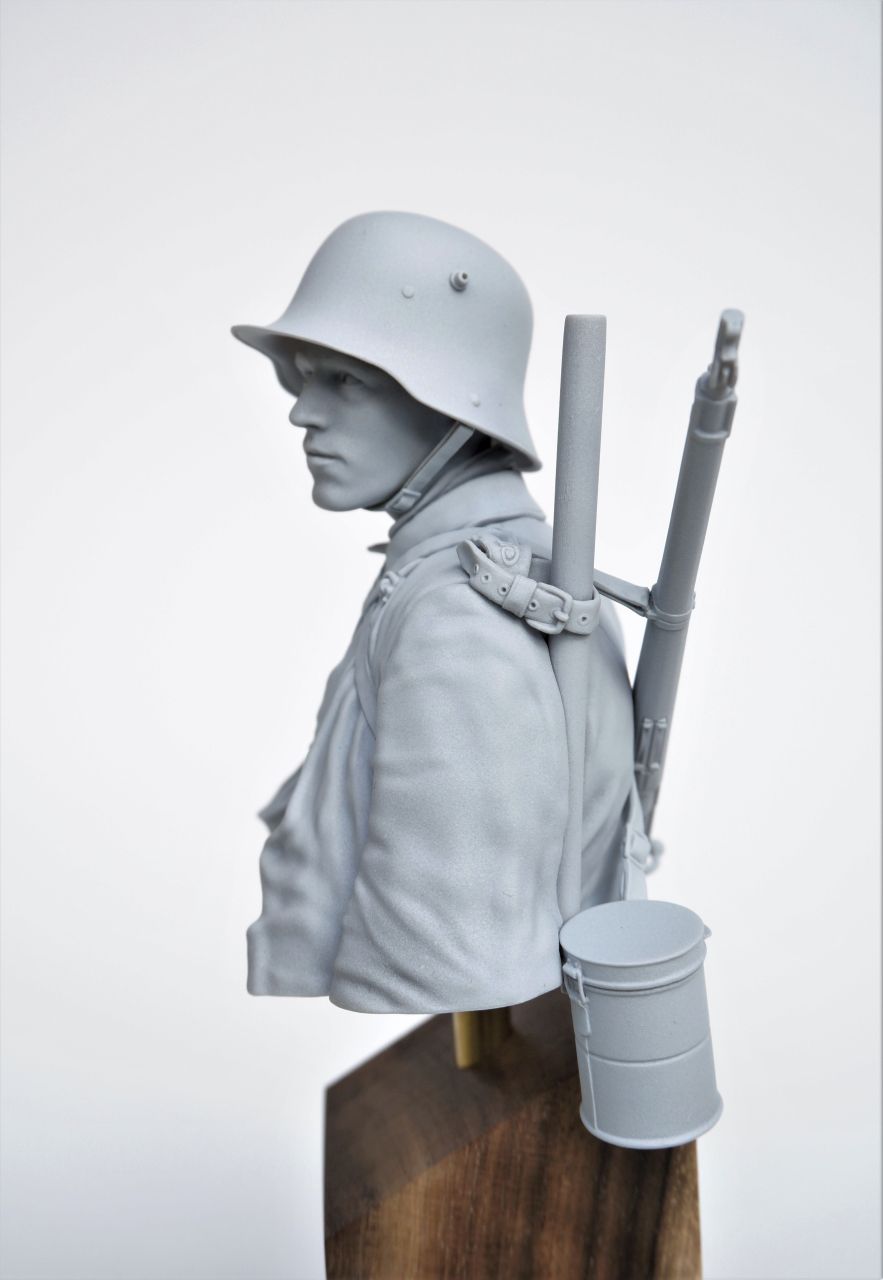
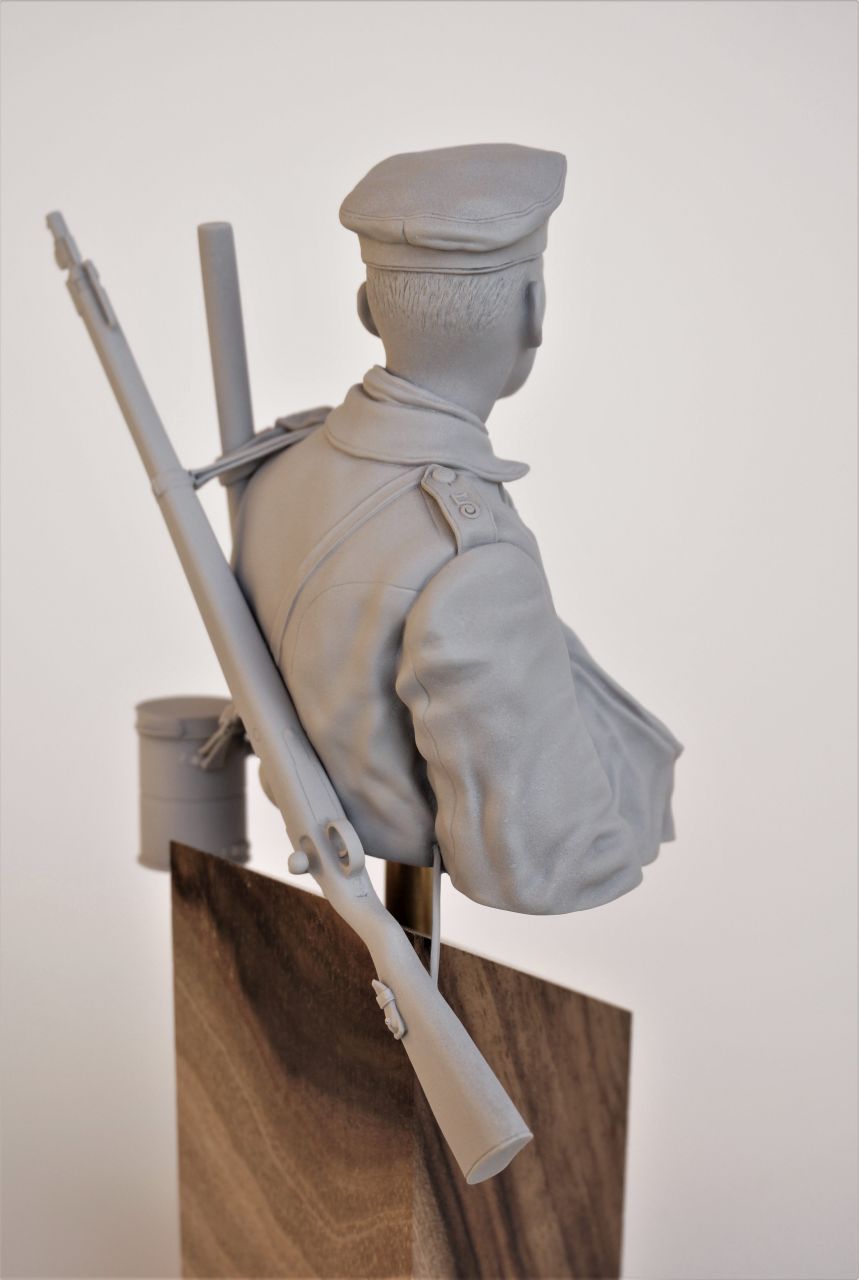
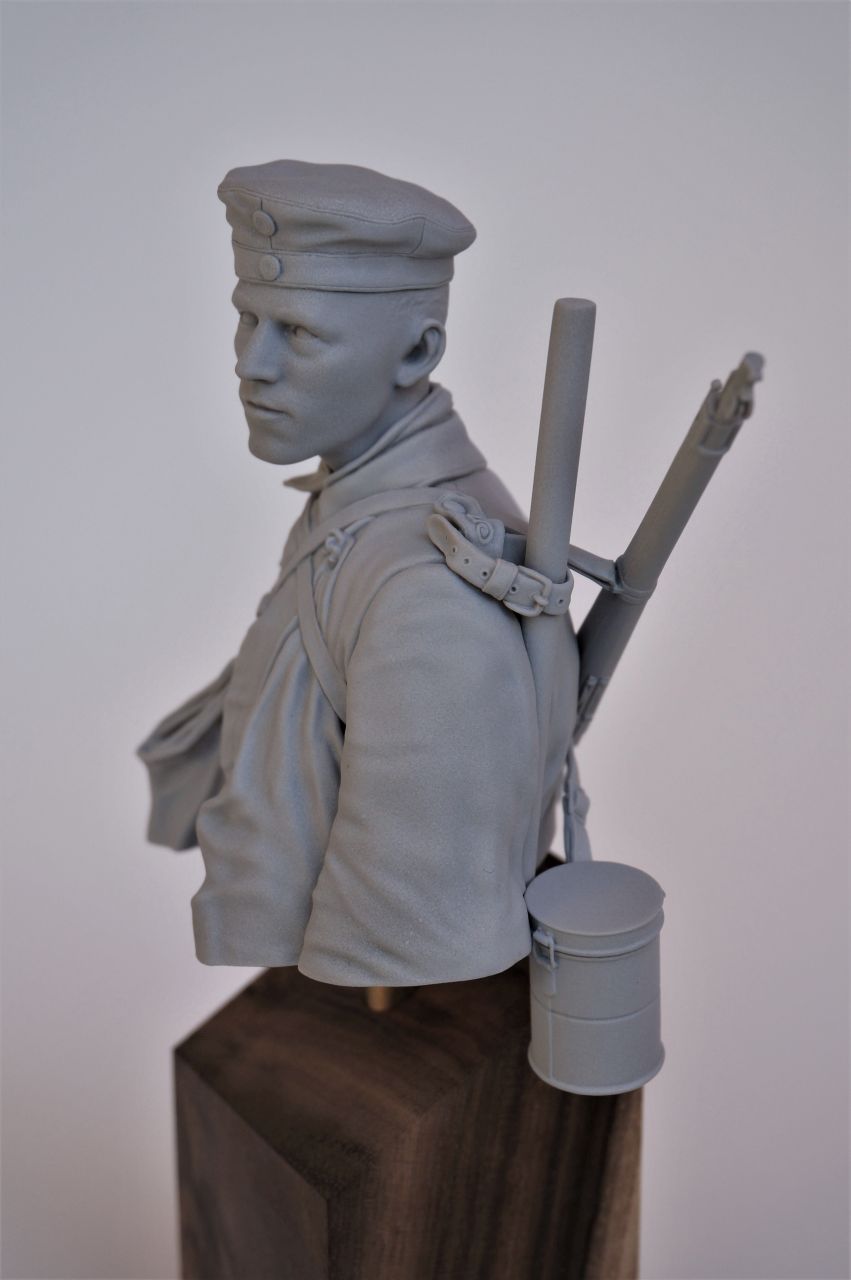
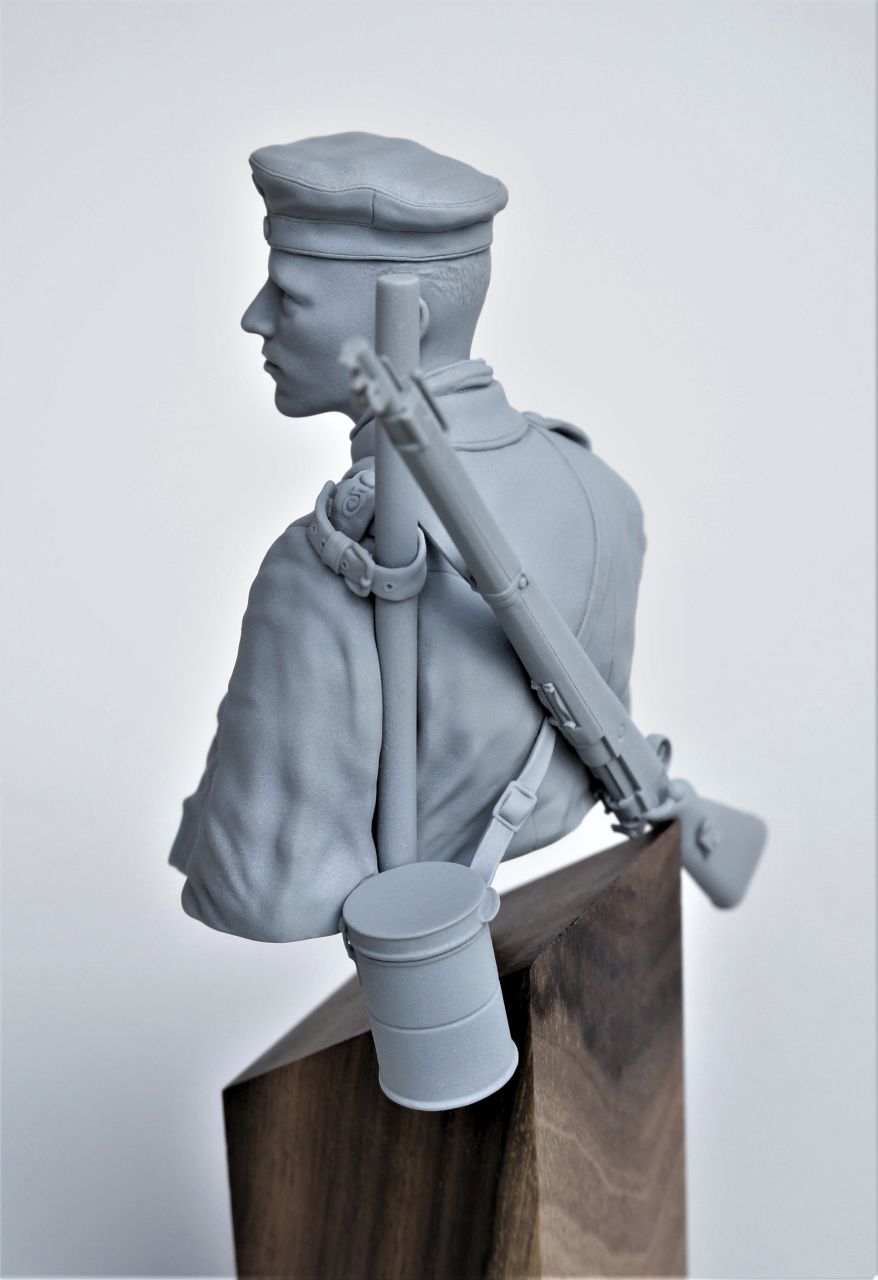
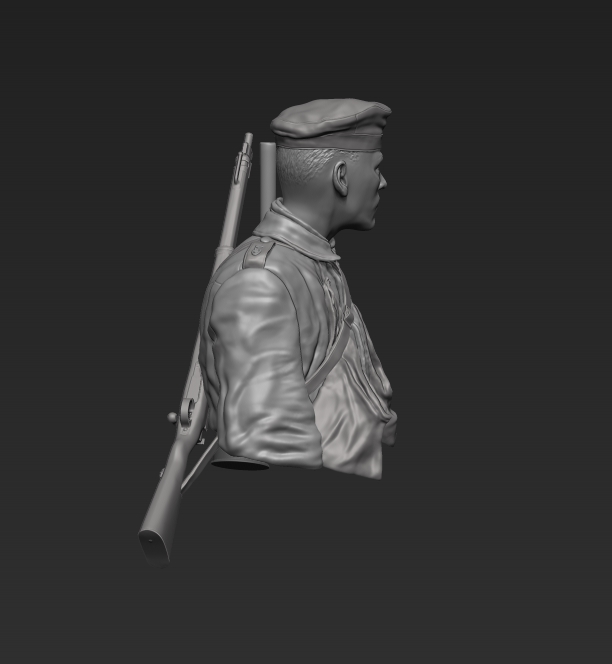
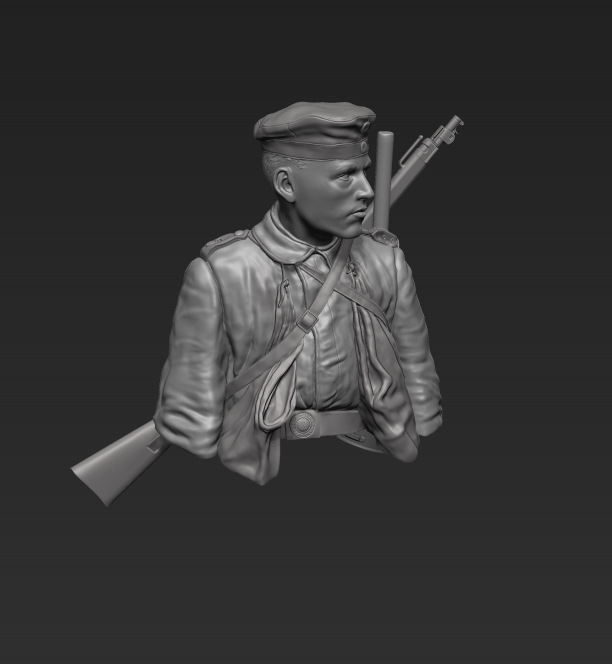
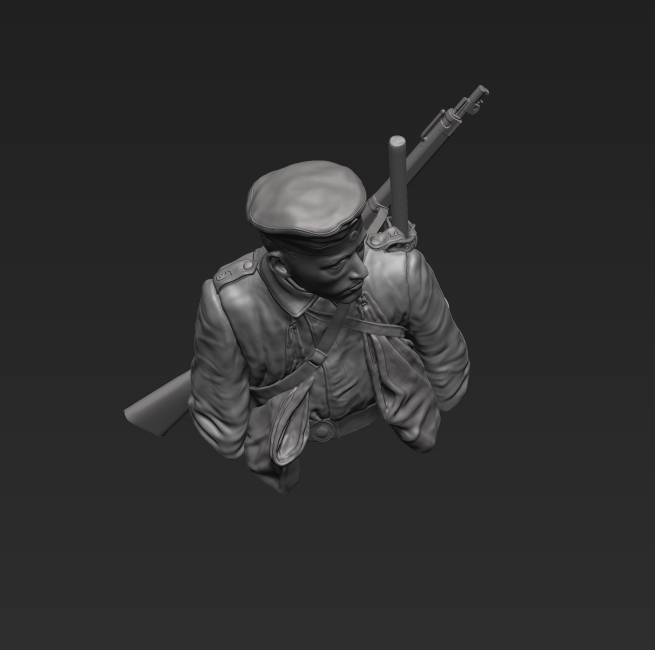
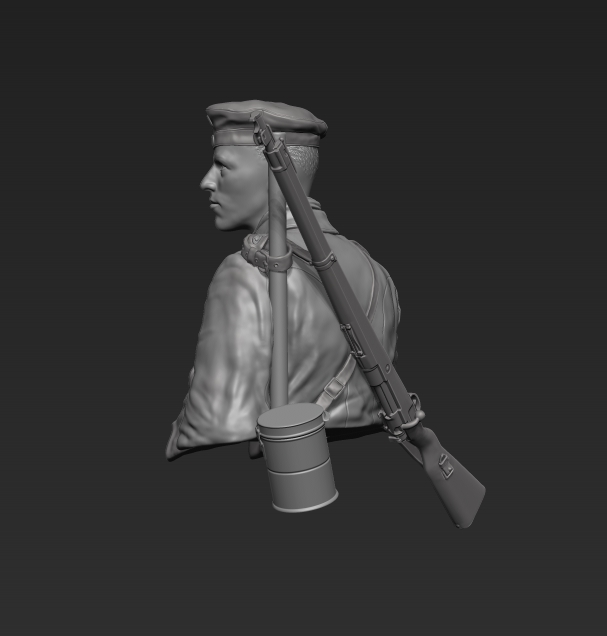
Chasseurs à Pied – French Light Infantryman 1914 / 15 – Chasseurs à Pied – Jäger zu Fuß 1914 / 15
- Scale / Maßstab: 1/10th
- Approx. height of bust / ca. Höhe Büste: 60mm
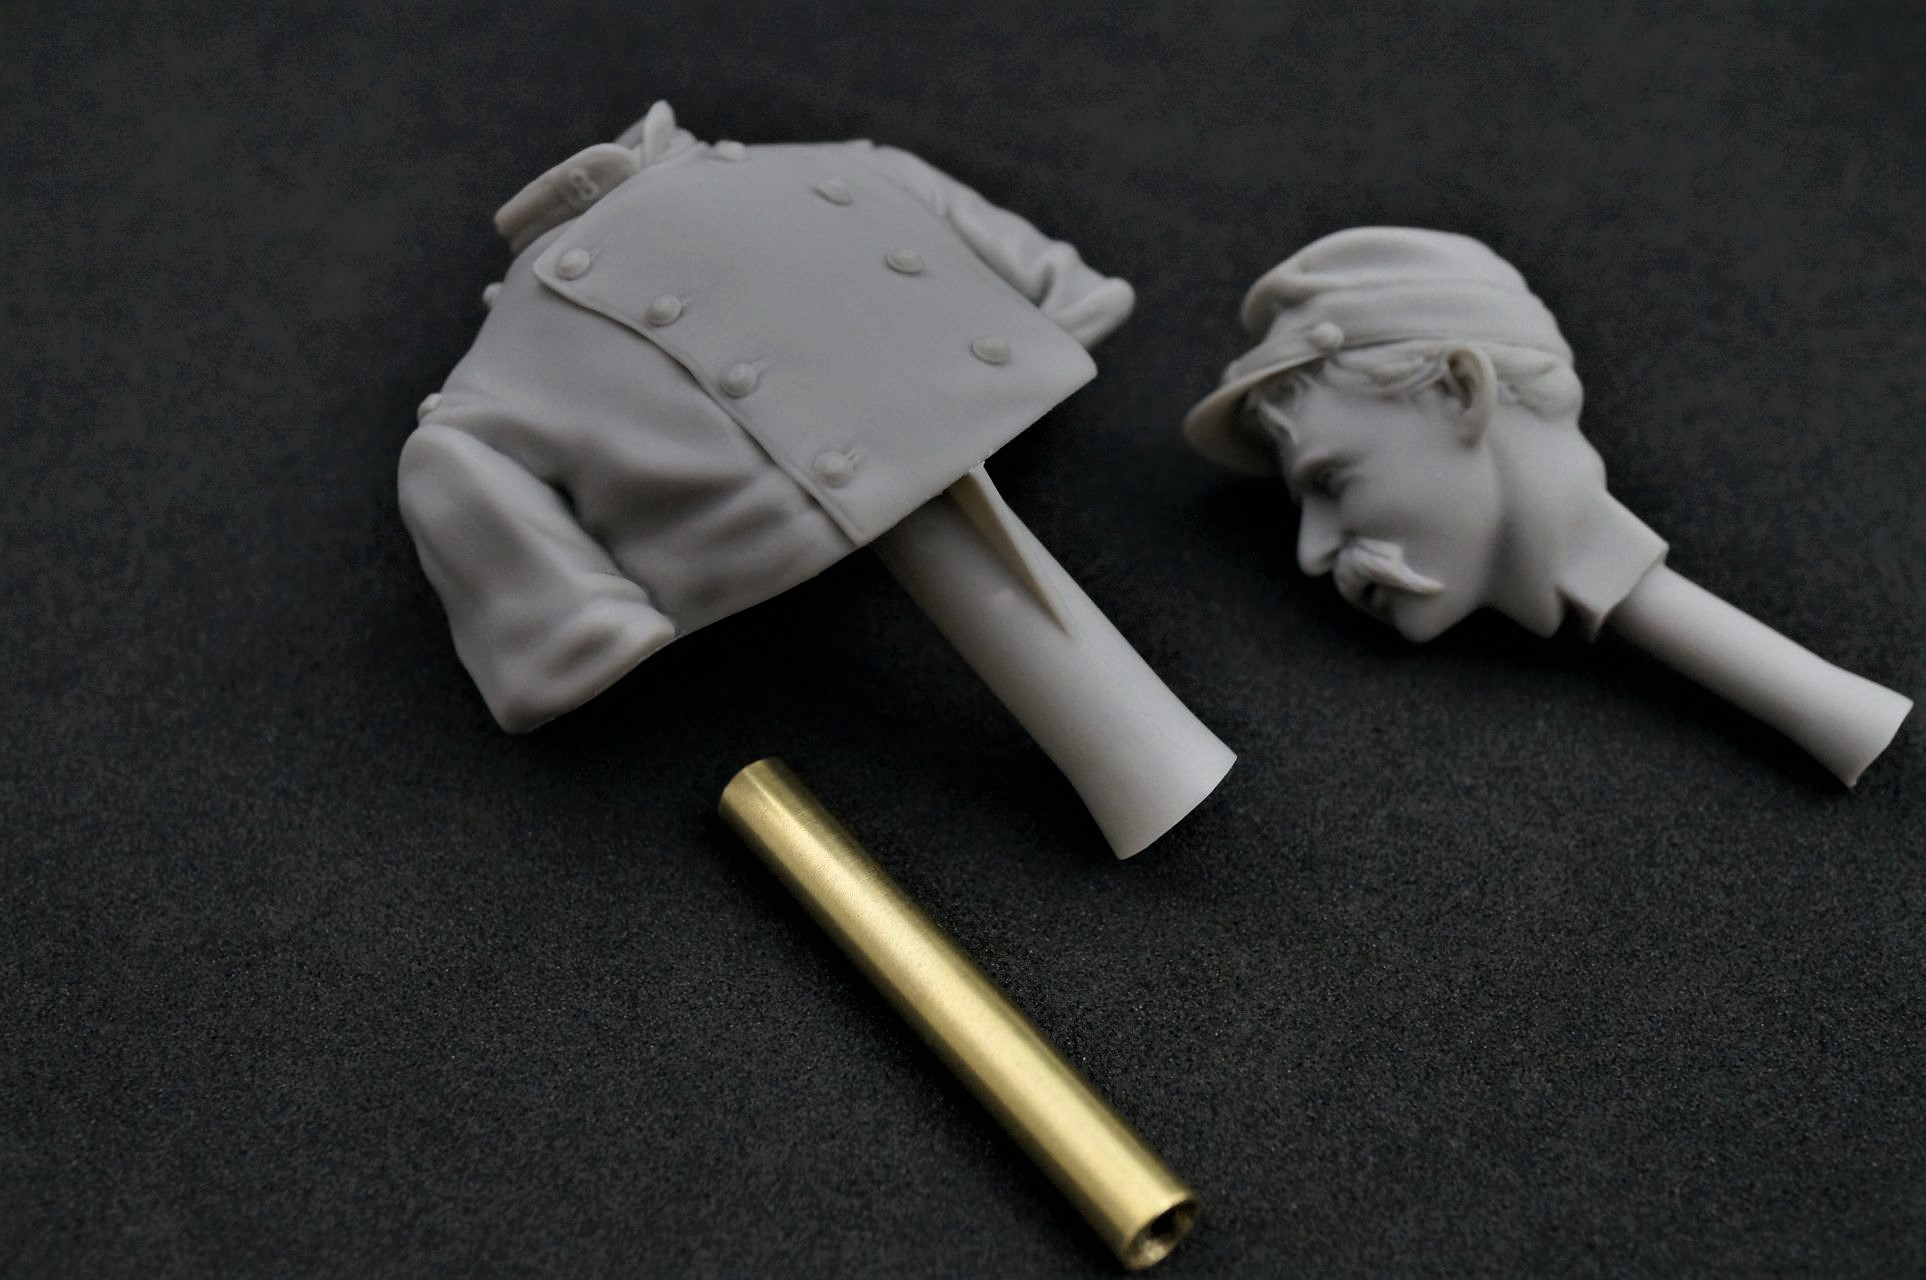
- Material: Resin (bust), 6mm Brass Tube (for bust mount) / Resin (Büste), 6mm Messing-Rohr (für Sockel montieren)
- Parts / Teile: 3
- Infosheet / Infoblatt: English
- Code / Artikel-Nr.: 29BUC
- Attention: Not a toy. Model kit or model making accessories – not suitable for children under 14 years of age. / Achtung: Kein Spielzeug. Modellbauzubehör – nicht für Kinder unter 14 Jahren geeignet
GPSR Data / Angaben
- Manufacturer / Hersteller: Jon Smith Modellbau
- Responsible Person / Verantwortliche Person
- Address: Hannoverstr. 68, 29664 Walsrode, Germany
- Contact / Kontakt: info@jonsmith-modellbau.com
- Tel: +49 (0)5161 8255
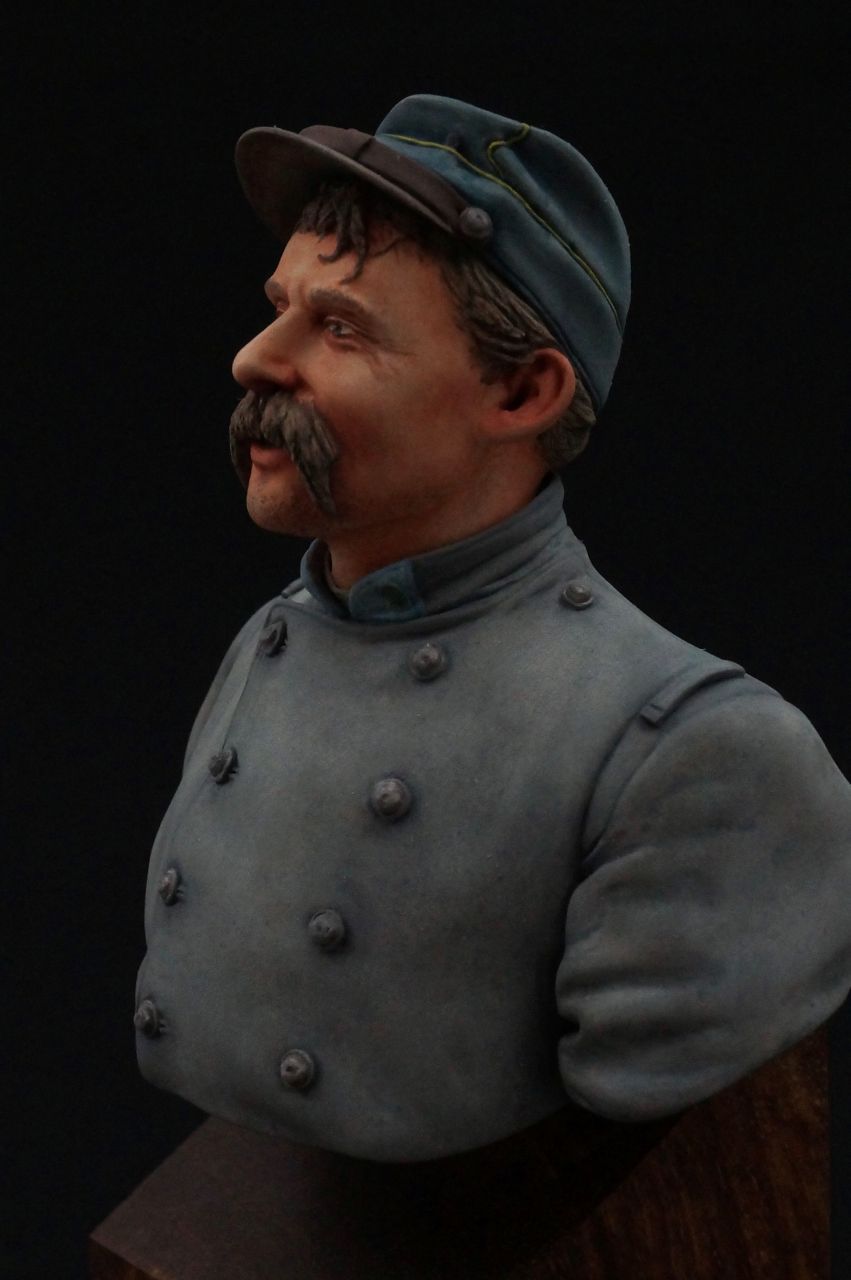
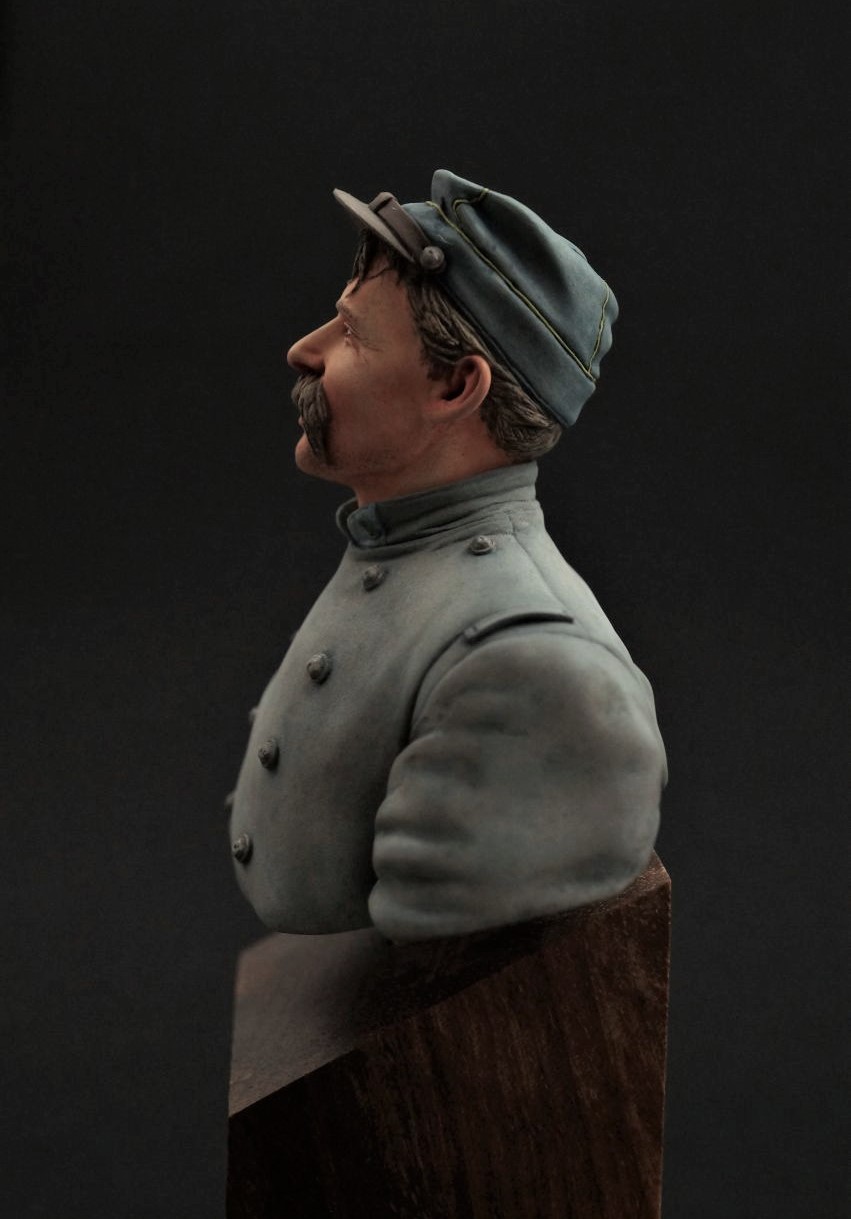
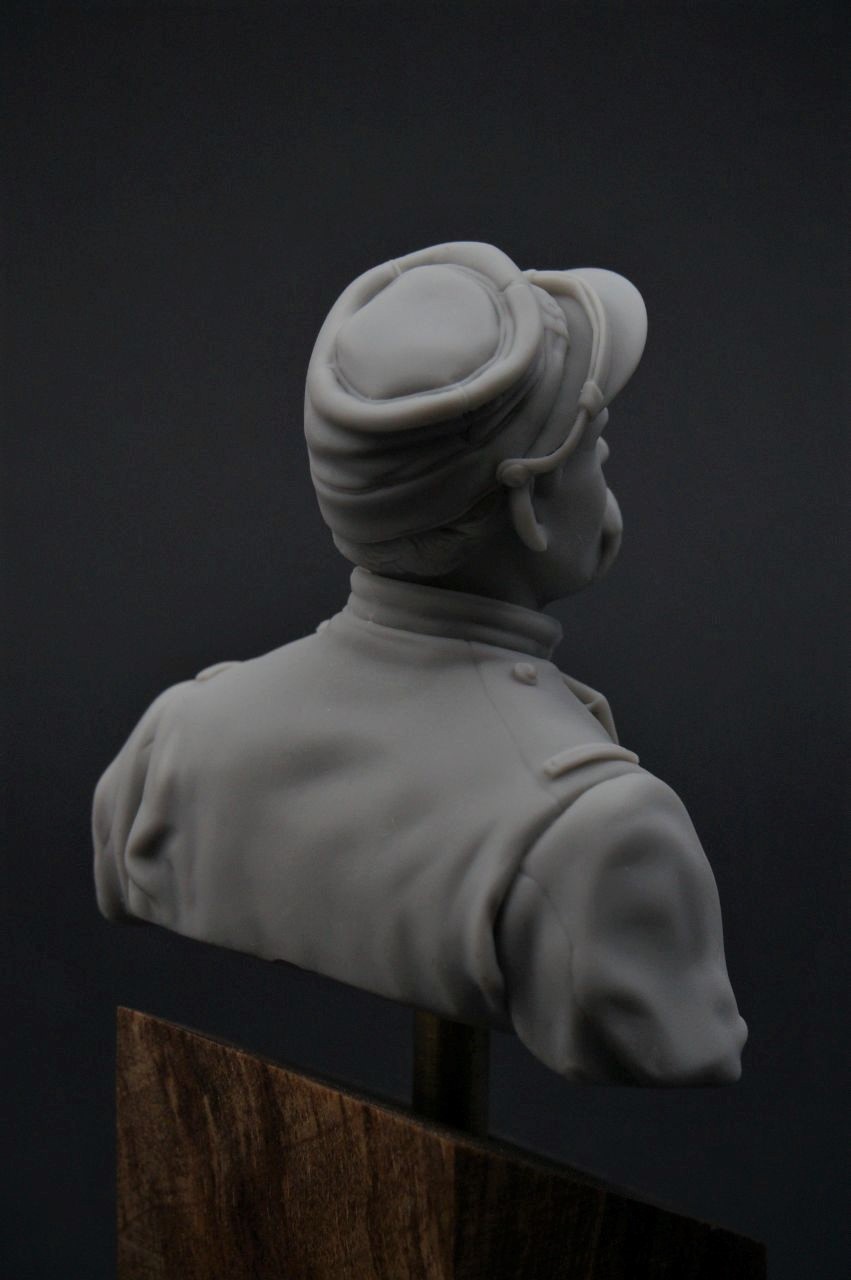
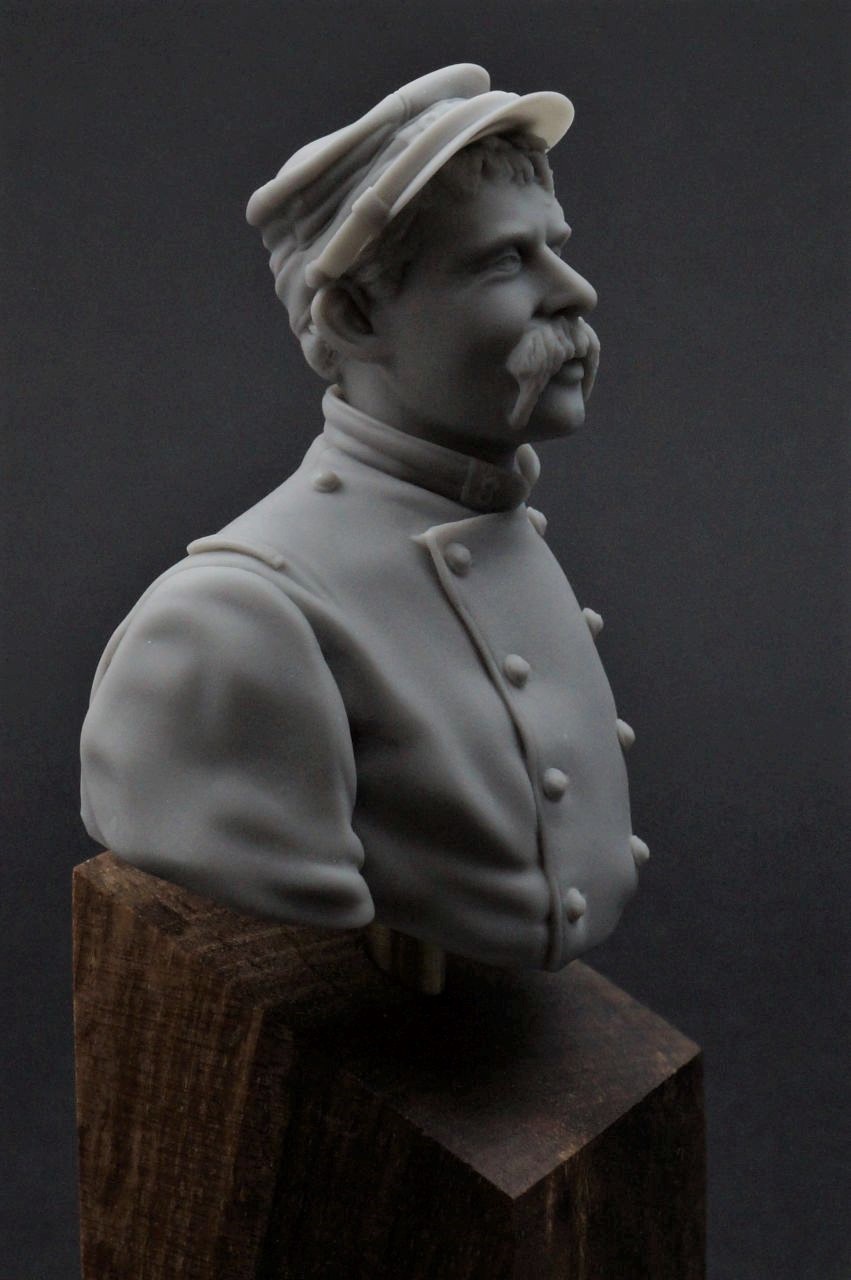
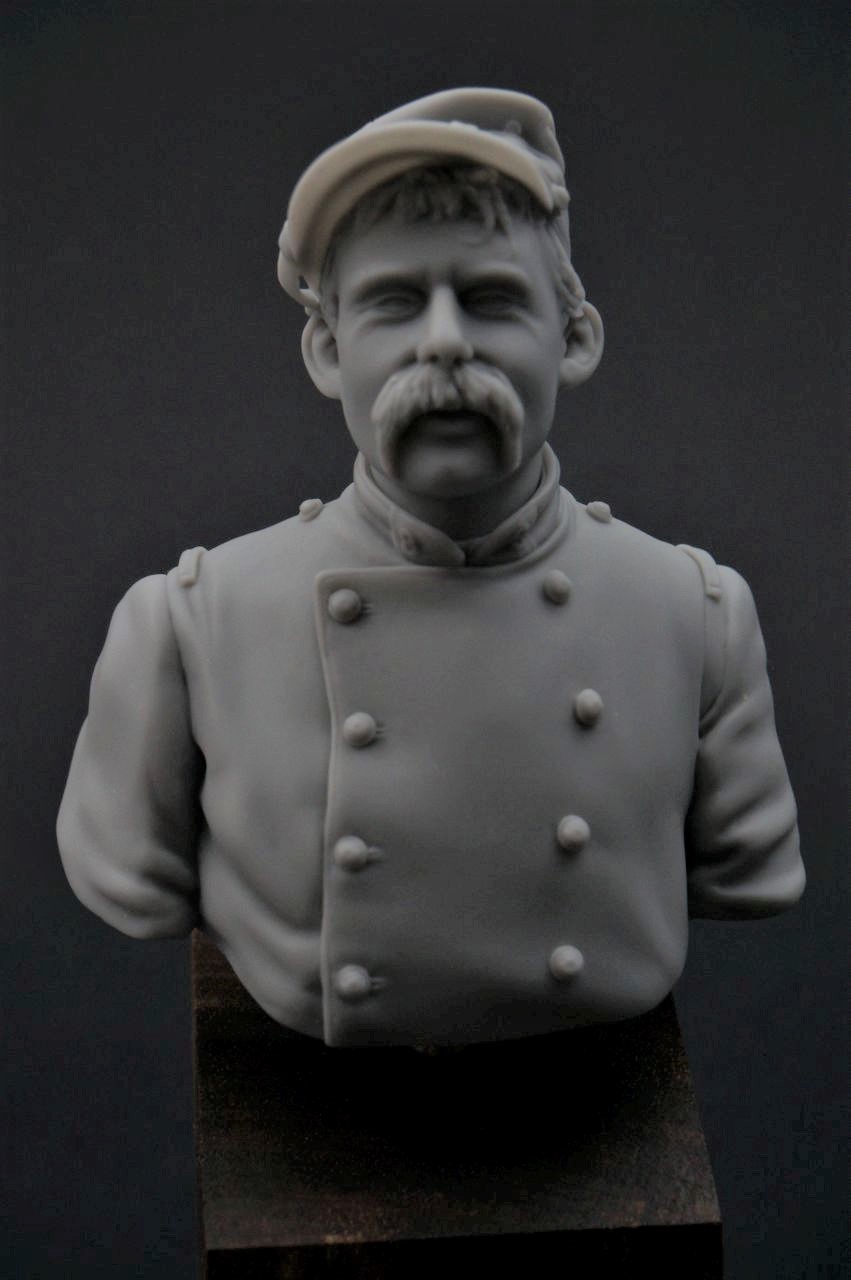
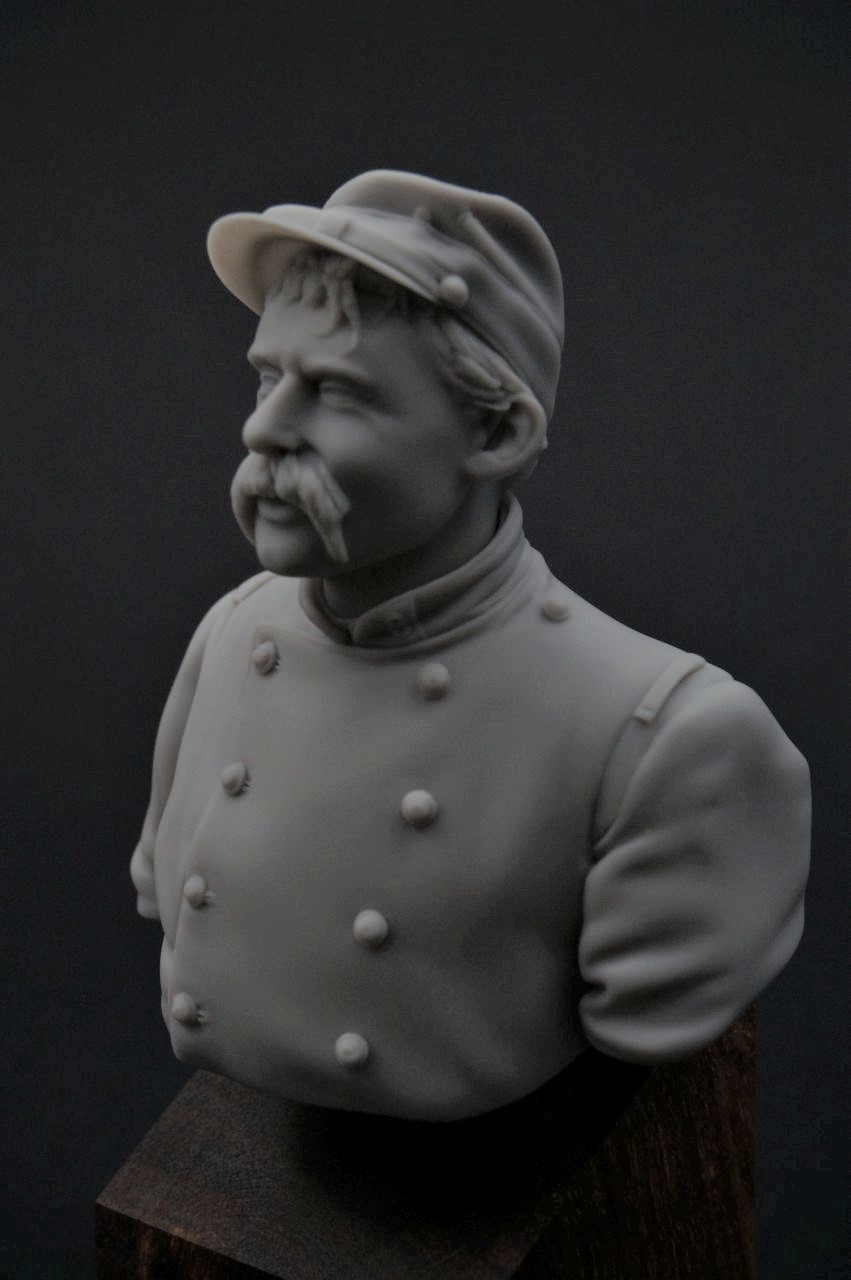
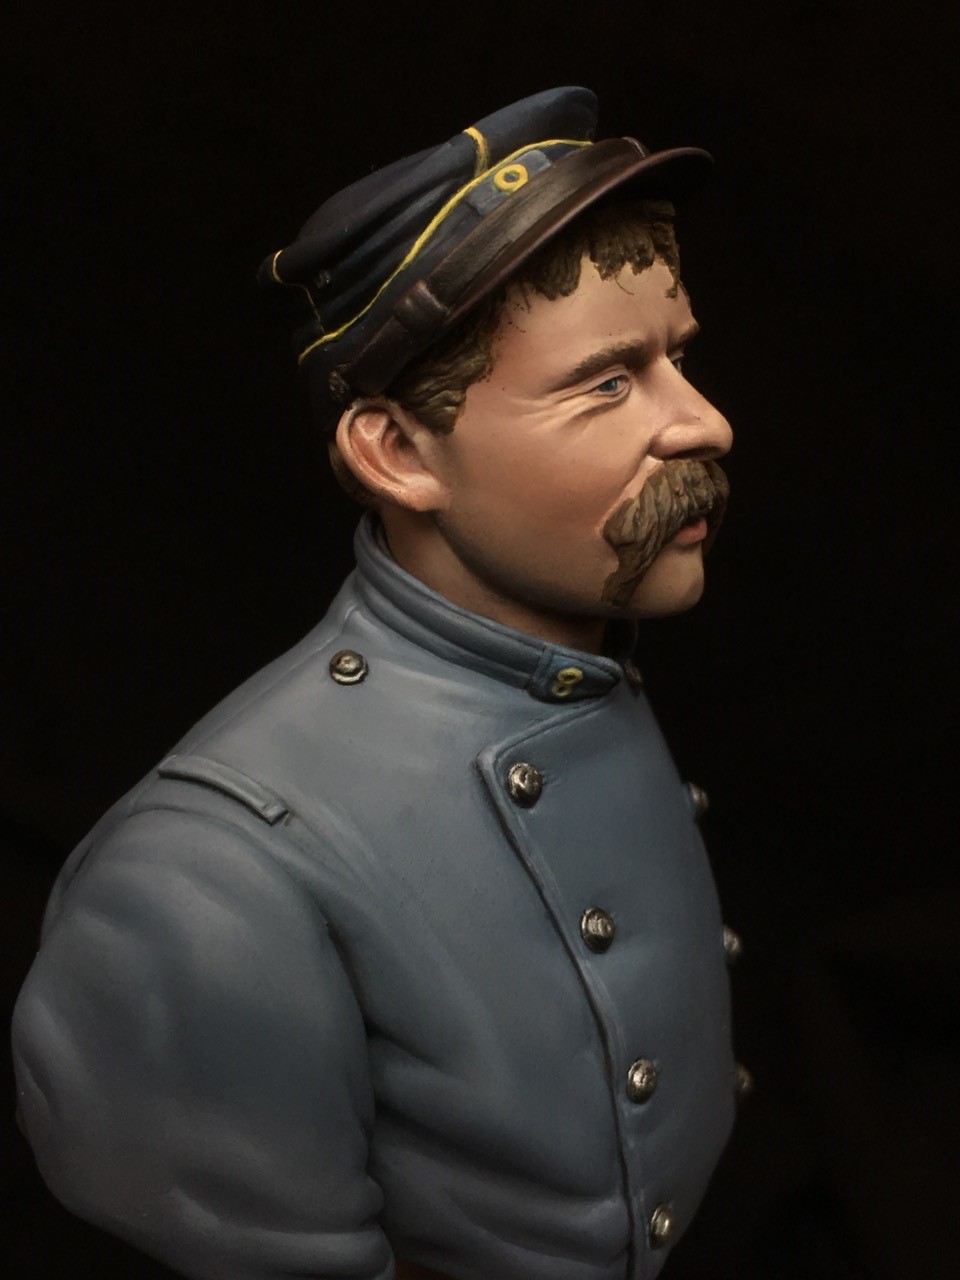
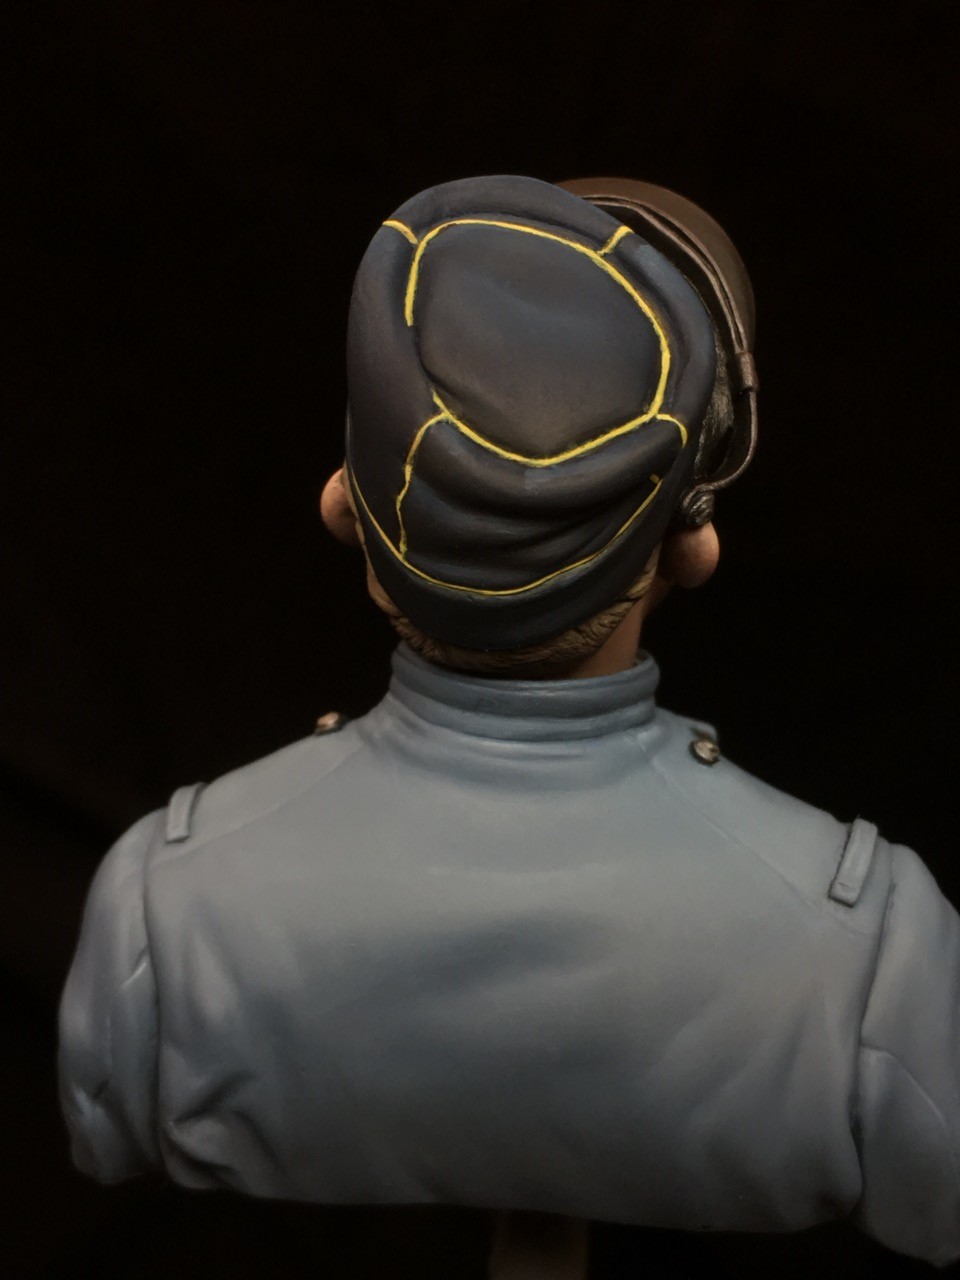
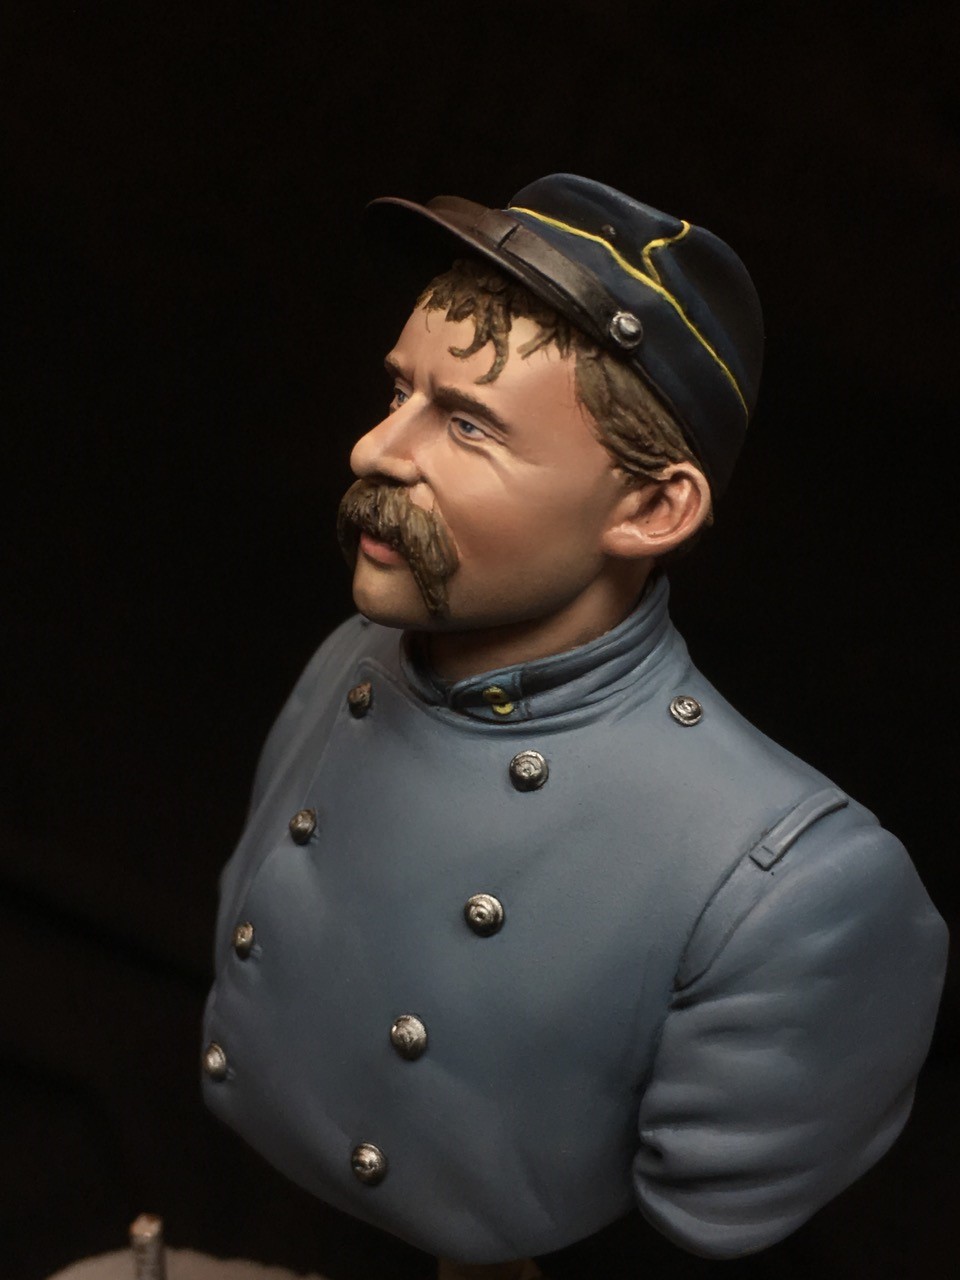
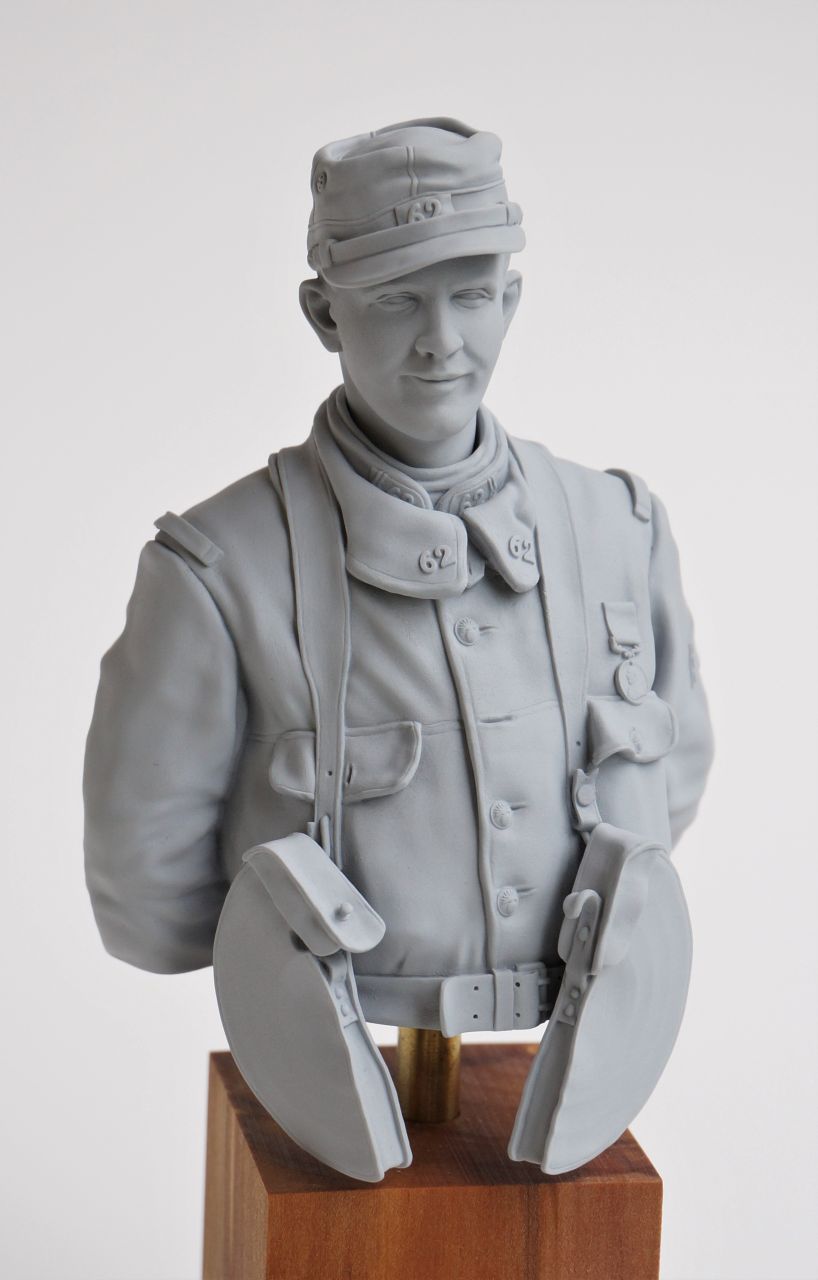
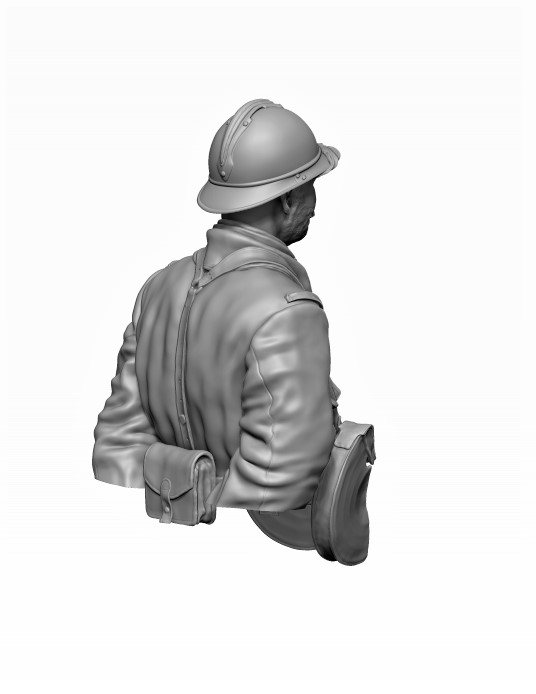
Above are photos of my own painted example of this bust, also with resin model pictures. Below are versions painted by David Lane.
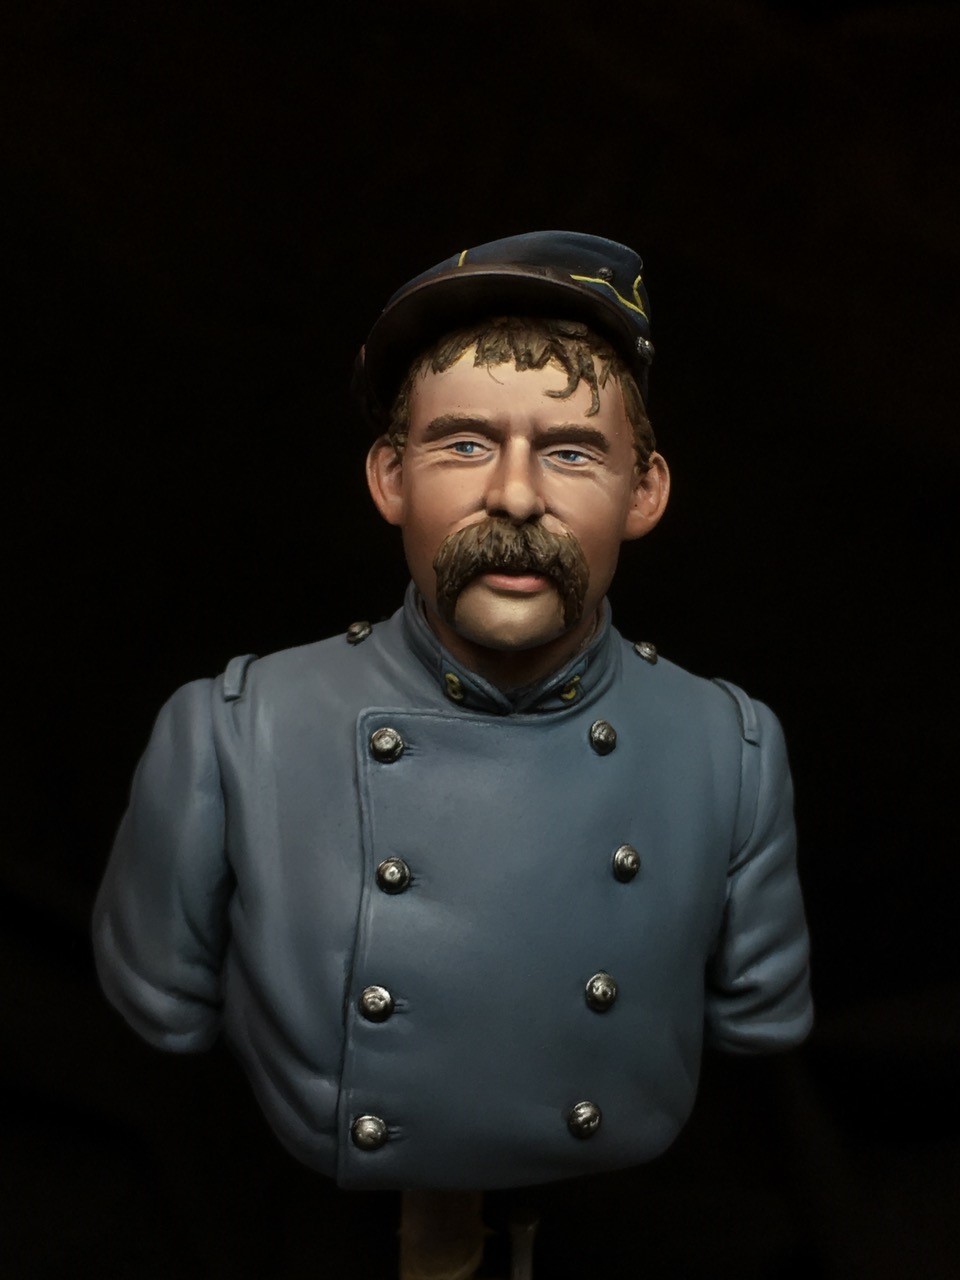
About this Bust
The Chasseurs, or French light infantry were divided into two different types of troops according to their tactical roles. The Bataillons de Chasseurs à pied – or BCP, were classical Infanterie legéré or light infantry and ascended from the 1st Empire. The Bataillons de Chasseurs alpins – or BCA, were mountain troops, originally intended to secure the border between France and Italy, a necessity dating back to the Franco – Prussian war of 1870 when Italy formed her own Alpini battalions in this same area. In 1914 a total of 32 Chasseur battalions were listed, of which 12 were Alpini. The Chasseurs were considered to be elite troops.
The Chasseurs à pied units wore a traditionally dark blue uniform (sometimes described as Chasseur-blue), which consisted of the Model 1877 coat, matching knee high trousers in the same material and the kepi as that of the all the infantry units, but in the same chasseur special colour – blue. Additionally, Chasseur units had yellow (light shaded yellow – jonquille, or narzissgelb) piping and battalion numerals. This Chasseur blue was less conspicuous and more practical than that of their comrades in the French line infantry regiments, then issued with red trousers and red topped kepis. The Chasseurs alpins wore the short, distinctive Dolman-jacket with the same trousers as the Chasseurs à pied but with their characteristic beret M1889.
At the outbreak of war, the enormous logistical difficulties forced the French High Command to simplify the uniform standards of the fighting troops and many historical and traditional characteristics were discontinued. The sudden influx of imported textiles required to meet the new demands (incl. from Britain – gris bleuté), combined with the new standards, meant that many French units within the first months of war appeared much different as they would have done a year or two before. One could say that the Chasseur units generally, with a few exceptions to colour tones and types of cloth, kepi their distinctive appearance, at least until the advent of the Adrian steel helmet and the further uniform and equipment standardisation.
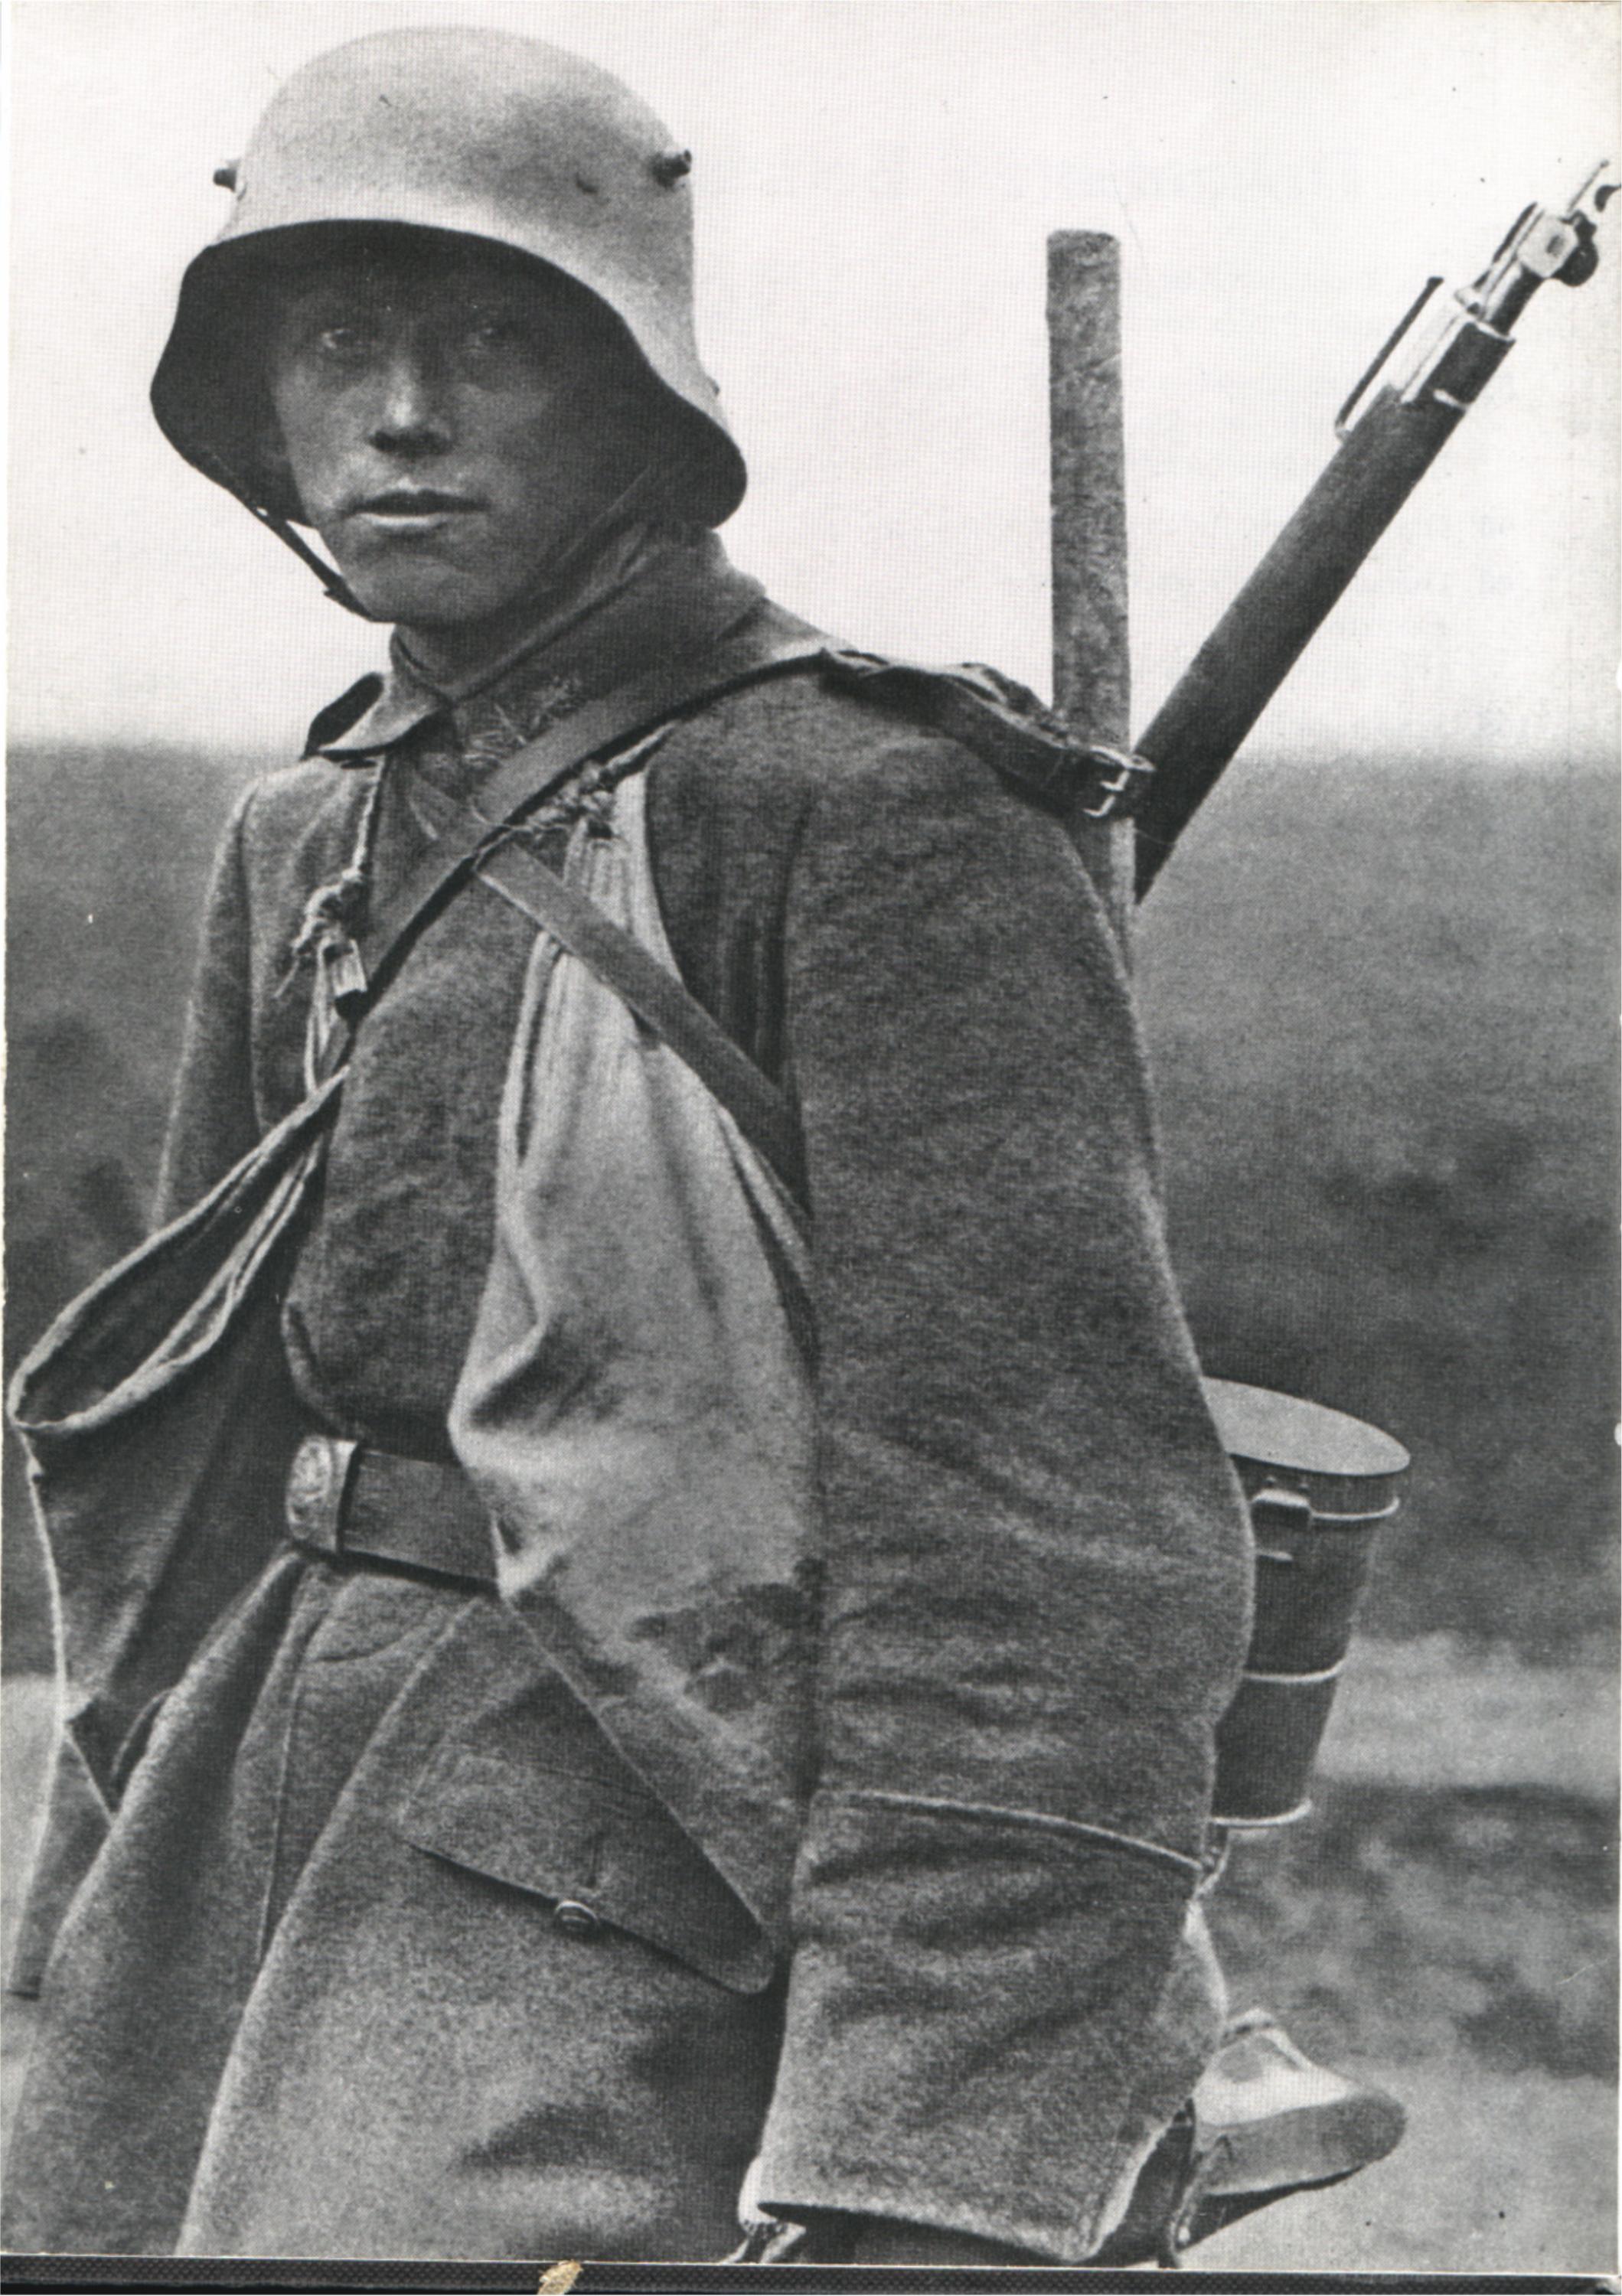
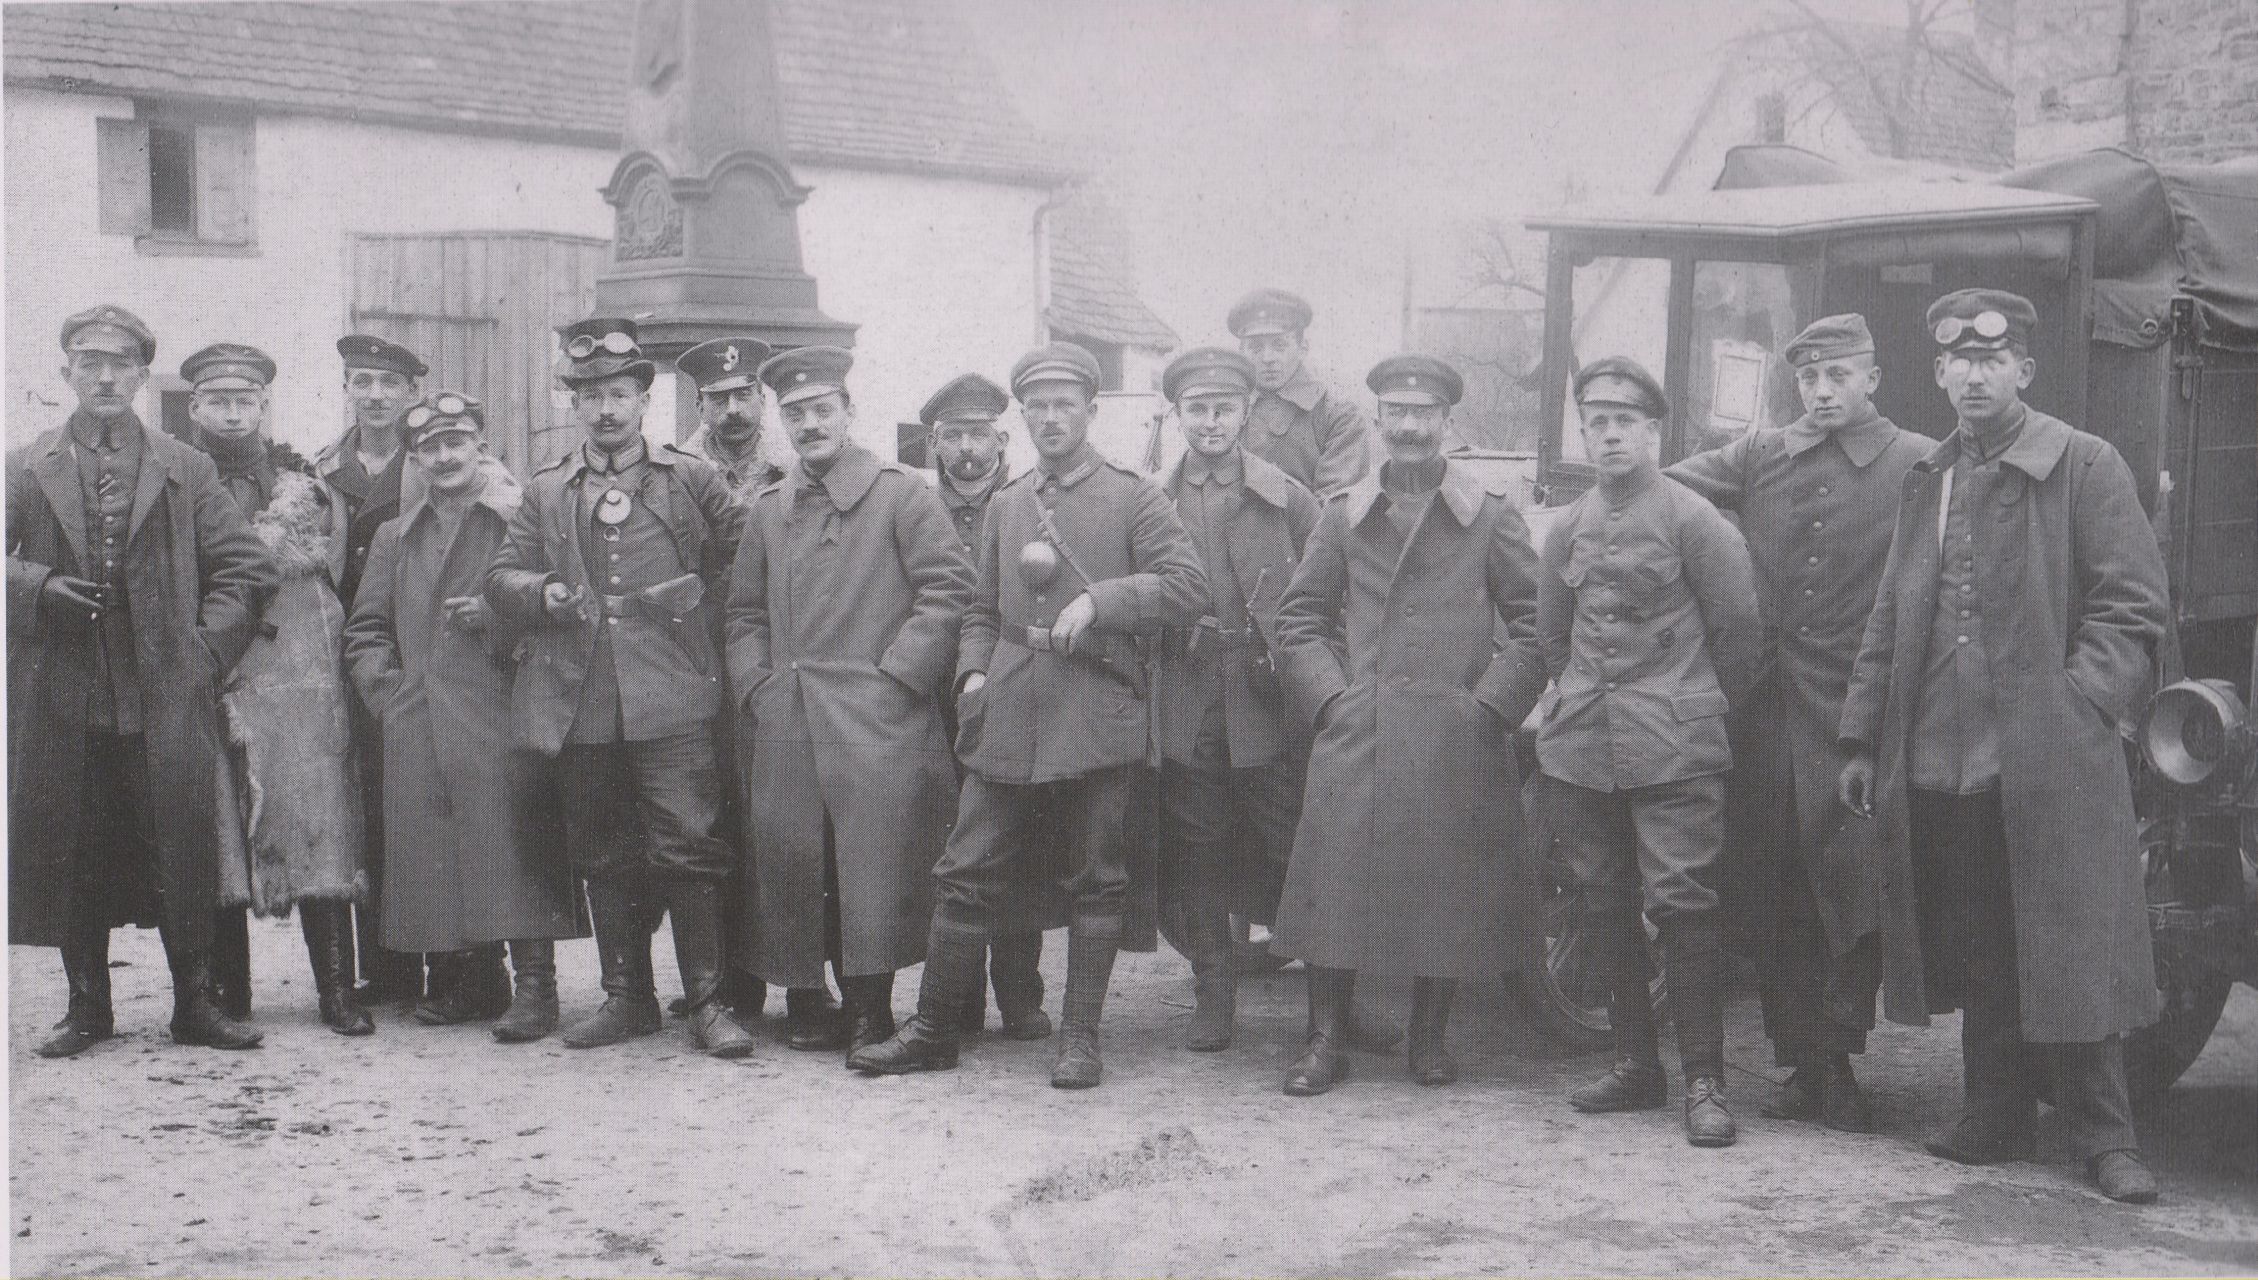
The Bust: the reference material for this character was taken from two photos displaying Chasseurs light infantry mingling with British troops and civilians in a French or Belgium village, probably early autumn 1914 or the spring of 1915. This somewhat dishevelled character is sporting longer hair than would normally be the case and an unkempt moustache, which may indicate an extended period in the front area. The stand-up collar is open at the front and just showing what seems to be a top of a shirt or neck tie. The leather chin-strap to the kepi has become loose and has slipped forward, hanging partly over the cap visor and his right ear. The kepi itself has been pushed back and to one side of the head in a casual fashion. The shoulder strap attachment buttons are slightly off-centre to the top of the greatcoat and lean forward – this can be seen on many contemporary photos of this period. This Chasseur belonged to the 8th battalion, garrisoned at Etain, which at the outbreak of war in August 1914 belonged to the 83rd Brigade (42nd Division, VI Corps).
Kepi for Chasseurs à pied, Model 1884: the Chasseurs à pied Kepi was identical to the French line infantry kepi, but in blue, with a blackened leather visor and yellow (jonquille) piping. The yellow battalion number was mounted on a dark blue cloth backing. The small air vents situated on each side of the upper cap are black coated metal. The blackened leather chin-strap is fastened by 2 small zinc buttons, displaying the light infantry horn. Although an iron-grey / bluish cloth cap cover was issued to Chasseurs à pied battalions, this was generally not worn. Judging by the original photographs and marked difference in shade of greatcoat, the kepi would almost certainly be of the original Chasseur darker blue type.
Note: the gap between kepi and overhanging chinstrap has been filled with a thin layer of resin. This is to help in the casting process and can be removed before painting.
The black chinstraps on original kepis seem to appear with a brownish look, as if the original leather colour is showing through. There is a marked difference between the black of visor and strap.
When fitting the head to the upper body, one should make sure that the bottom of hair at rear of neck is just touching (or slightly above) the stand-up collar.
Greatcoat Modell 1877 / 1914: On each side of the stand-up collar are the green (pre-war in light yellow jonquille) battalion numbers, backed onto a horizon blue base cloth patch – in this case the 8th battalion. The detachable shoulder straps have been removed, leaving the two small fastening zinc buttons displaying the light infantry horn. The same style zinc buttons, but larger were situated at the front of the coat in two rows. Although the correct shade for the Chasseurs greatcoat would be blue, I am of the opinion that the original photos show a much lighter shade (only slightly darker than the British troops shown on the same photos wearing their khaki M1902 Service Dress), indicating a different material being used by the manufactures at the time of production. This may well be a part of the blue-grey cloth supplied by the British in the winter of 1914 (gris de fer bleuté – geblaeutes Eisengrau), identifying the greatcoat as the Model 1914 (also described as greatcoat M 1877 / 1914).
Note: Behind the top of the greatcoat flap and body there is a small casting web – this is to enable a better casting flow and should be removed before painting. The sewn-on regimental patches on the collar have been modelled slightly raised than would normally be the case – this is to enable an easier paint finish. The colour of these greatcoats varied considerably and depended a lot on the type of dye used, origin, wear and tear and age of the garment.
Brass Tube: the 6mm buffed diameter brass tube supplied is to mount the bust to a suitable stand. Under the bust, an appropriate hole has been modelled at the correct angle and position to allow the figure to be displayed appropriately.
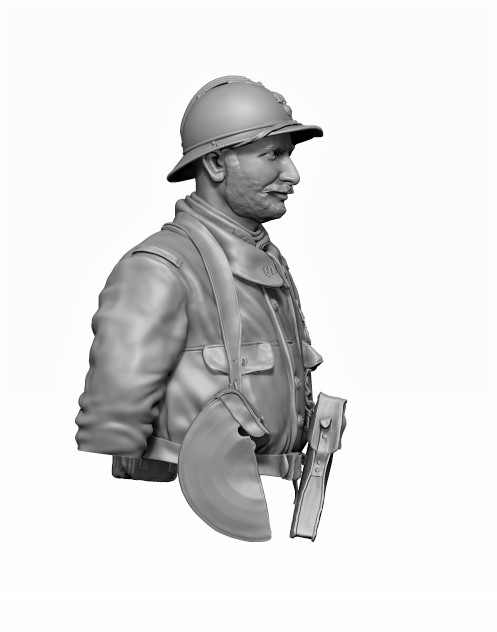
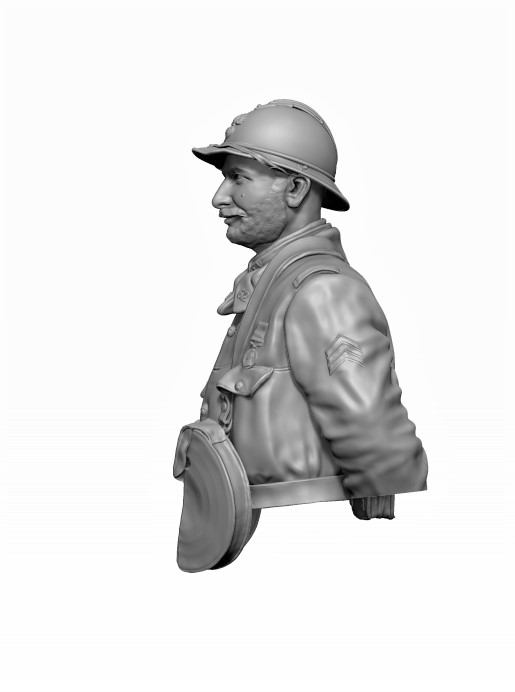
Below are photos of the painted version with Adrian helmet head by David Lane
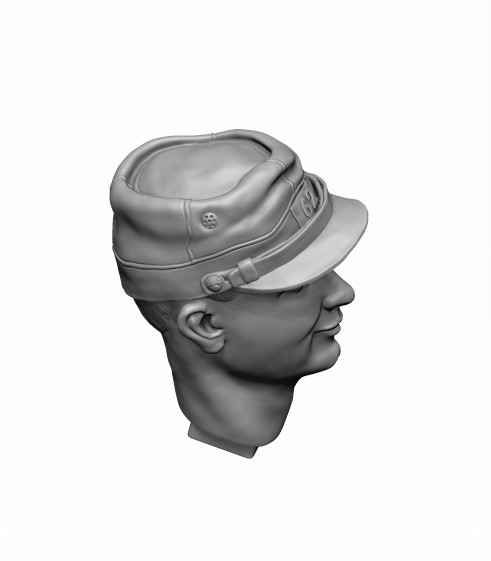
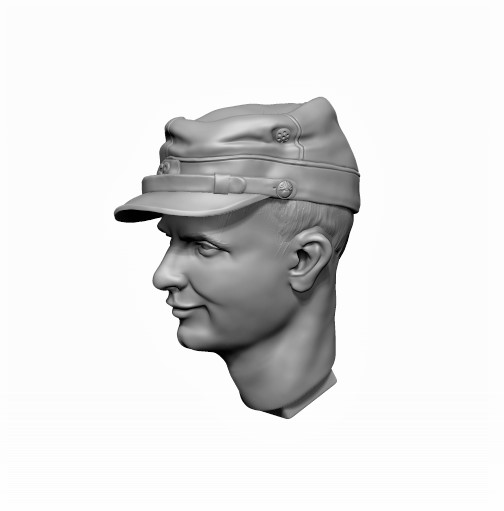
The photos below are snapshots from the 3D program used to create the master figure

French Infantryman Chauchat MG Gunner, 62nd Regiment, 1916 – Fz. Chauchat MG Schütze, 62. Infanterieregiment, 1916
- Scale / Maßstab: 1/10th
- Approx. height of bust / ca. Höhe Büste: 75mm
- Material: Resin (bust), 6mm Brass Tube (for bust mount) / Resin (Büste), 6mm Messing-Rohr (für Sockel montieren)
- Parts / Teile: 12
- Infosheet / Infoblatt: English
- Code / Artikel-Nr.: 32BCG
- Attention: Not a toy. Model kit or model making accessories – not suitable for children under 14 years of age. / Achtung: Kein Spielzeug. Modellbauzubehör – nicht für Kinder unter 14 Jahren geeignet
GPSR Data / Angaben
- Manufacturer / Hersteller: Jon Smith Modellbau
- Responsible Person / Verantwortliche Person
- Address: Hannoverstr. 68, 29664 Walsrode, Germany
- Contact / Kontakt: info@jonsmith-modellbau.com
- Tel: +49 (0)5161 8255
Contents Bust / Inhalt Büste:
- Upper Body / Oberkörper
- Head for Helmet / Kopf für Stahlhelm
- 2nd Alternative Head for Kepi / 2. Alternativ-Kopf für Käppi
- Adrian Helmet M1915 / Adrianhelm M1915
- Infantry Kepi M1884/1914 / Infanterie-Käppi M1884/1914
- 2 x Magazine Pouches 1st Type / 2 Stck. Magazin-Taschen Typ 1
- 2 x Magazin Belt loops (bottom half only) / 2 Stck. Magazin Gürtelschlaufen (nur untere Hälfte)
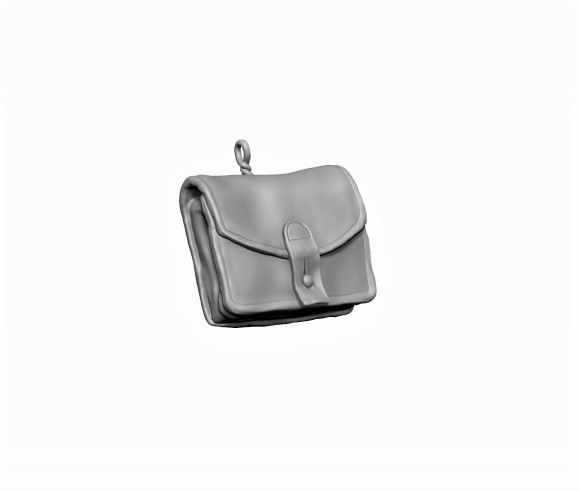
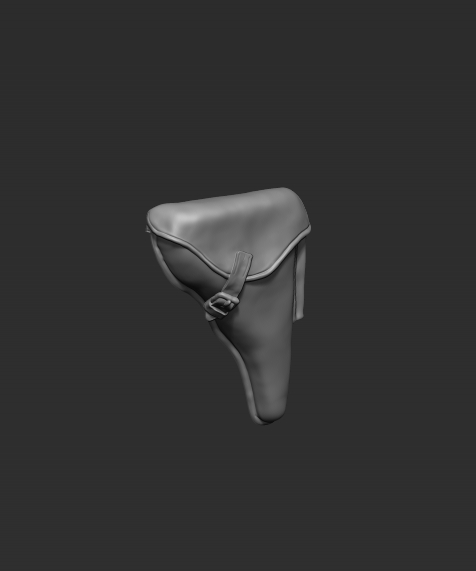
- Ruby Pistol Pouch M1916 / Ruby-Pistolentasche M1916
- Grenade Emblem (for Stand) / Grenatenemblem (für Sockel)
- 6mm Brass Tube (for bust mount) / 6mm Messing-Rohr (für Büste montieren)
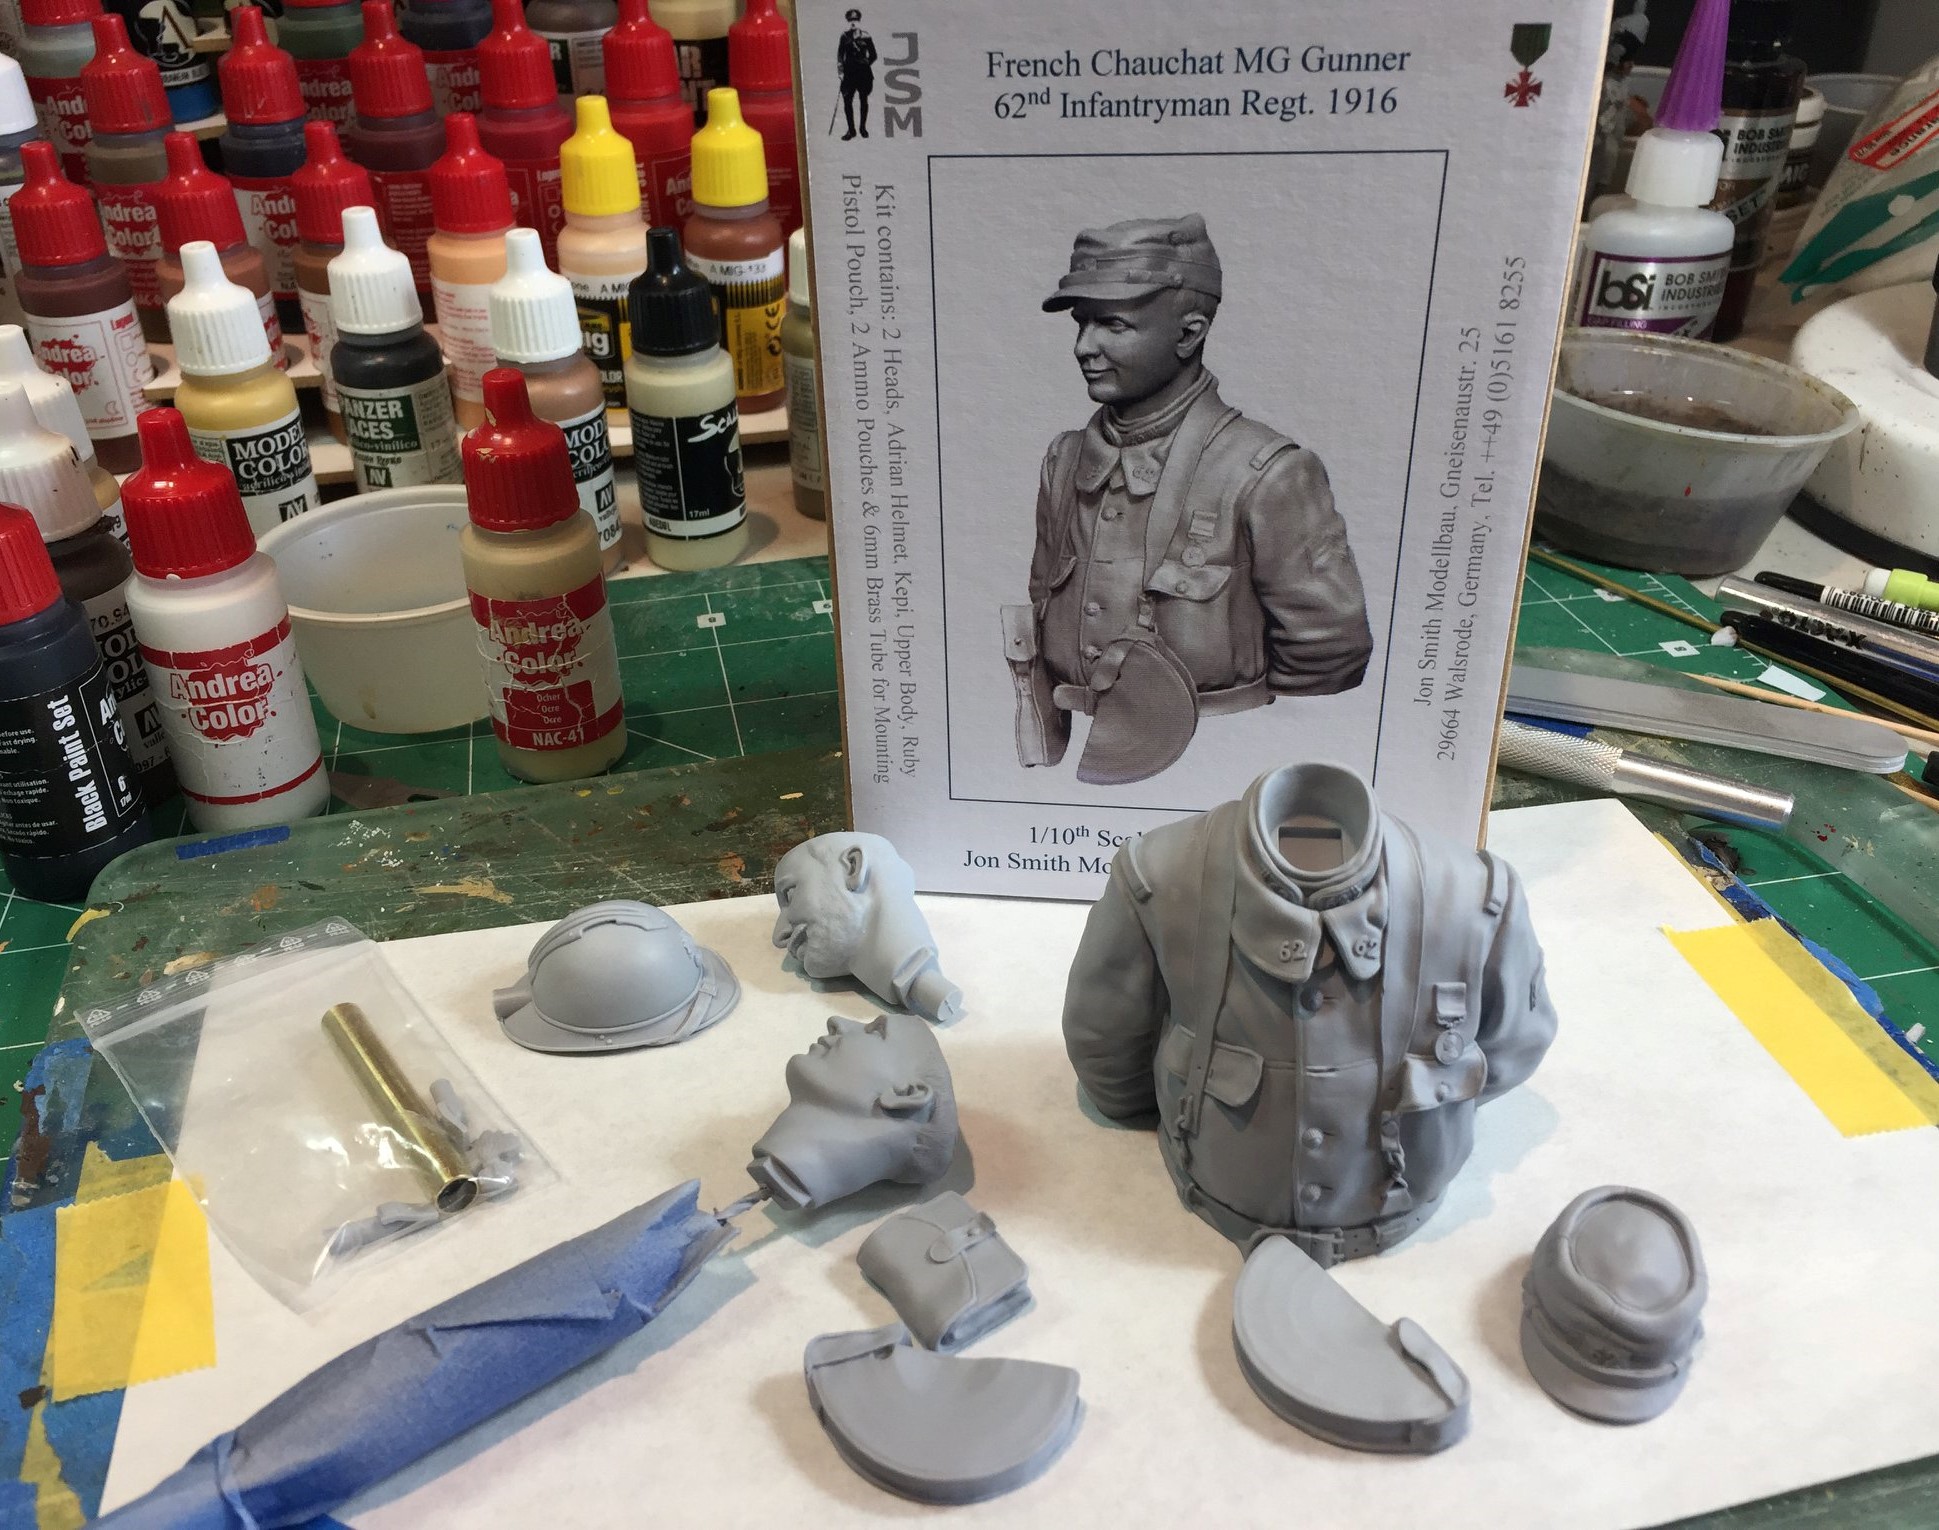


Above are the unpainted parts showing the now typical light grey resin used by JSM. On 2 of the photos, one can just make out the grenade emblem, or La grenade à 12 flammes to decorate a wooden plinth if required.
About this Bust
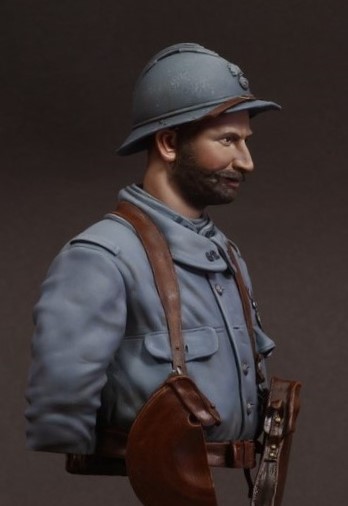
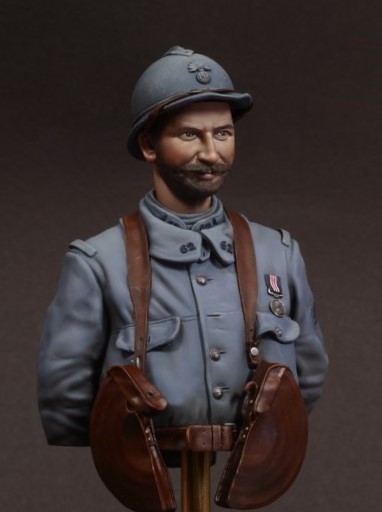
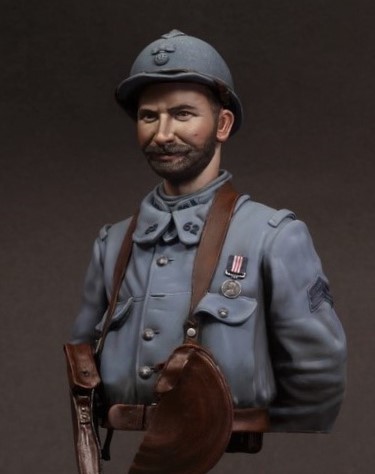
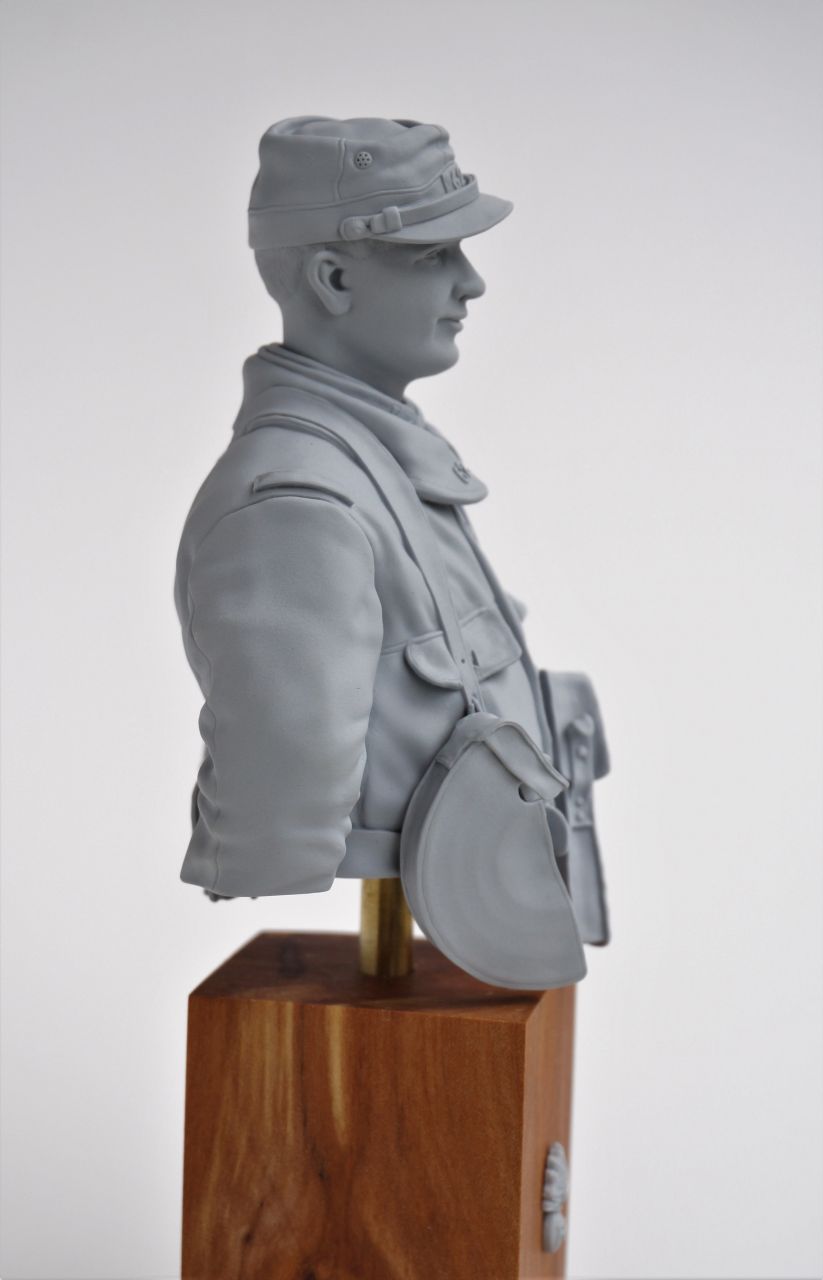
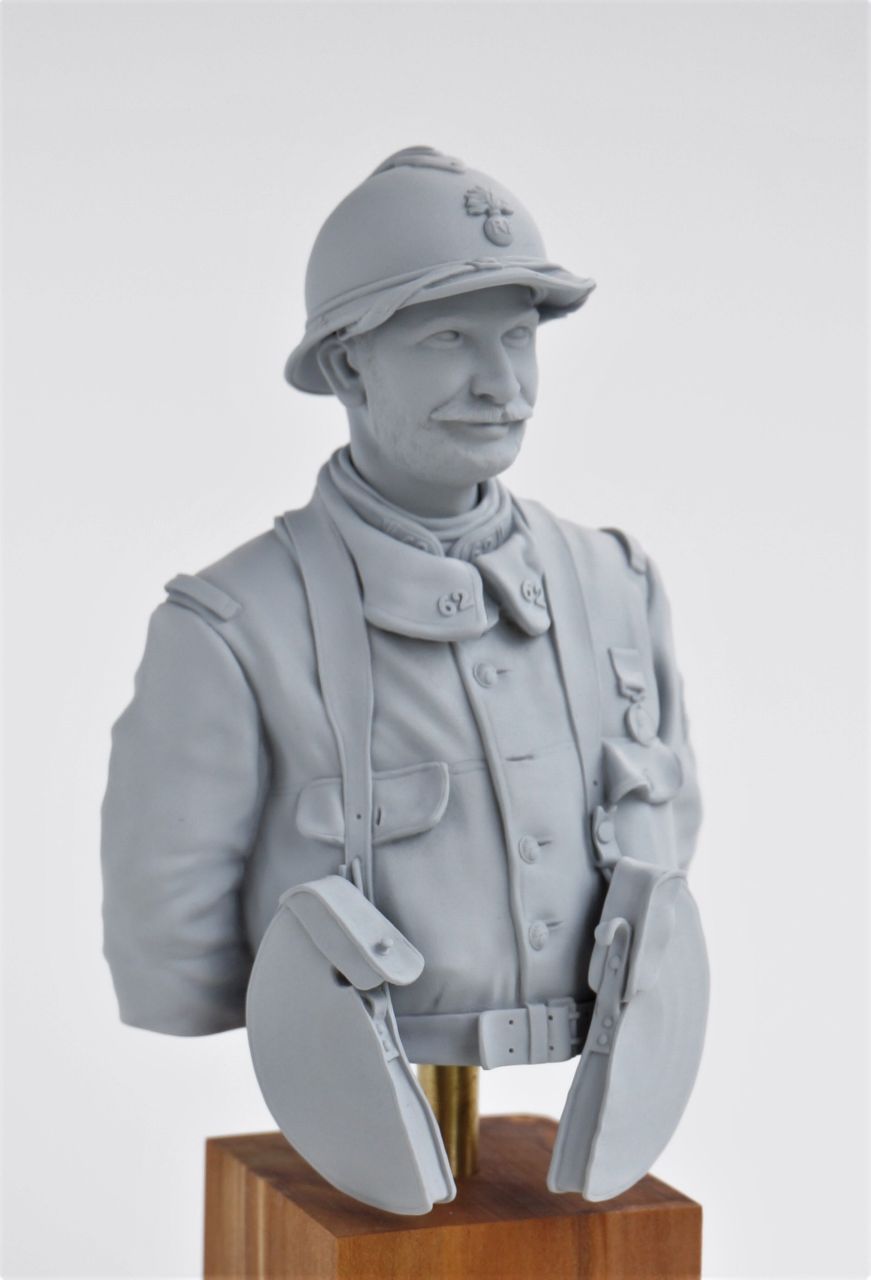
The bust is based on a French Chauchat MG Gunner of the 62nd Infantry Regiment photographed at Mericourt sur Somme, 12th November 1916. Here he has been awarded with the British Military Medal (probably presented by the Duke of Connaught). For what reason he received this medal and in which area of combat is unknown. The official movements of this regiment from March 1916 to January 1917 gives Verdun, but a battalion, or smaller unit may well have been attached to another Army Group, possibly during the Somme battle. Their battle history is: Marne, 1st Aisne, Champagne, Verdun, 2nd & 3rd Aisne and Meuse-Argonne and the home base was Lorient, Brittany.
He carries a reduced amount of equipment, which would normally not be sufficient for combat.
To date I have only come across the 2 original photos of this soldier. The original head wearing the Adrian helmet shows a slightly bent nose, which is more evident in the 2nd, less known photograph.
Extracts from the Infosheet with this Bust:
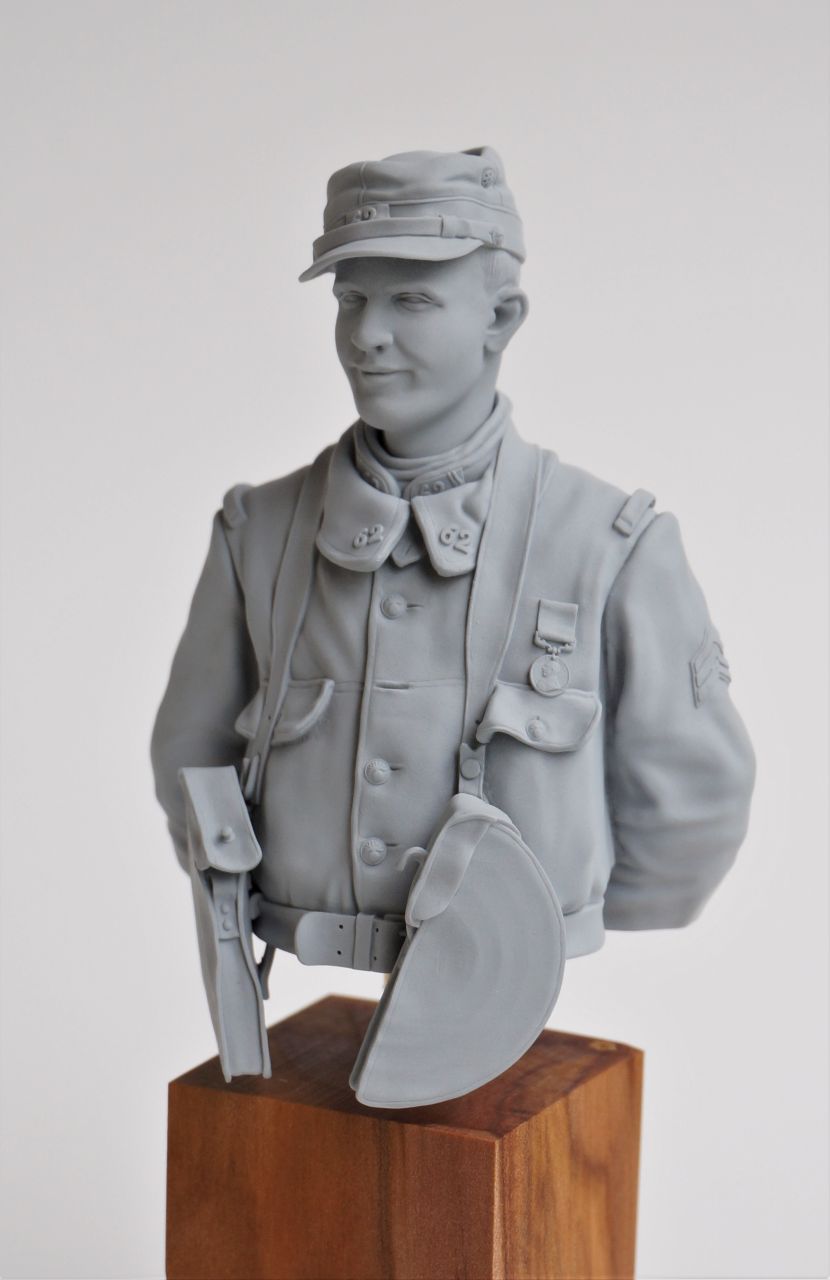
Other Ranks Infantry Kepi Model 1884/1914 / Képi d’Infanterie, modèle 1884/1914: The 2nd, alternative head wears the earlier type M1884 /1914 Kepi in gris bleuté. From the end of 1914, beginning of 1915, one saw more and more French troops wearing the new simplified kepi M1914 version (without piping), but there were still many of the old caps around, especially with reserve and territorial units. The chin-strap and visor were still made out of blackened leather, with Tombac (or sometimes zinc) buttons and black painted vent at each side.
One can display this kepi in at least 2 different coloured versions. Both original items were used as references during the making of this bust. The old-type red regimental numbers on dark-blue backing were often removed from the older, pre-war red kepis and remounted to the new types, giving quite a mixture of headdress colours.
Version 1: Blue kepi with yellow piping. Red sewn-on regimental cloth patch on dark-blue backing.
Version 2: Blue-grey (gris bleuté) kepi with dark-blue piping. Regimental number as in version 1.
There are also versions of this kepi with the regimental numbers in a dark-blue on light-blue backing. The numbers have been modelled slightly more raised than would normally be the case for cloth patches – this is to enable an easier paint finish.
The alternative head for kepi has a casting web above right ear. This is to be removed before painting.
Neck Cloth: Seems to be a private item and in a somewhat lighter colour than the Service Tunic collar.
Service Tunic M1914/15: On the original photograph, under the greatcoat collar one can see parts of the service tunic M1914/15. Normally, the greatcoat was the regular combat uniform of the French Army and the tunic would only be worn in the warm months of summer. However, in cold conditions, a combination of both greatcoat and tunic were worn together giving sometimes a bulky appearance to the soldier. The collar patches for infantry regiments were normally mounted on a horizon blue backing cloth, with darker blue regimental numbers and vertical stripes (white No. and stripes were used for reserve / territorial units).
Greatcoat Model 1914/1915 – 3rd Type: This was a simplified version of the original M1877 dark blue greatcoat. The two large pockets (partly hidden behind the turned up flaps) were added towards the end of 1915 and often one sees theses made out of a different coloured material. The pockets were reinforced from within and intended for the carrying of extra ammunition. It had a large turned down collar with grey-blue metal buttons (although these tend to reflect the light somewhat, giving a shiny appearance sometimes) at the front and smaller ones on the pockets and at rear waste belt.
The distinctive turned up coat flaps were buttoned back at each sides (not seen on the bust) – here the material was reinforced at the corners. On his upper left arm are the 3 dark-blue chevron stripes, mounted on a light blue backing cloth, indicating the time served at the front. The first stripe for 1 year, with every successive stripe for ½ year service. The colour of these greatcoats varied considerably and depended on the dye used, origin, wear and tear and age of the garment.
On the original photograph the service stripes appear much lighter than they should be. This could well be due to fading, or are of a different coloured cloth altogether.
The dark-blue 62 sewn-on regimental collar patches have been modelled slightly more raised than would normally be the case in this scale – this is to enable an easier paint finish. Casting webs have been placed under the coat collar, top pocket flaps, behind / within magazine pouch attachments and belt end (bottom part, protruding out). These are to be removed before painting.
On the original photograph there appears to be what looks like a fastening strip between the coat collar ends. This is normally not a feature of these coats and I have only seen these on versions for cavalry and train (transport). This may well be a variant from a particular manufacture or an add-on feature carried out locally or by soldier. Also, one cannot see the bottom pocket flaps (not on bust model). Here they have either been pushed into the pocket openings, or are missing altogether. The top pockets seem to be quite full, with corners of contents showing up on the outer cloth (more evident on right hand pocket). Also evident is the fact that there are 2 greatcoat buttons missing from a total of 6 at the front (1 is behind belt).
On the greatcoat itself, the structure and fold of the creases follows the standard form copied from various photos of French troops in the field. It is always better when gathering reference material to use original photos of troops who have been actually wearing their uniforms over long periods of time, as most garments (as indeed all types of clothing, depending on the material used) will crease and fold in roughly the same way. Some reference books, especially for collectors of uniforms are helpful for colour-reference and information etc., but will not always portray an accurate picture of how the uniforms appeared after many days of being worn.
British Military Medal (MM): This French soldier has been awarded the Military Medal, which although generally intended for British personnel, was known to have Commonwealth and other Allied troops as recipients. The MM was the other ranks equivalent of the Military Cross (MC), which was awarded to Commissioned Officers and on the odd occasion to Warrant Officers, for bravery in battle on land. Established in March 1916, the MM was never as popular as the higher ranked Distinguished Conduct Medal (DCM), which had a money grant of twenty pounds and a sixpence a day bonus added to the soldier’s pension.
The medal ribbon is flanked by 2 dark blue thicker stripes, centred by 5 equal stripes, 3 white and 2 red. The obverse (the side of a coin or medal bearing the head or principal design) shows an image of the reigning monarch – in this case, King George V. The suspender (attachment between medal and ribbon) is decorated with scrolls. As this medal has been newly presented, it will not have signs of the normal patina seen often on these items.
Equipment
Adrian Infantry Helmet M1915 / Casque Adrian de l’infanterie française modèle 1915: The Adrian helmet, similar to the fireman, or dragoon helmets of the period, first appeared in sufficient numbers for the Champagne offensive in September 1915. By December 1915 a total of 3 million had been produced. Weighing only 765 grams and formed from relatively mild steel it did not give as much protection as its German and British counterparts. On the front is the grenade of the infantry (this would differ according to the arm of the service). Colour: the first helmets to be introduced had a shiny blue-grey finish, which by December 1915 were being covered with a khaki cloth cover. From the summer 1916 the helmets were issued in a blue-grey matt colour and were now worn without the cloth covers again (this was an official directive to avoid the cloth, which was never clean being dragged into head wounds, causing further complications).
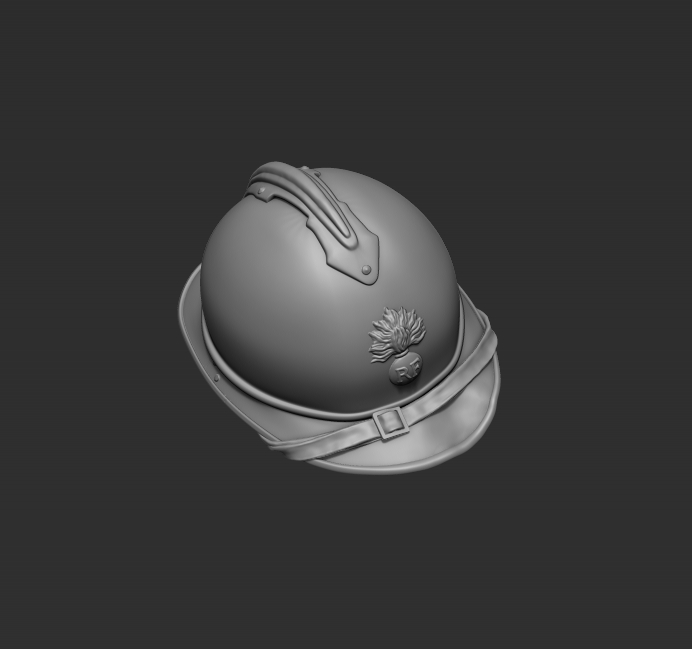
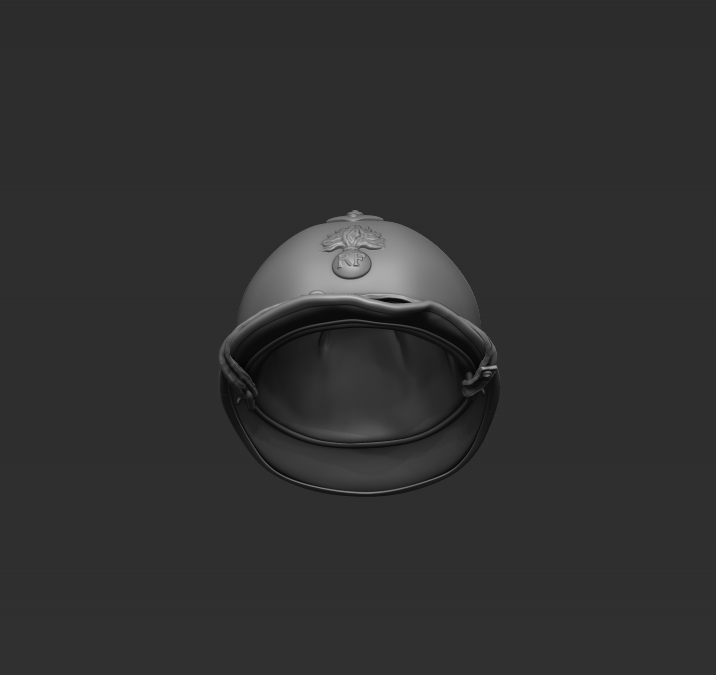
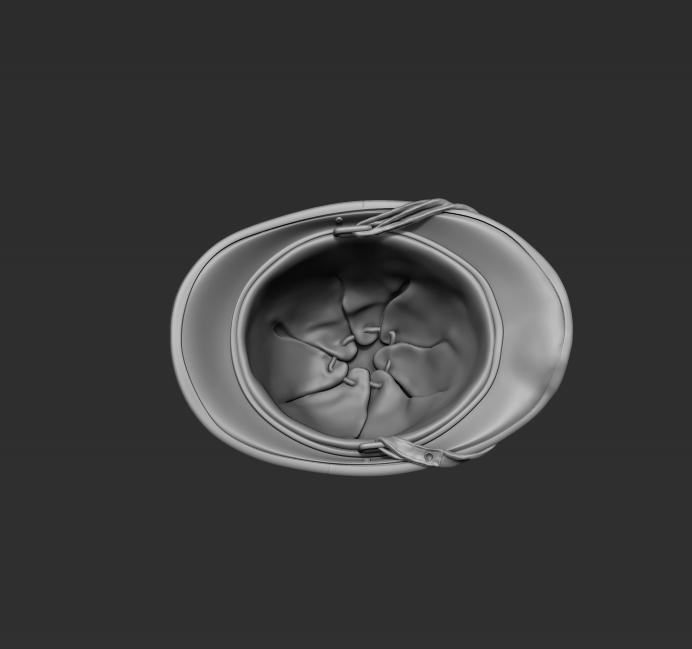
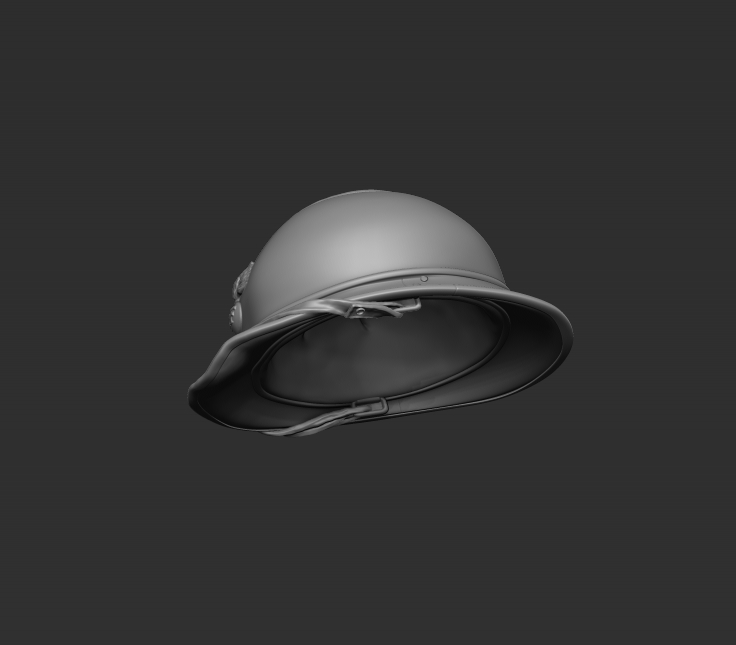
Within the square-shaped chin-strap attachments on the underside of helmet are casting webs. These are to be removed carefully before painting. The helmet has now been half filled to enable an easier casting method
Leather Belt and Brace Equipment M1892/1914 / Bretelle de suspension Mle 1892/14: The main difference from early pre-war equipment was that since December 1914 all belts, braces and straps etc. were issued now in brown, instead of black. Also, the shoulder and rear straps are now fixed to the metal ring by means of brass rivets, rather than stitched on. The belt now has a steel two pronged buckle.
Ruby Pistol Pouch M1916 / Cartouchiere Francaise Pour Pistolet Ruby: The special brown leather holster for the Ruby pistol was similar to the standard infantry cartridge pouch, but slightly larger. It was attached with the aid of a tin-plated iron suspension ring and hook to the brace (yoke) equipment and 2 loops to the belt. A brass stud at the front held the pouch flap down. The pouch held this simple, compact, but robust Spanish made Ruby pistol, with 2 additional magazines and was the standard secondary weapon of all French GCRG gunners.
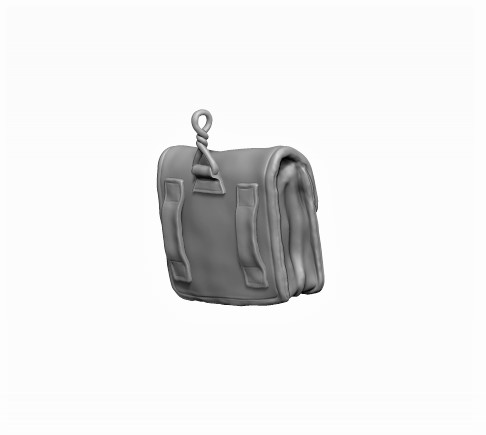
CSRG Frontal Magazine Pouches (1st type): Issued in the spring of 1916 to all CSRG gunners. These distinctive, half-moon shaped Chauchat magazine pouches were made from a thick brown leather and were at first worn with the convex sides facing inwards. Later, these pouches were swapped over on the webbing to enable a better access of the magazines by the gunner. The 2nd type version, which appeared in the summer 1917 had an additional strap fixed to the convex parts and around the gunner’s back, joining both and so keeping the pouches closer to the body during combat.
These pouches were not popular with the troops. They proved uncomfortable when firing the gun in the prone position (laying down) and the magazines were easily damaged within. Additionally, their characteristic shape, outlined against the lighter colour of French uniforms, became recognizable and an obvious target for German infantry. Two magazines would fit into each pouch, the feed-lips facing downwards and held in place with an outer flap / strap, fixed with brass stud fasteners.
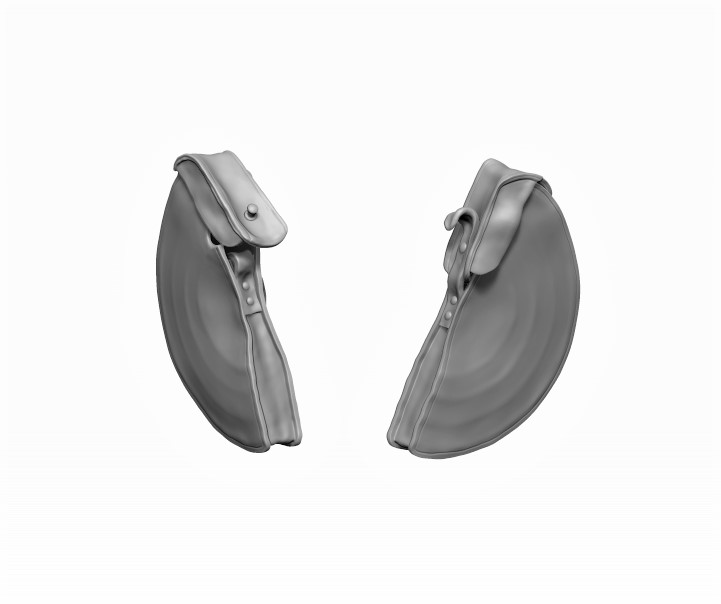
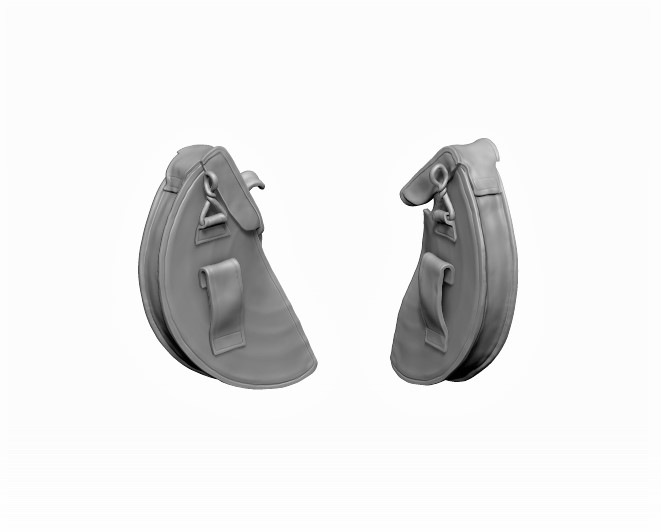
Quite often the shape of the magazines would show up on the outside of pouch, reflecting the light from the slightly raised parts. This is the case on the original photograph. It also appears that the pouches are both empty, with the right hand one left open. Casting webs have been placed at one of the pouch flap fastening studs and within the hanging down straps. These are to be removed before assembling / painting.
On the underside of body are 2 small indents for the fixing of the bottom part of magazine pouch attachment straps. These I would recommend attaching last, after the fixing of pouches.
Miscellaneous
Brass Tube: The 6mm buffed diameter brass tube supplied is to mount the bust to a suitable stand. Under the bust, an appropriate hole has been modelled in a middle position to allow the bust to be displayed. The hole will require to be drilled further into bust and is slightly larger than 6mm – this is to allow for a choice of positions / angles as required.
On my own example, I set the tube at a right angle to the bottom of bust and mounted onto a flat topped base.
The Grenade Emblem / La grenade à 12 flammes: The emblem can be used to decorate the base, or wooden plinth after the bust has been finished. It depicts the grenade of the infantry from the front of the Adrian helmet. The letters RF stand for Republique France.
On 2 of the photos, one can just make out the grenade emblem.
Above are the painted bust photos from David Lane
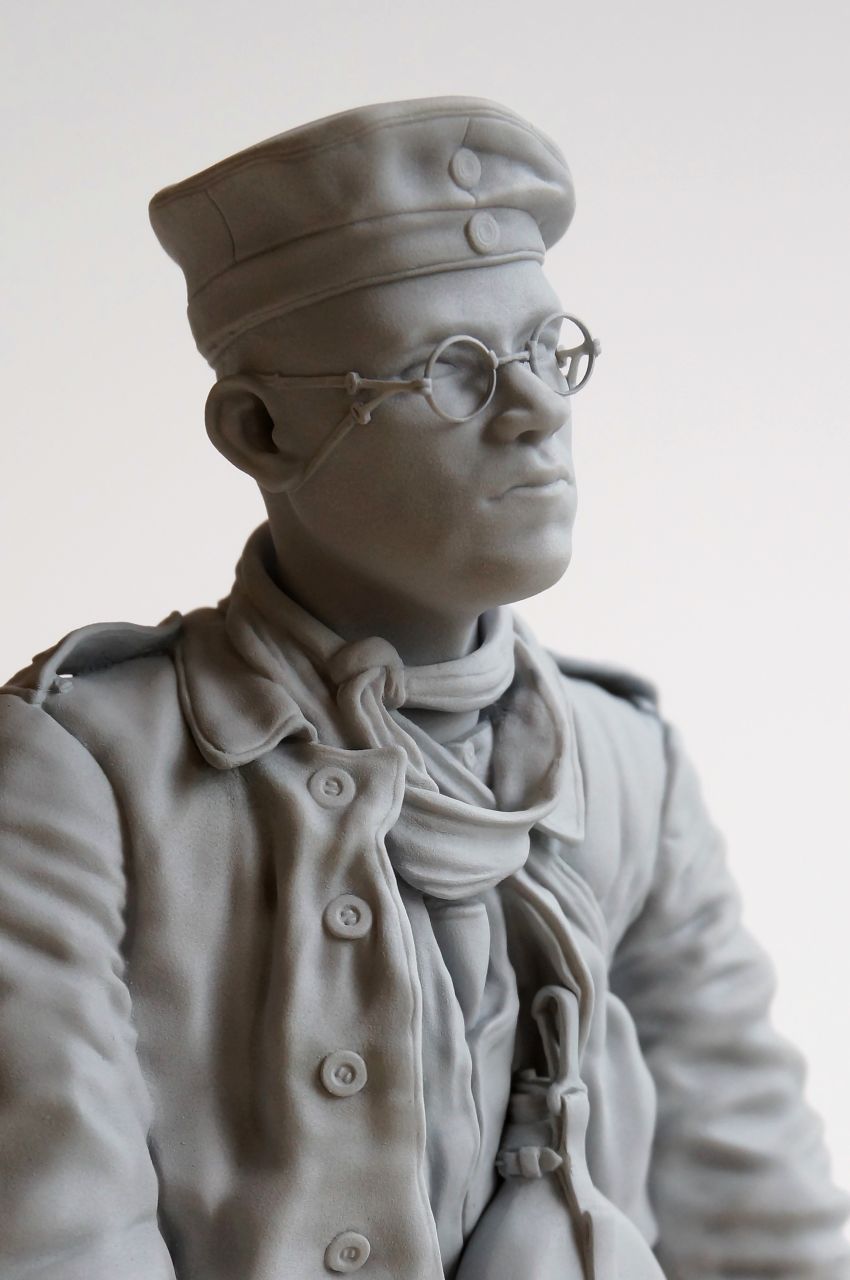
The 8 photos above are of the actual parts within kit and the assembled resin bust, showing the alternative heads supplied and gas mask spectacles attached to faces (without glass lenses). The photos below are snapshots from the 3D program used to create the master figure
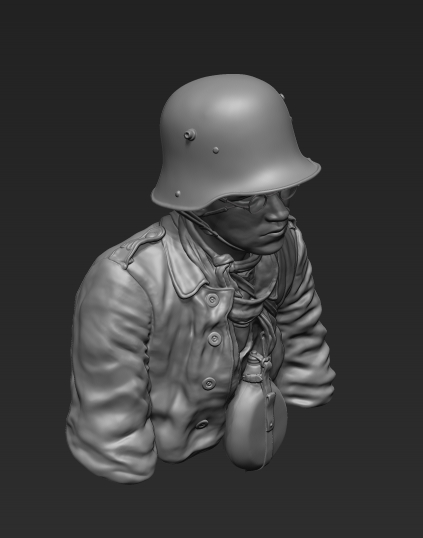
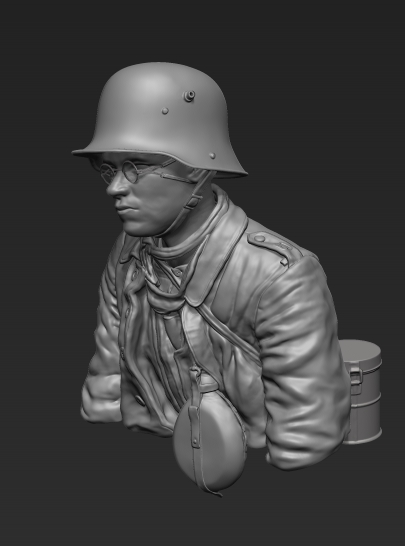
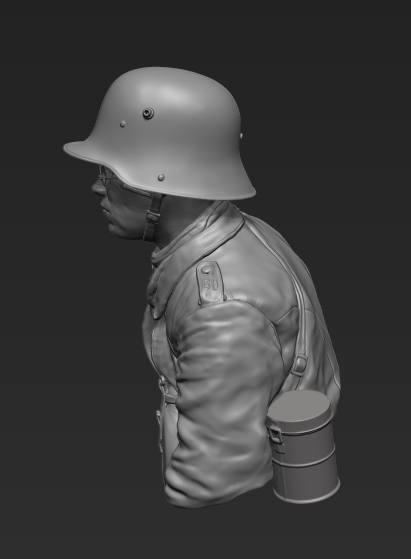
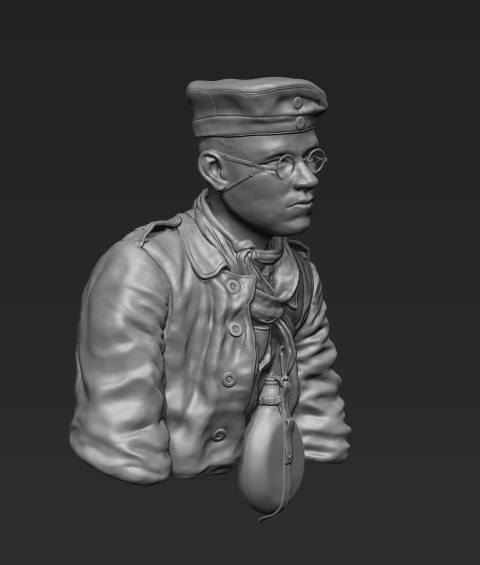
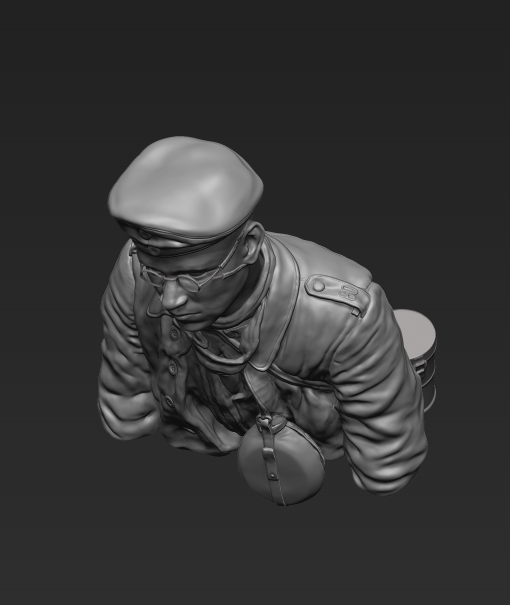
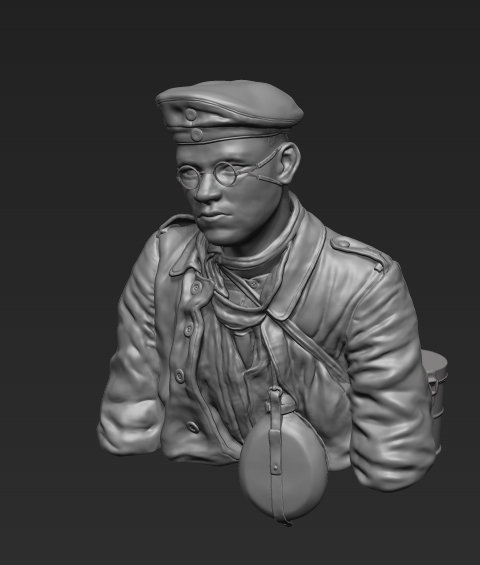
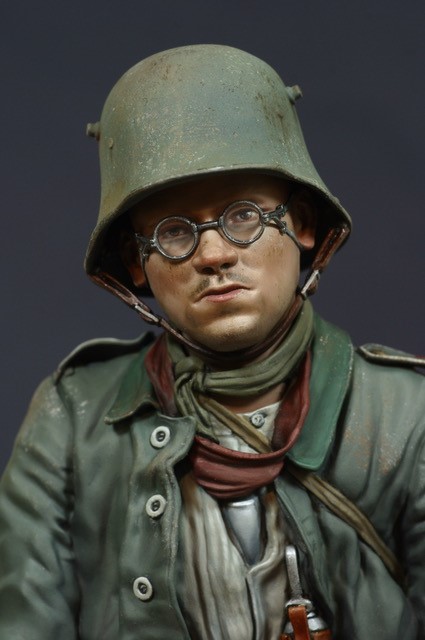
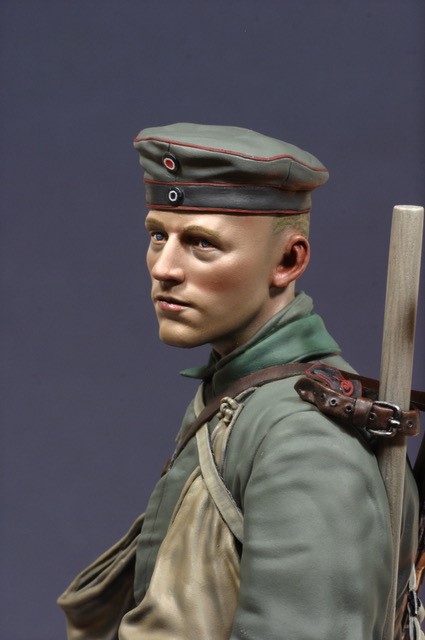
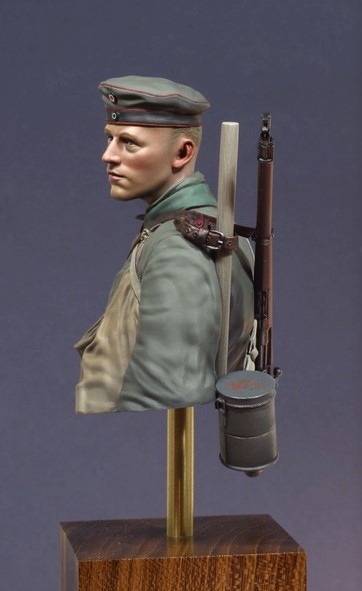
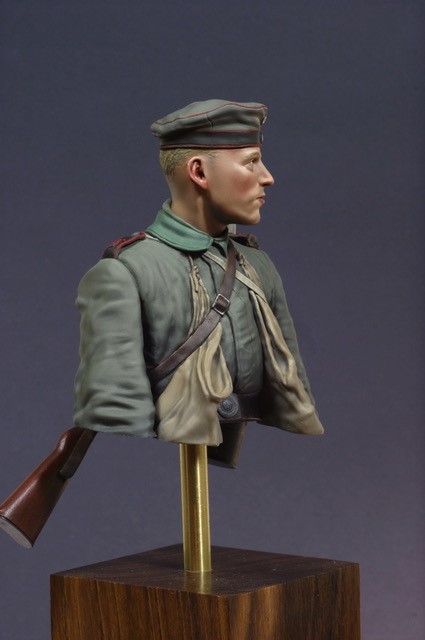
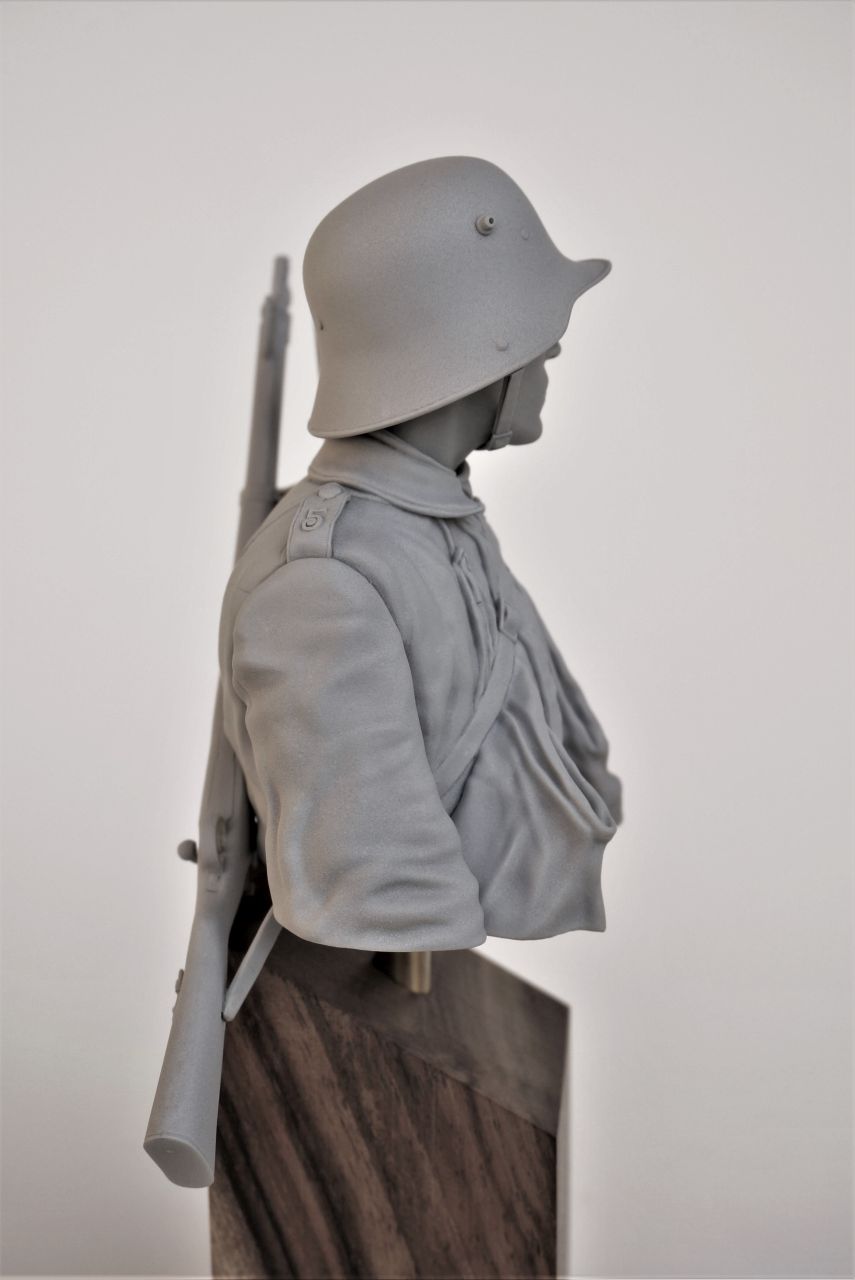
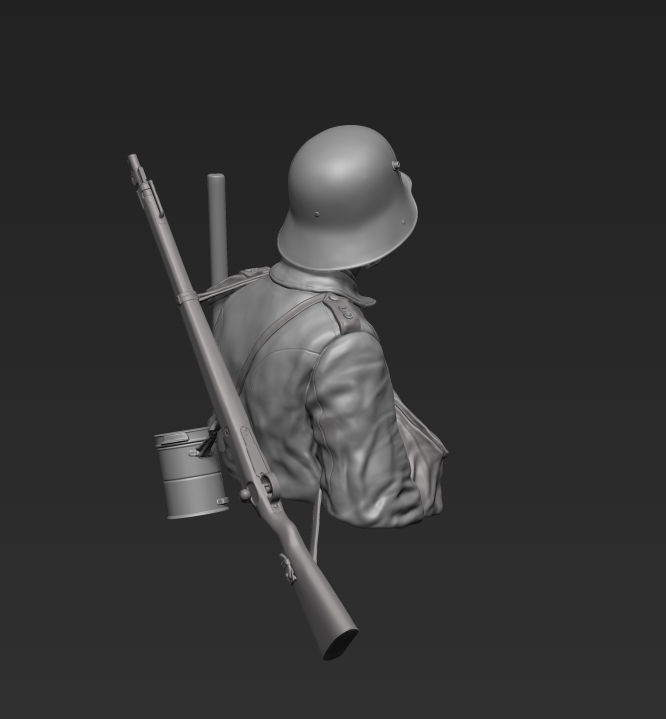
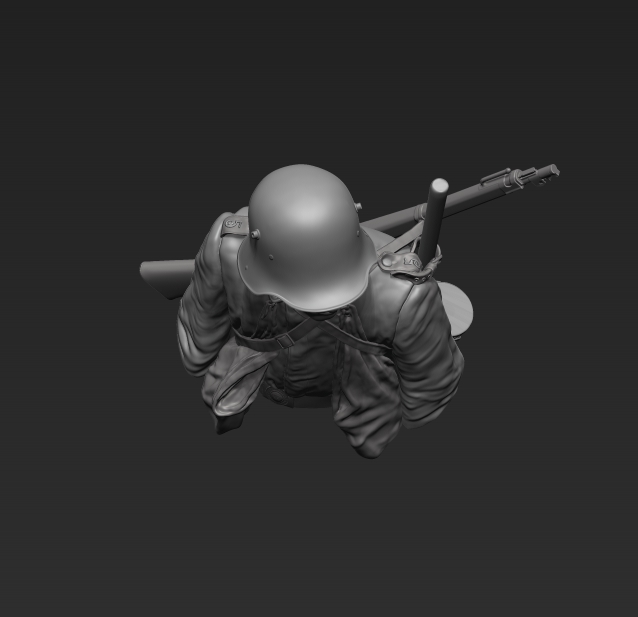
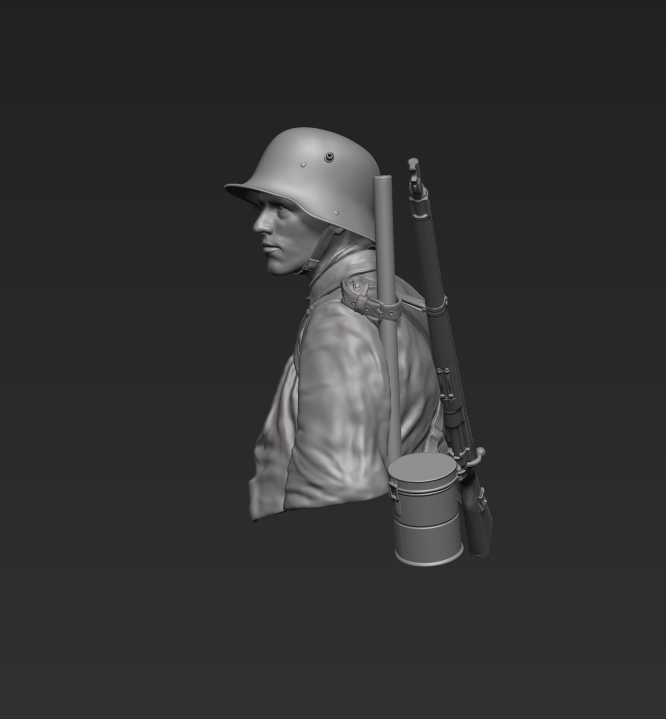
German Prisoner – Infantry Regiment No. 60, Passchendaele, September 1917 – Dt. kriegsgefangner IR60, Passchendaele, September 1917
- Scale / Maßstab: 1/10th
- Approx. height of bust / ca. Höhe Büste: 65mm
- Material: Resin (bust), 6mm Brass Tube (for bust mount) / Resin (Büste), 6mm Messing-Rohr (für Sockel montieren)
- Parts / Teile: 12
- Infosheet / Infoblatt: English
- Code / Artikel-Nr.: 30BGP
- Attention: Not a toy. Model kit or model making accessories – not suitable for children under 14 years of age. / Achtung: Kein Spielzeug. Modellbauzubehör – nicht für Kinder unter 14 Jahren geeignet
GPSR Data / Angaben
- Manufacturer / Hersteller: Jon Smith Modellbau
- Responsible Person / Verantwortliche Person
- Address: Hannoverstr. 68, 29664 Walsrode, Germany
- Contact / Kontakt: info@jonsmith-modellbau.com
- Tel: +49 (0)5161 8255
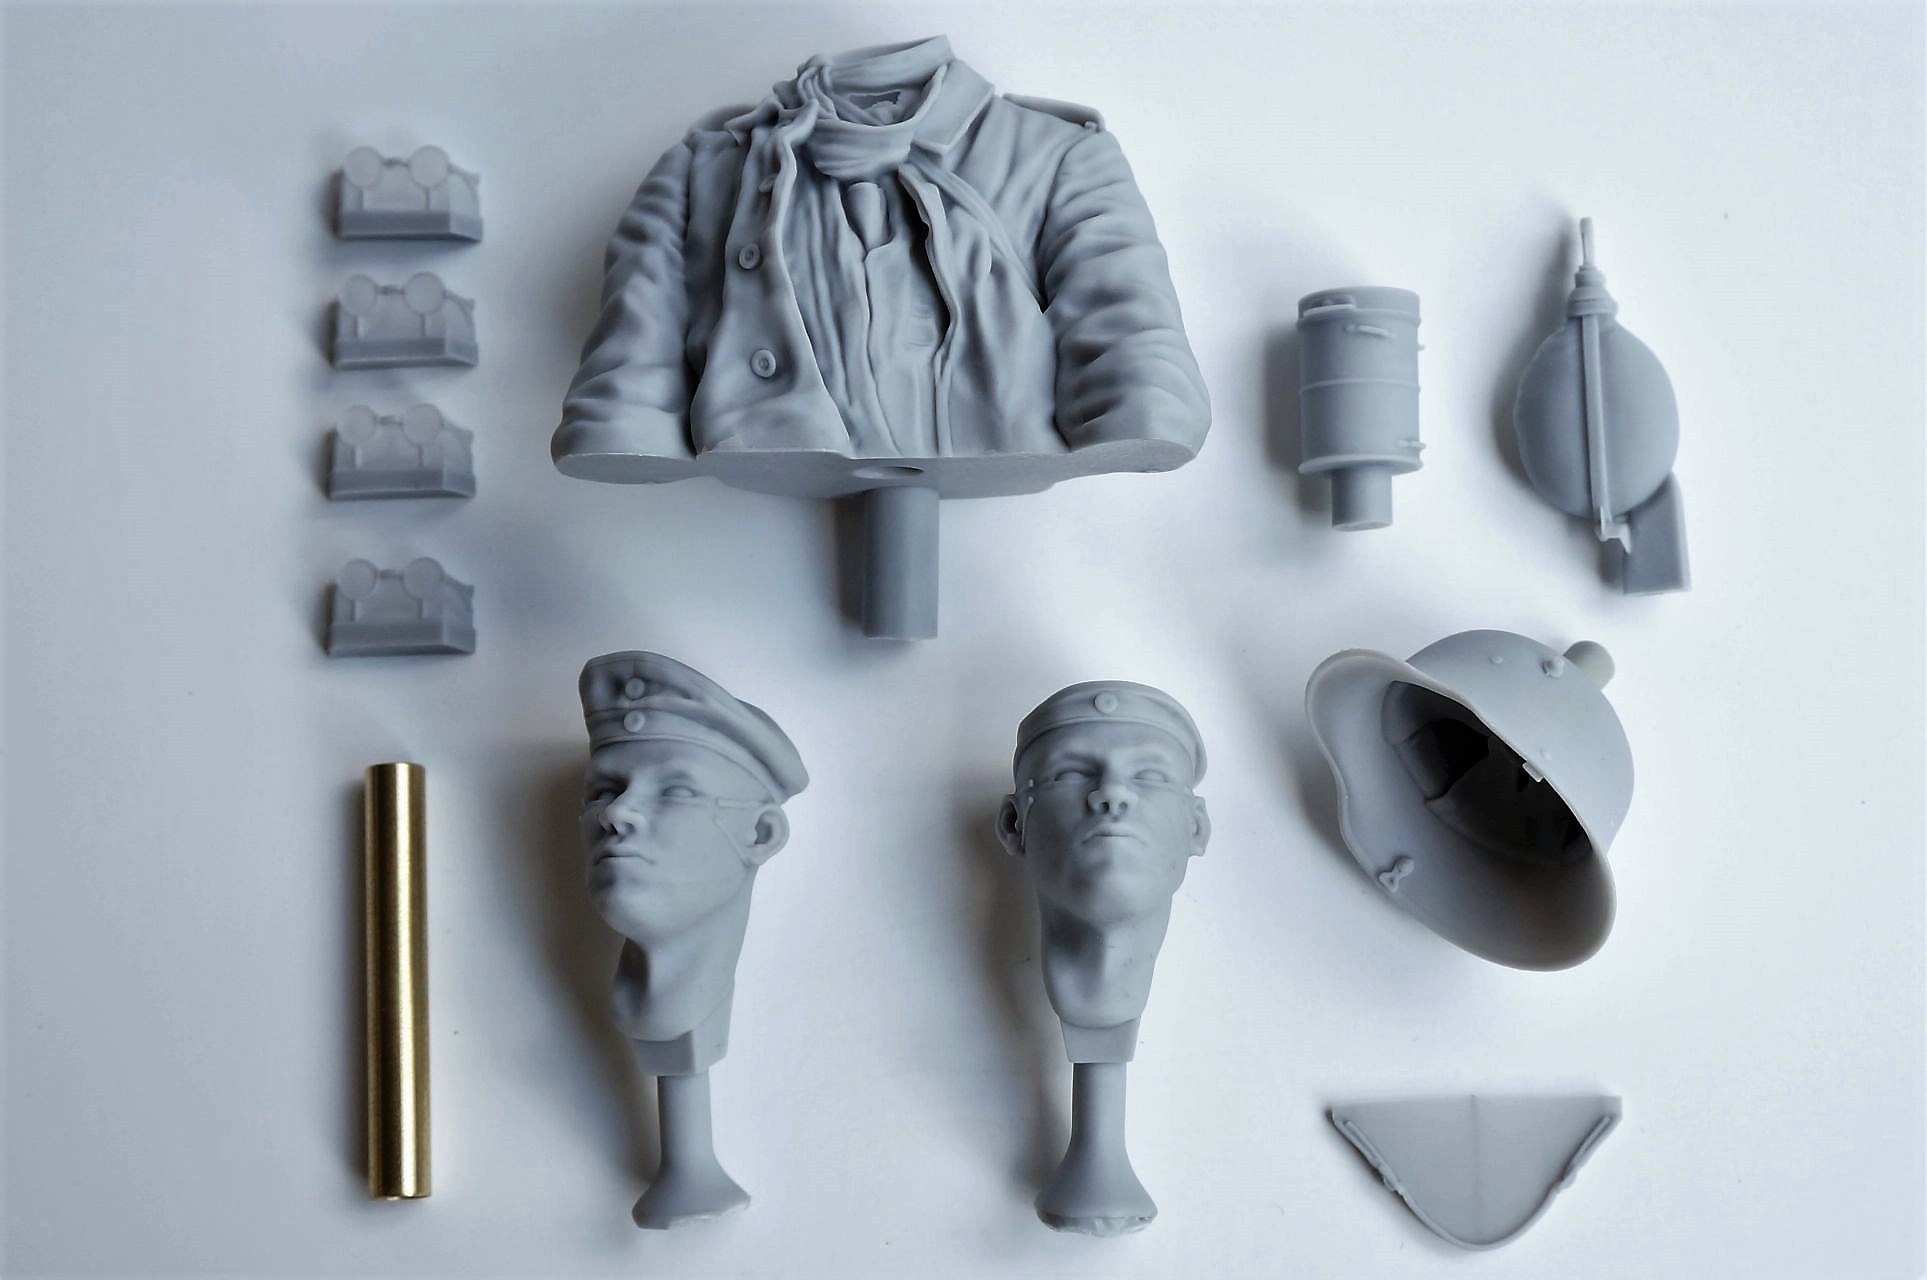
Contents Bust / Inhalt Büste:
- Upper Body / Oberkörper
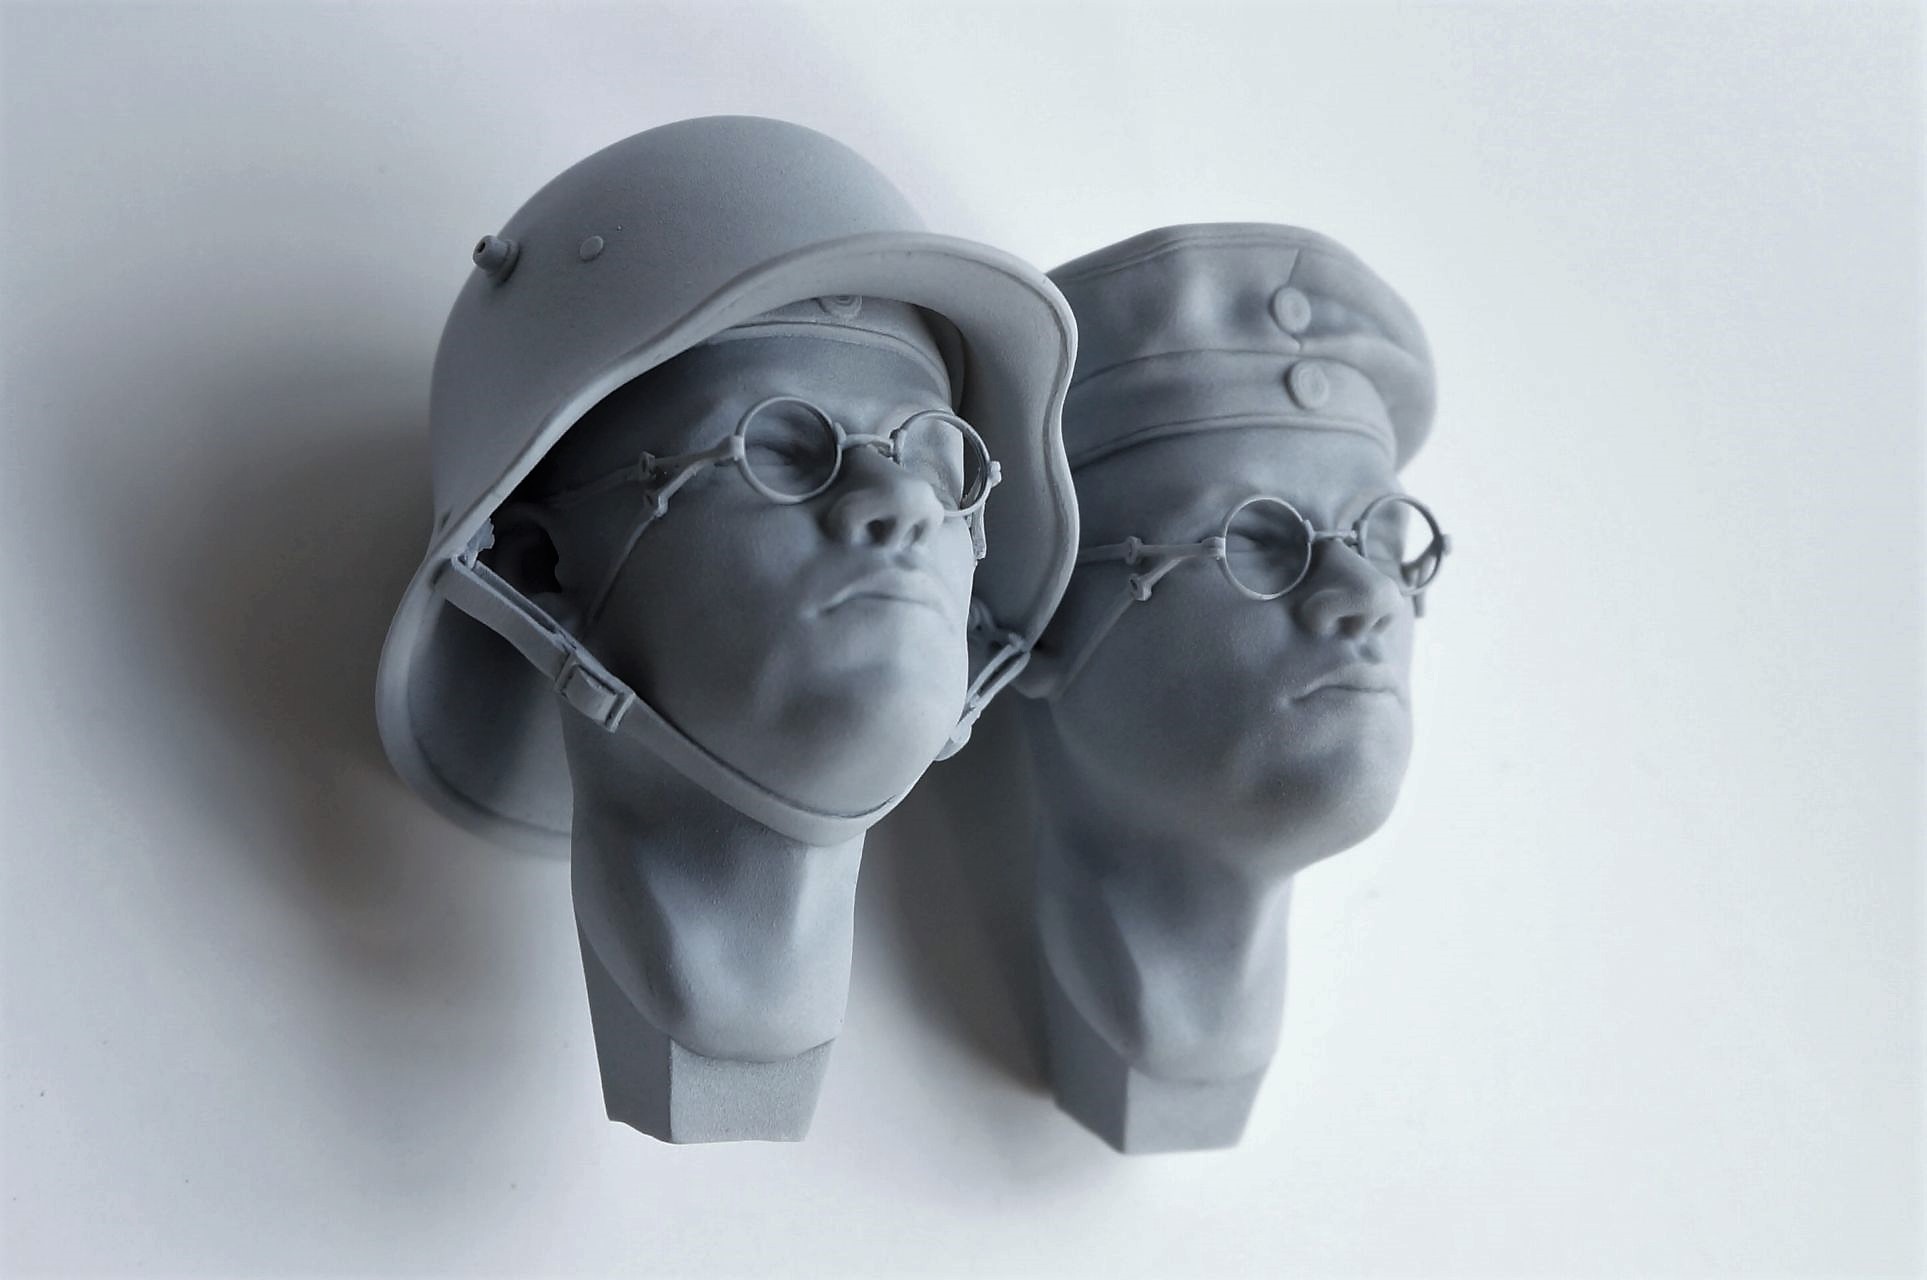
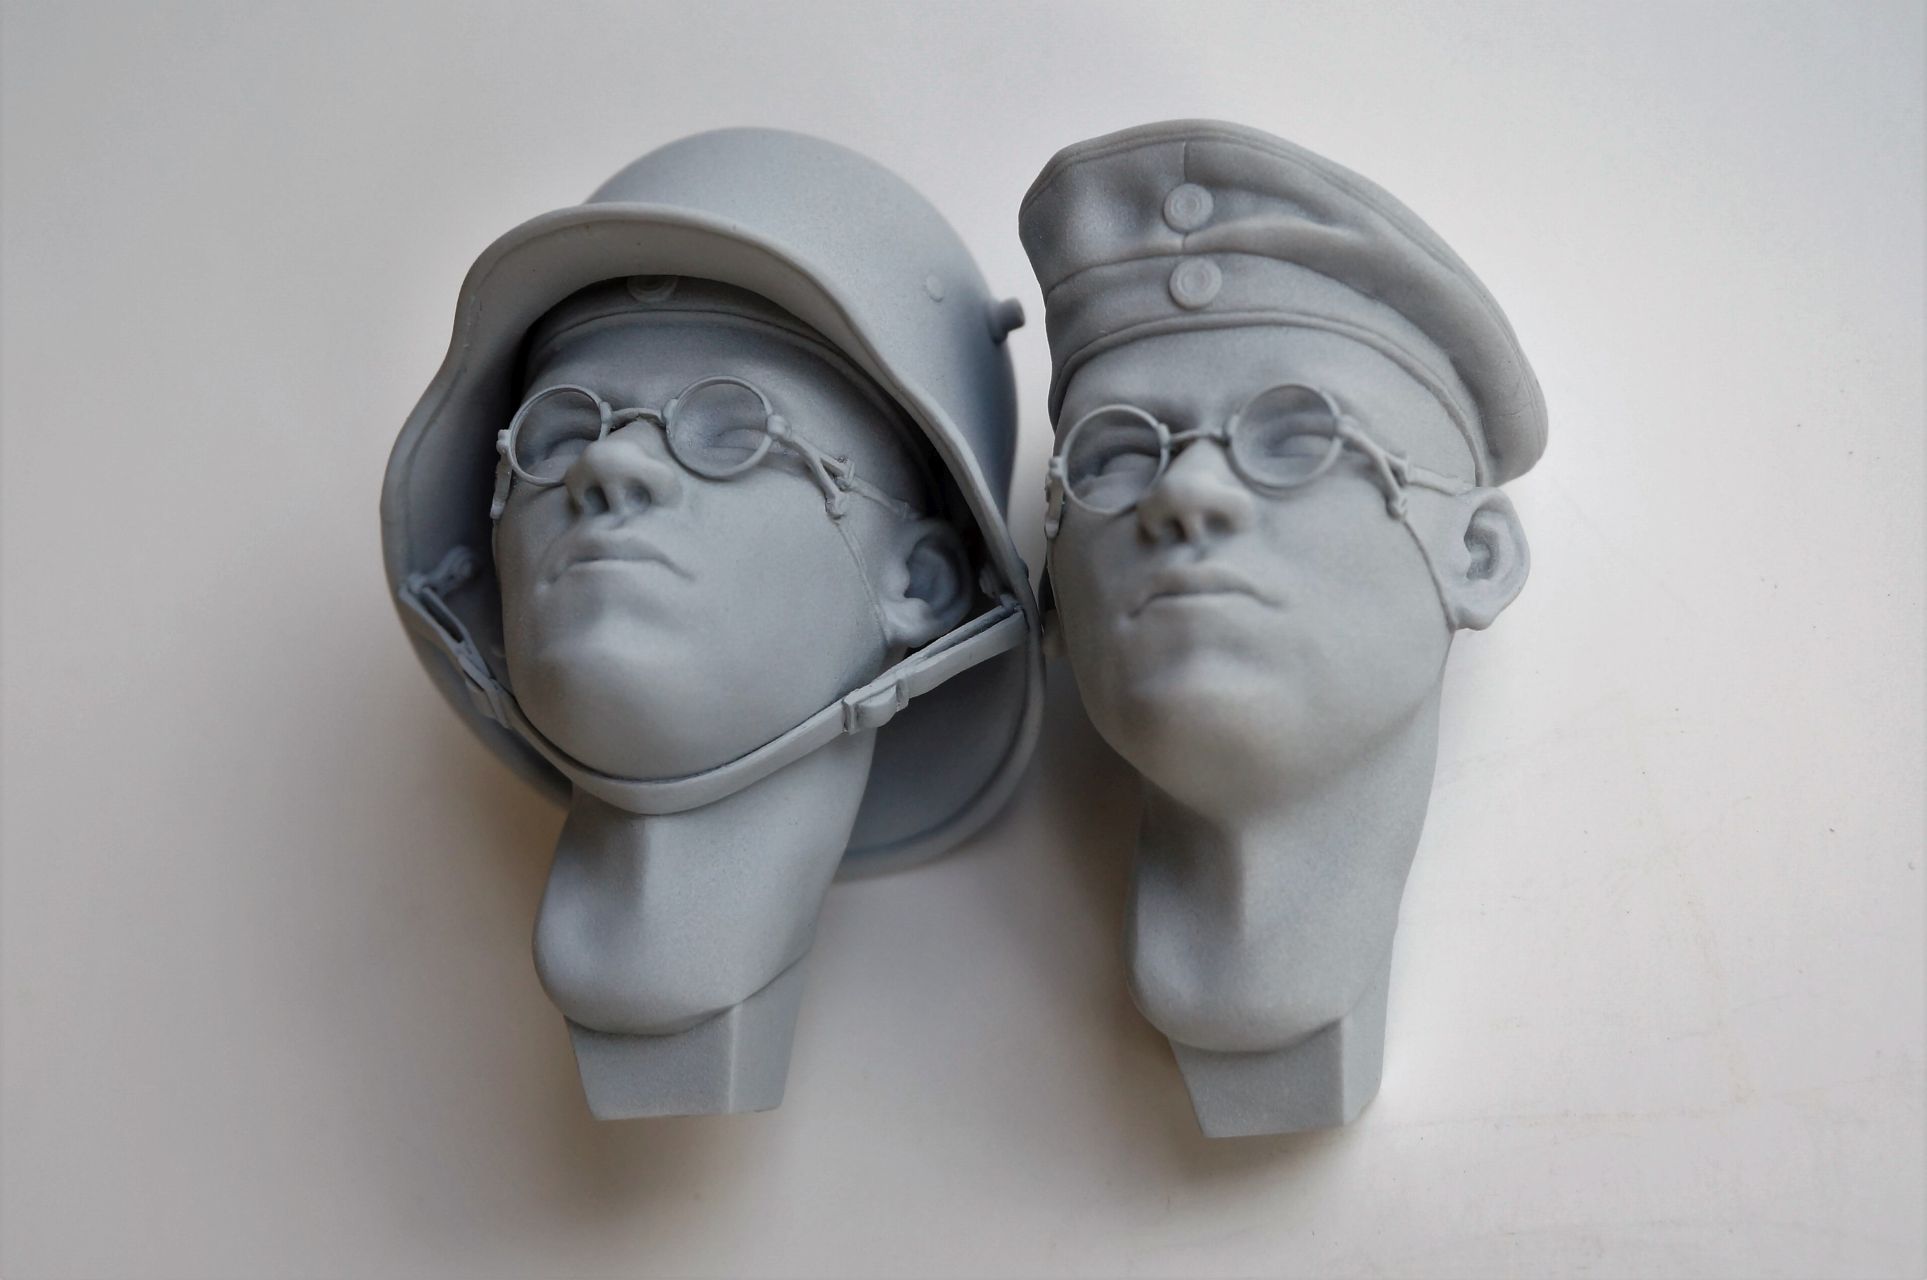
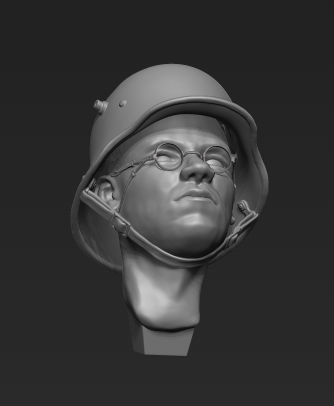
- Head for Helmet / Kopf für Stahlhelm
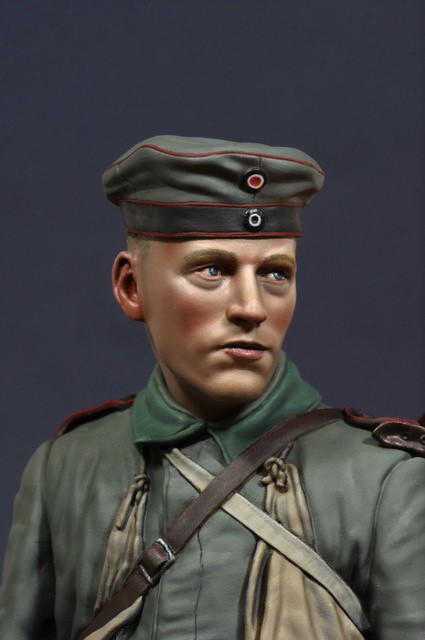
- 2nd Alternative Head with Prussian Field Cap M1917 / 2. Alternativ-Kopf mit Preußische Einheitsmütze für Mannschaften M1917
- 4 Gas Mask Spectacles (2 for each head) / 4 Stck. Gasmaskenbrille (für jeden Kopf 2)
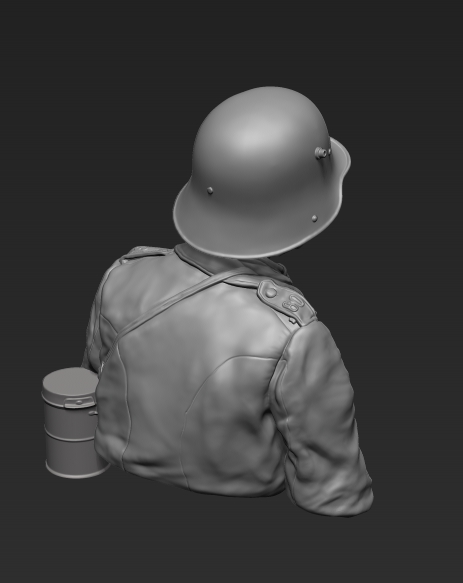
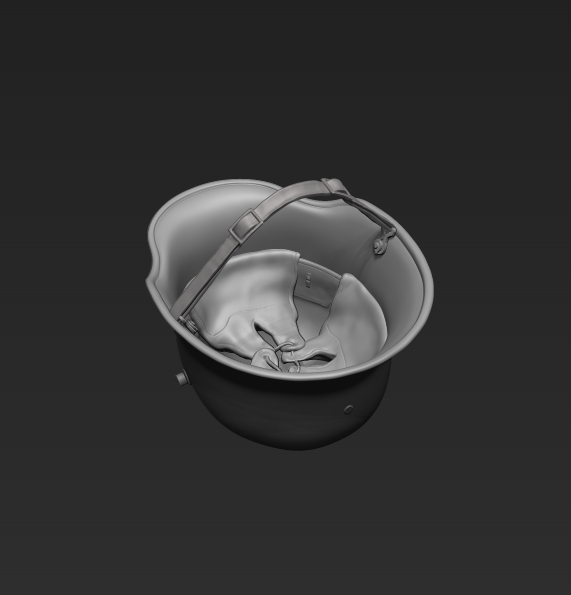
- Steel Helmet M1916 / Stahlhelm M1916
- Chin Strap / Kinnriemen
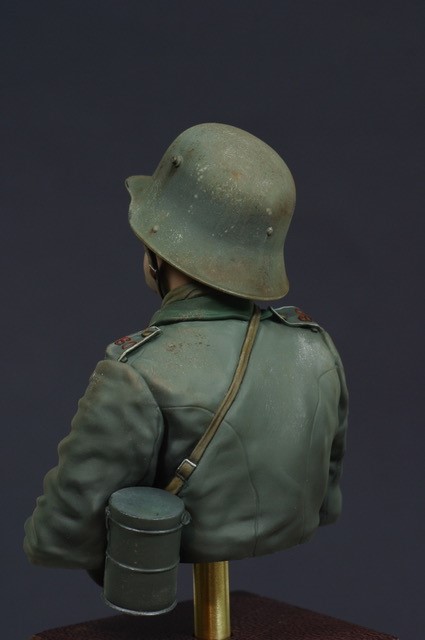
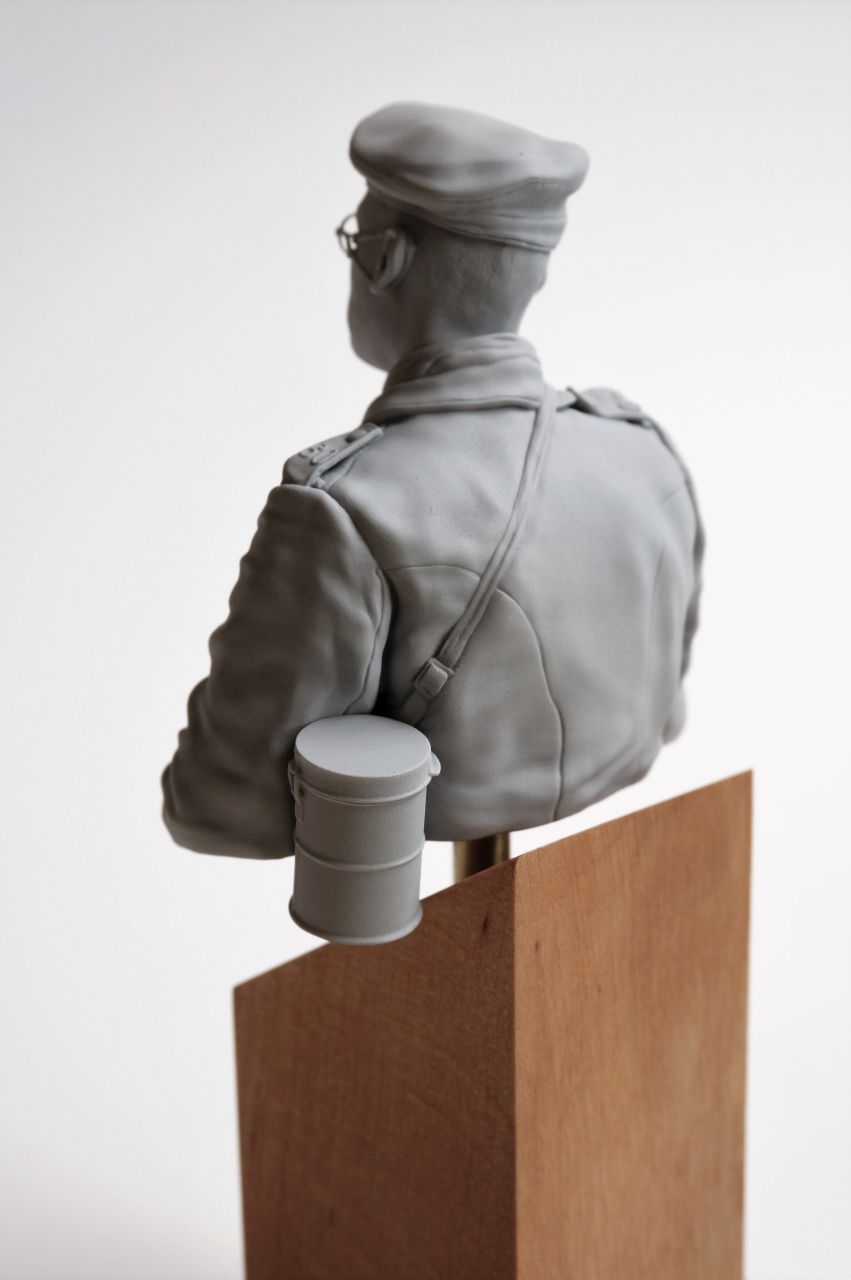
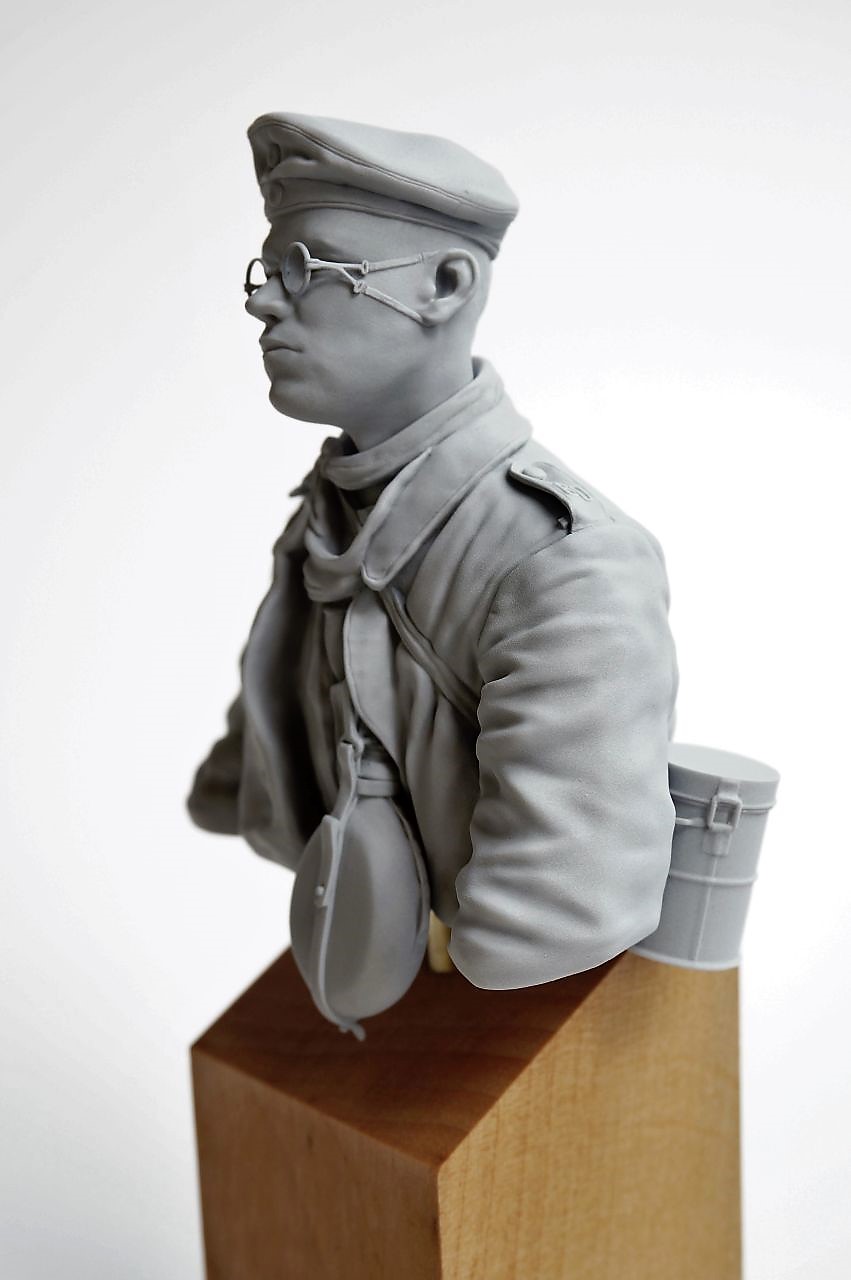
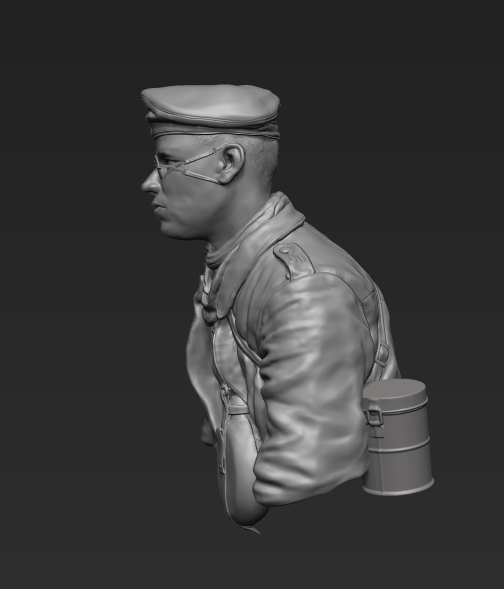
- Water Bottle M1915/17 / Feldflasche M15/17
- Gas Mask Tin M16 / Bereitschaftsbüchse M16
- 6mm Brass Tube (for bust mount) / 6mm Messing-Rohr (für Sockel montieren)
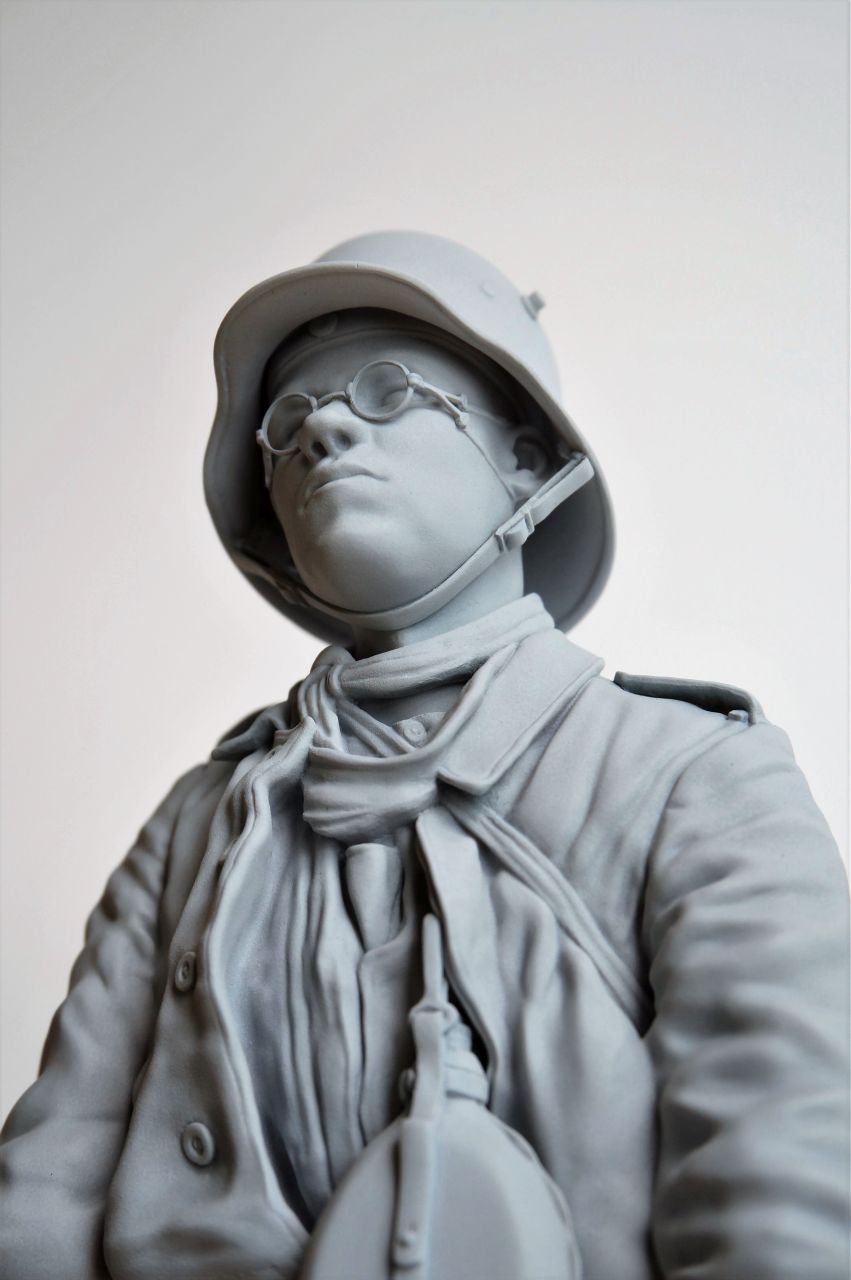
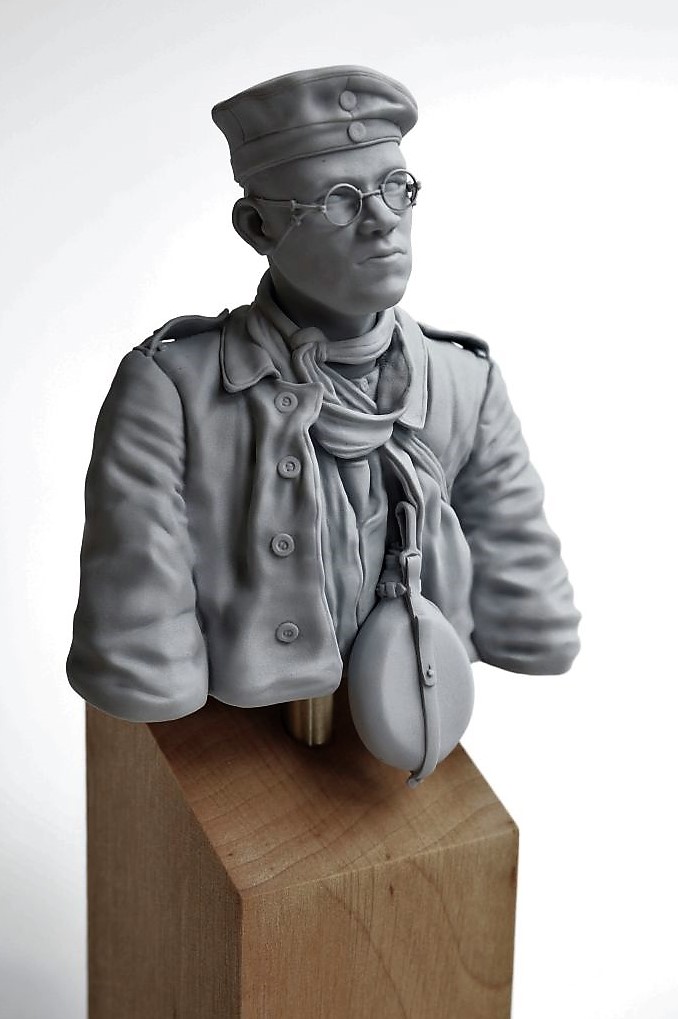
About this Bust
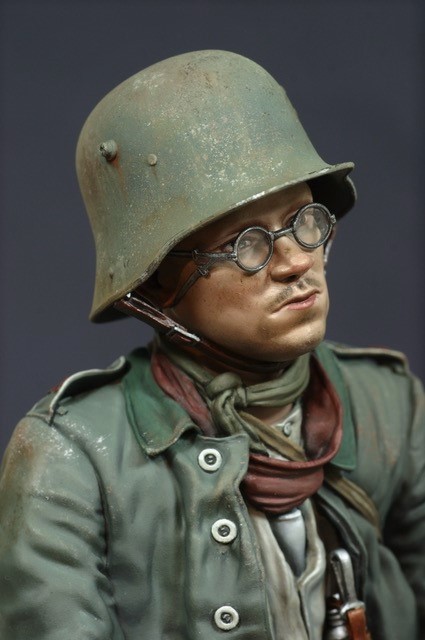
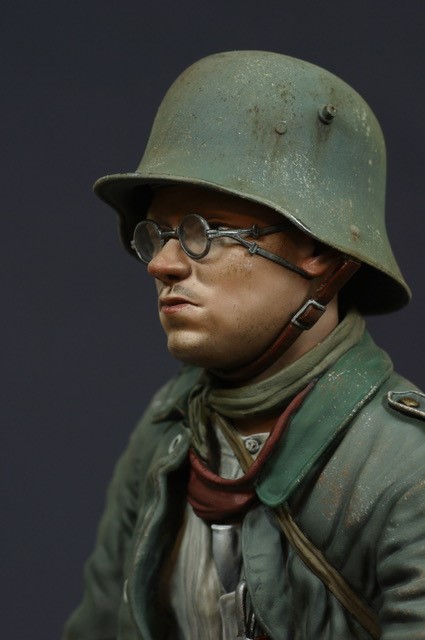
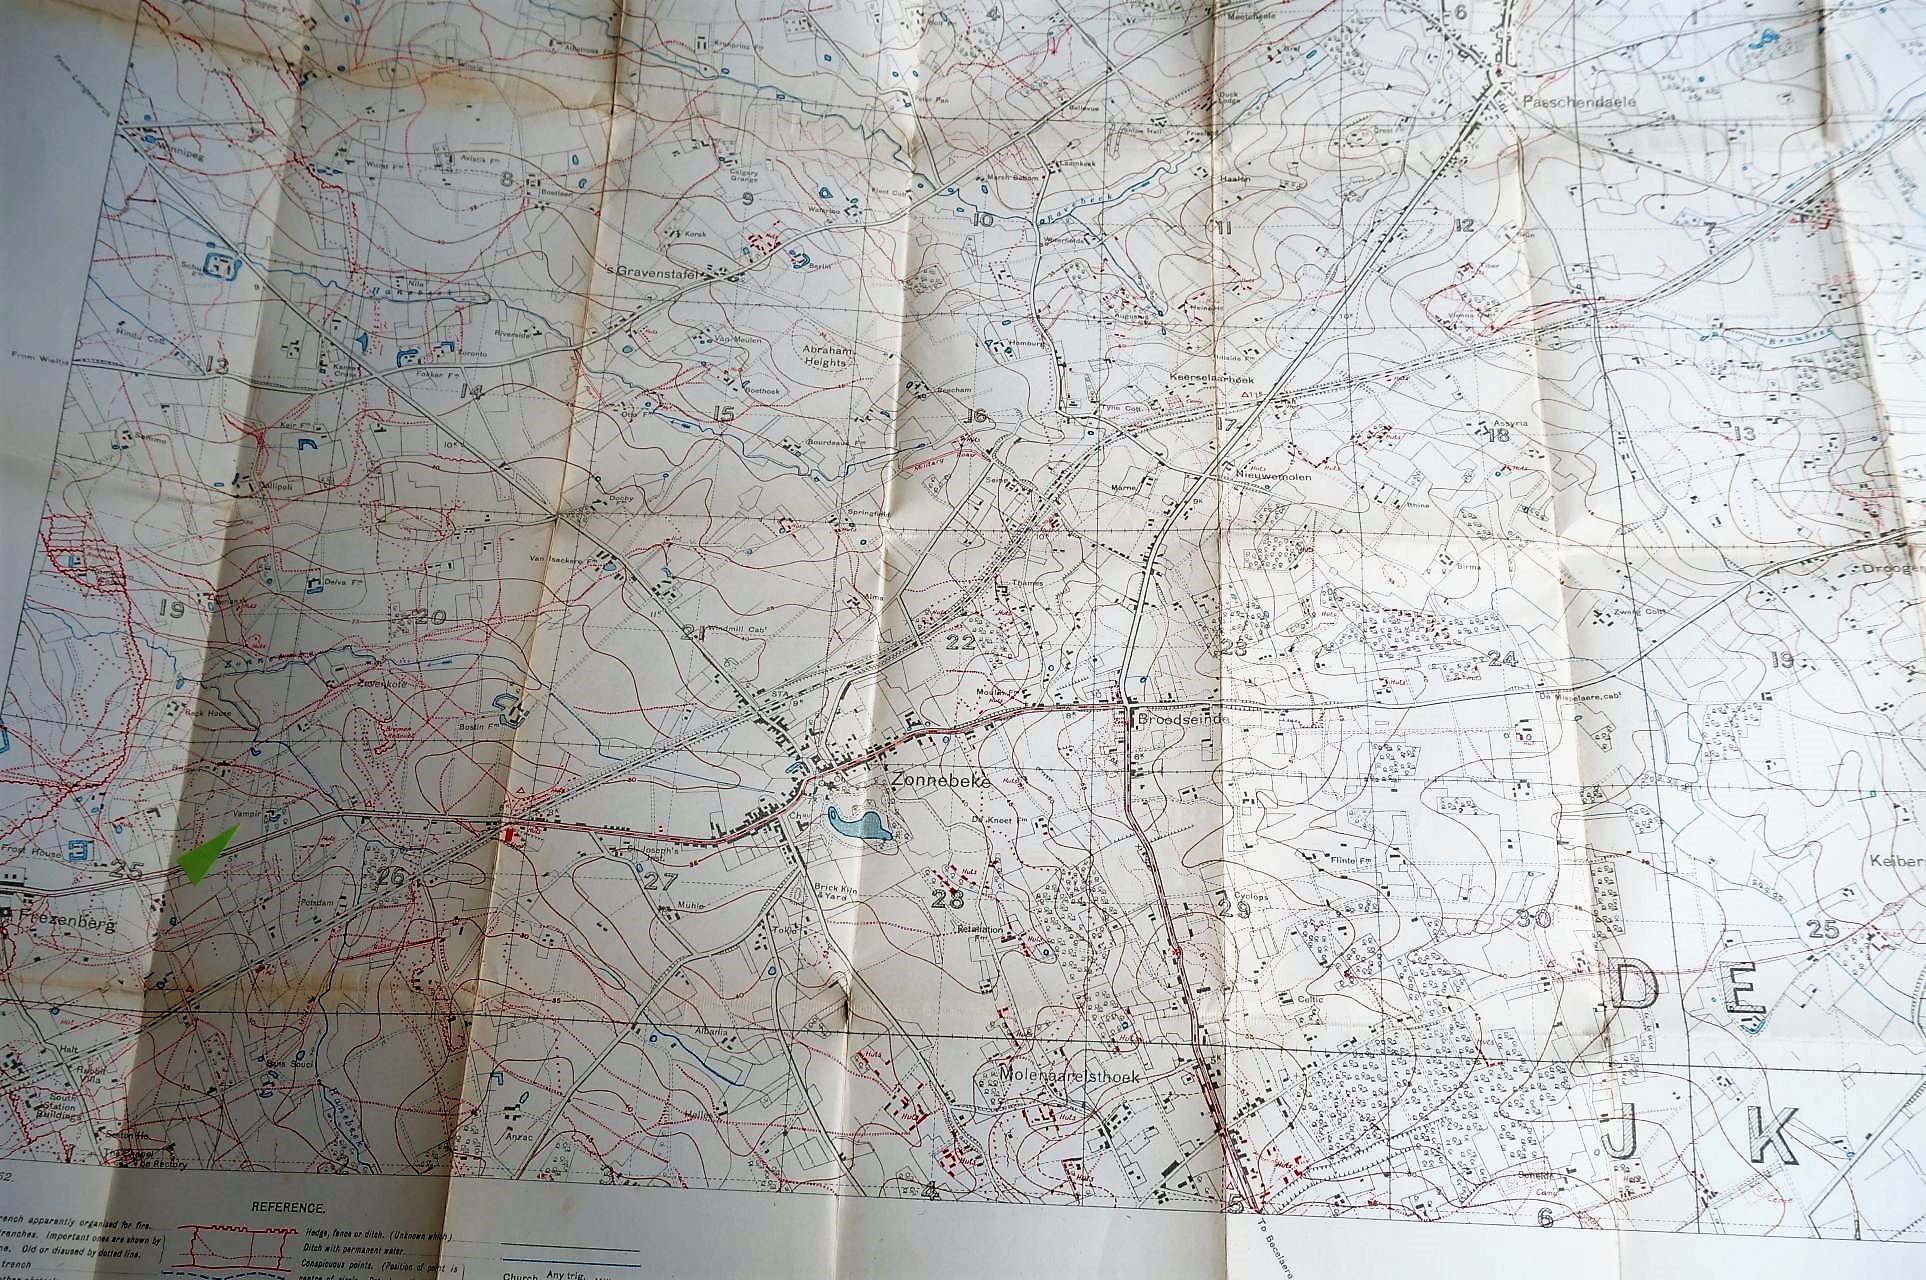
The bust depicts a young German infantryman taken prisoner by Scottish and South African troops in an attack on Vampire Farm, near Potijze, in September 1917 during the Battle of Menin Road Ridge. He belongs to the German 60th Infantry Regiment / Inf.-Regt. Markgraf Karl (7. Brandenburgisches) Nr. 60, which was part of the German 121st Infantry Division in positions around the town of Zonnebeke. The 60th IR was the northern unit of the 121st ID and had their companies in defensive positions in depth facing Ypres, running back approx. 3 Km in a rough line towards Passchendaele. The 7th RIR (Reserve Infantry Regiment) and 56th RIR made up the rest of the Division positioned to the south of the 60th IR. The place of capture at Vampire Farm was situated between the German defensive lines Wilhelm Stellung & Flandern 1 Stellung.
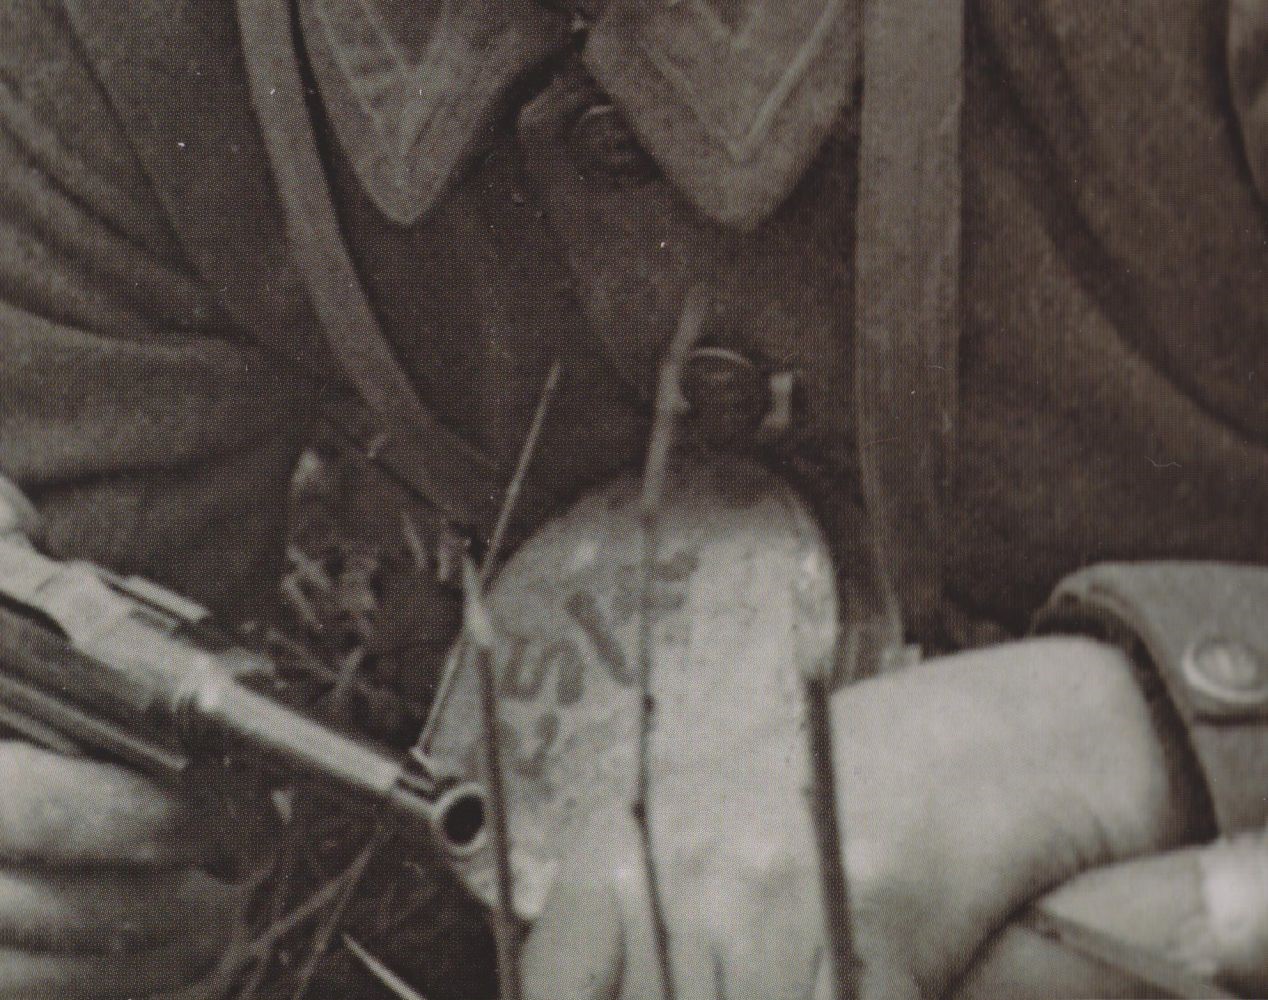
The original photograph shows the steel helmet sitting higher on the head than would normally be the case. One could assume that he is still wearing his field cap underneath, a not too uncommon situation practiced by German troops, particularly when being taken prisoner. If time allowed, then they would most certainly try and take a greatcoat, gas mask and water bottle with them. On a second photograph, taken at the same time, one can see the water bottle, attached to his opened field tunic (probably fixed to one of the button holes?). Also apparent on the photograph, is that his face, particularly around the mouth area is swollen, indicating a wound, or eventually some form of rough treatment during his capture.
Extracts from the Infosheet with this Bust:
Other Ranks Prussian Field Cap M1917 / Prueßische Einheitsfeldmütze für Mannschaften M1917: Made out of a field grey material. The band and piping were in Resedagrün reed-green for all units (earlier caps had a red band & piping for infantry). The two metal Kokarden badges at the front are – top: national colours Die Reichsfarben: black, white and red (from outwards to the centre) and – bottom: represents the German State where the unit was raised – e.g. Prussia – Preußen: black, white and black. Bavaria – Bayern: white, light blue and white etc. See table below.
From 1917 a new field M1917 cap was introduced with a green band for all arms, but both old and new types were worn alongside each other during the rest of the war. The field cap was worn extensively, both in the rear and front line areas, in all different shapes and styles. Interestingly it was commented by the Officer Commanding Sniper School in the British First Army area, how well the German field cap, with its floppy and uneven edges, blended in with its surroundings. (The first British caps were far larger and flatter on top, reflecting the light and hence attracting attention).
Notes from Sculptor – Judging by the height & position of steel helmet on head, I have guessed that the soldier is wearing his field cap underneath – not a too uncommon combination, which I have also seen on other photographs of this period.
Unofficial Scarf or Neck Cloth: May well have been acquired by himself locally and is tied with a knot at the front. Colour: judging by the original photograph, this could have been a green, red, brown or a grey shade, but seems slightly darker than the service dress tunic and neck band.
Neck Band / Einheitshalsbinde M1914: Hanging loosely, underneath the scarf is the neck band. Designed to soak up the sweat and at the same time keep the field service dress or overcoat collar clean. This was the replacement to the M1907 Neck Cloth, a square piece of material, which produced problems when the wearer was marching, actually causing the garment to tighten up around the neck. The neck band on the other hand was smaller and not unlike a detachable shirt collar, with a semi-circle apron of material attached underneath at the front.
Other Ranks Shirt / Hemd für Mannschaften: Looking at the original photograph of his open field tunic, one can make out a shirt and possibly a vest or similar garment underneath (on the bust, directly underneath the neck band). On the shirt collar and just visible is the small white horn button. At the beginning of the war, these shirts were issued in an off-white (or faded yellow tone). The photograph suggests a darker, maybe grey garment (this could have been a private shirt?).
Field Service Dress Tunic M1915 / Feldbluse M1915: This was to replace the early M1907/10 and the simplified M1914 service dress tunics. All three were in fact worn alongside each other throughout the war. The Bluse was a radical change in the design of combat clothing, with trials before the war and the new experience gained at the Front producing a garment without the unnecessary elements of the earlier tunics, giving the German soldier a completely different, in some cases baggy appearance. Designed for all arms of the service and for all ranks (officers were allowed to acquire the Bluse in a better quality of material, but were not permitted to show difference in colour from the other ranks).
Colour: made out of a field grey material (the Light Infantry units, or Jäger and Schützen wore a green-grey version). All units had the turn down collar in resedagrün reed-green, exception being the Bavarians, who retained the field-grey material, piped on the outer edge (later only the front, vertical edges) in the State colours white / blue Rautenborte, a particular feature of Bavarian troops. The six front horn buttons to the Feldbluse were normally hidden behind a flap – these had an off-white colour. On early version of the tunic, the small shoulder strap buttons were kept in brass, later these were painted over in various colours, ranging from green to grey.
Notes from Sculptor – On the shoulder straps I have raised the regimental numbers somewhat more than would normally be the case – this is to allow for an easier painting application. With a bit of care and a thin knife blade, it is possible to hollow out the gaps underneath and to the rear of both shoulder straps. Here one can use the back end of a sharp knife and scrape away the resin. There are also small casting webs underneath the ends of collar at front of tunic – these should be removed before painting.
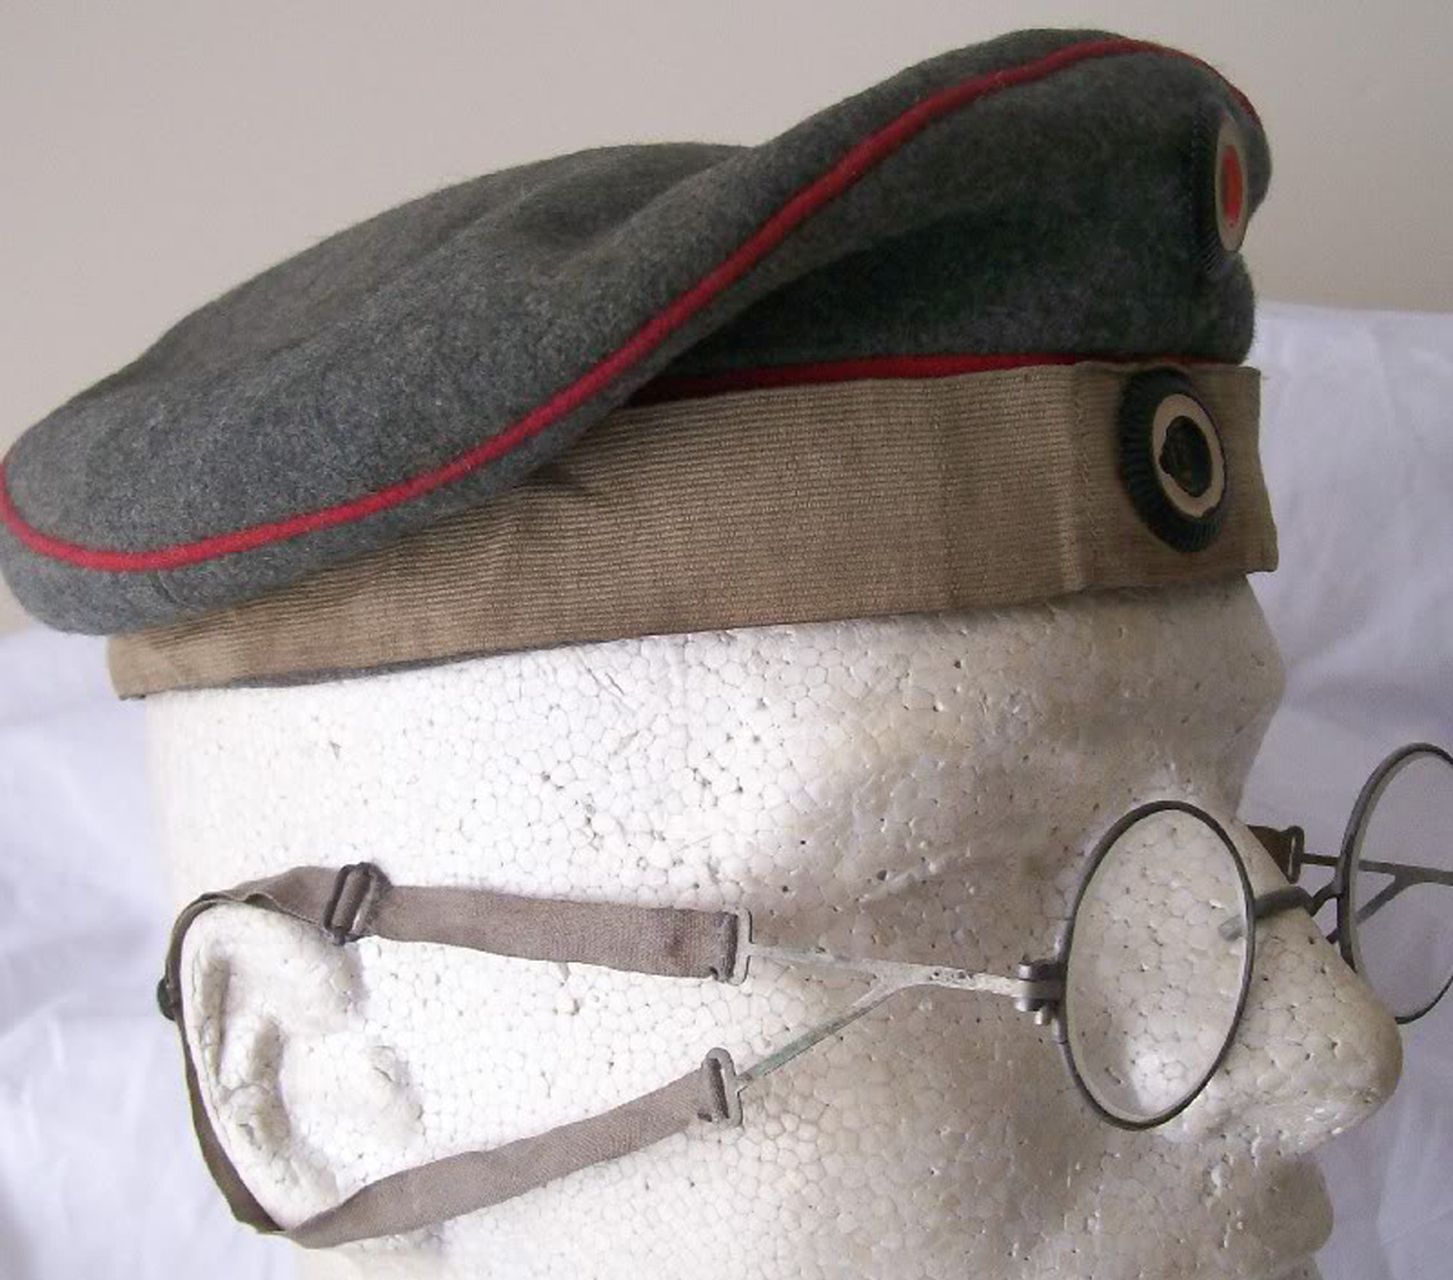
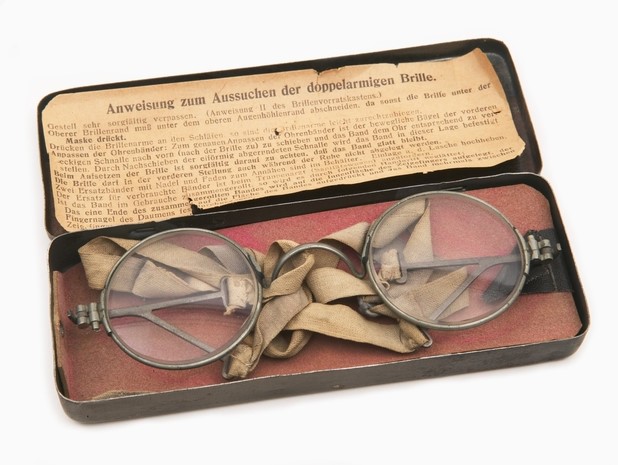
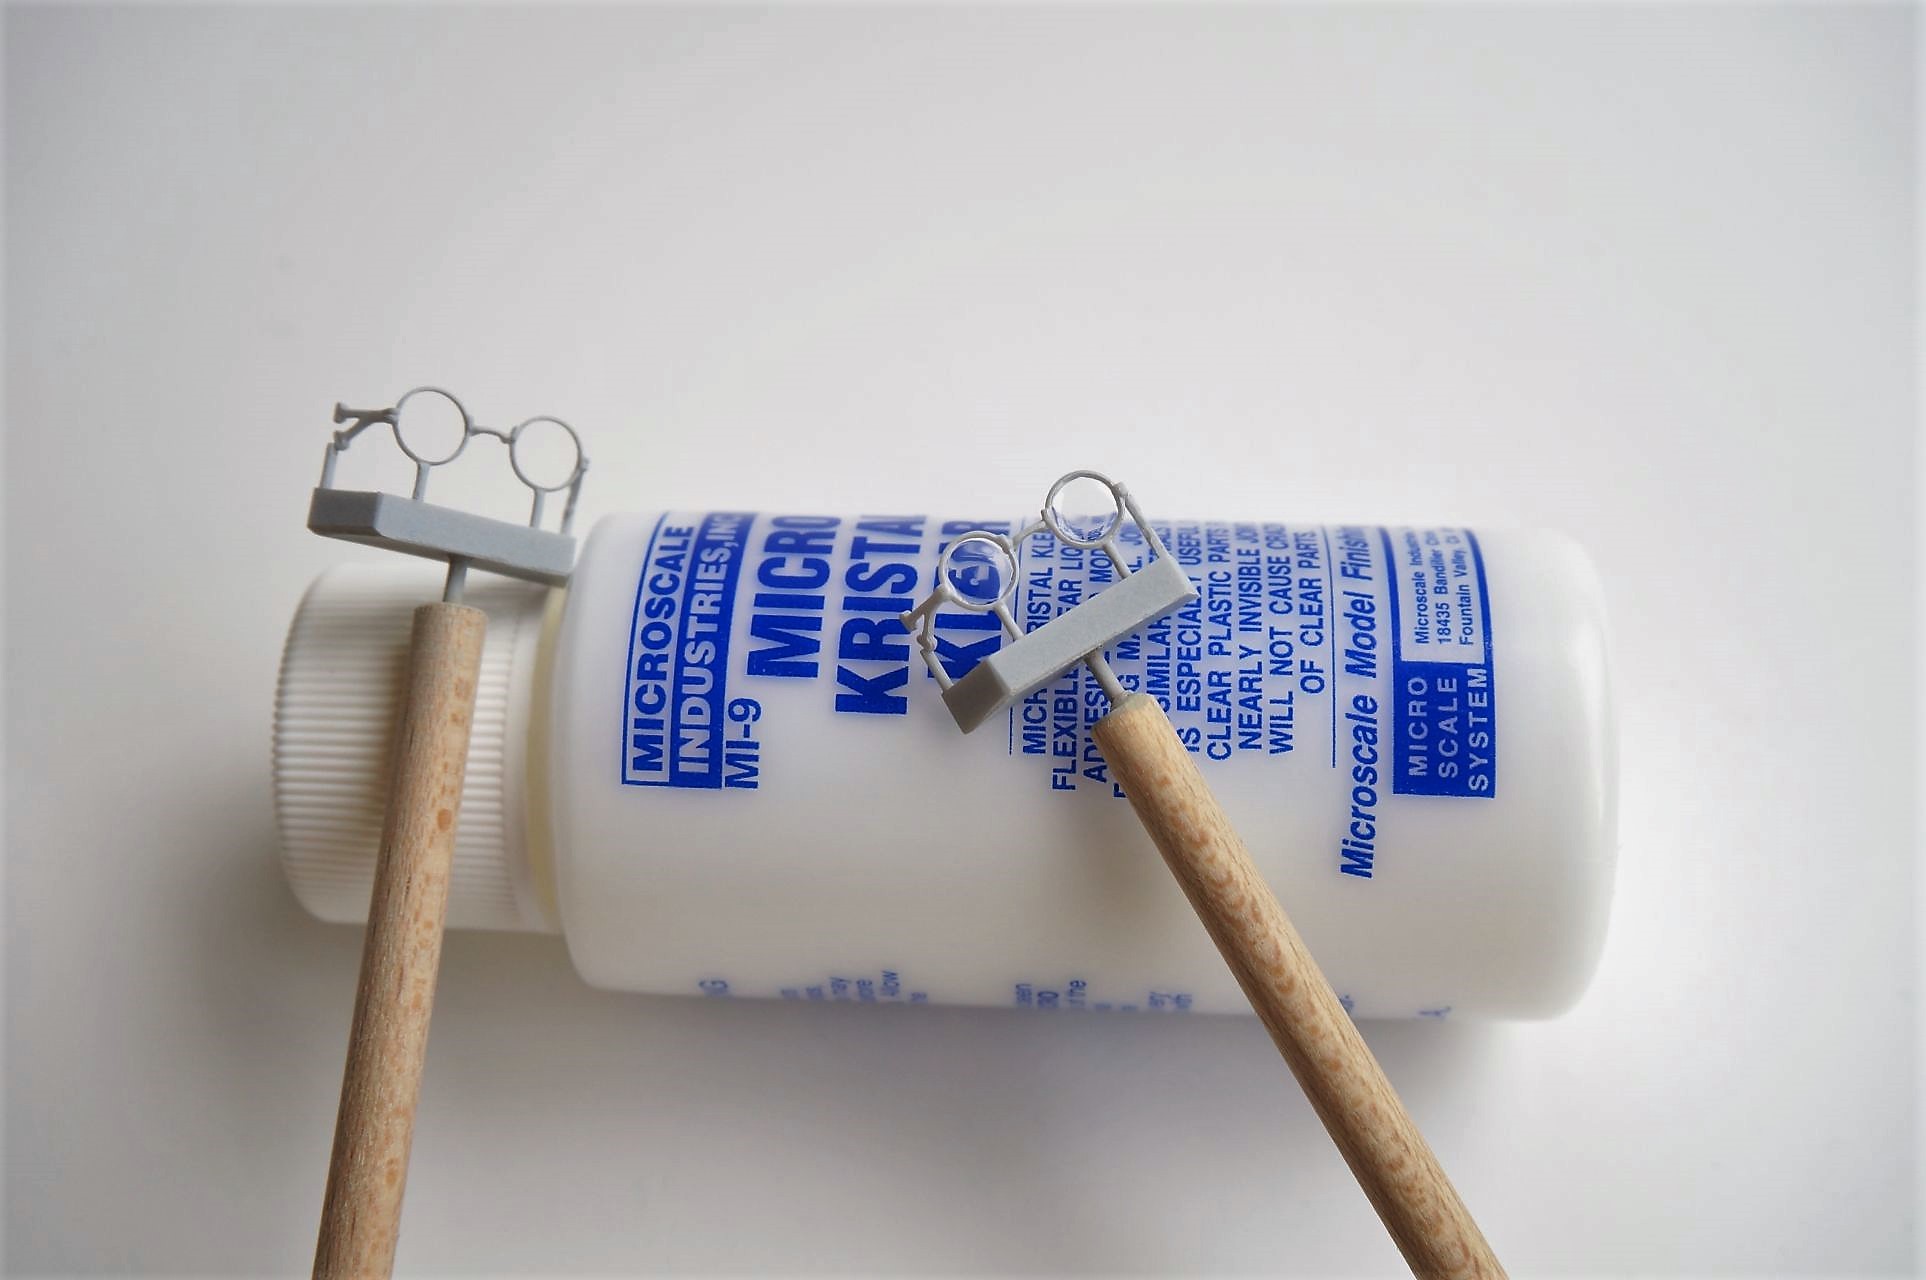
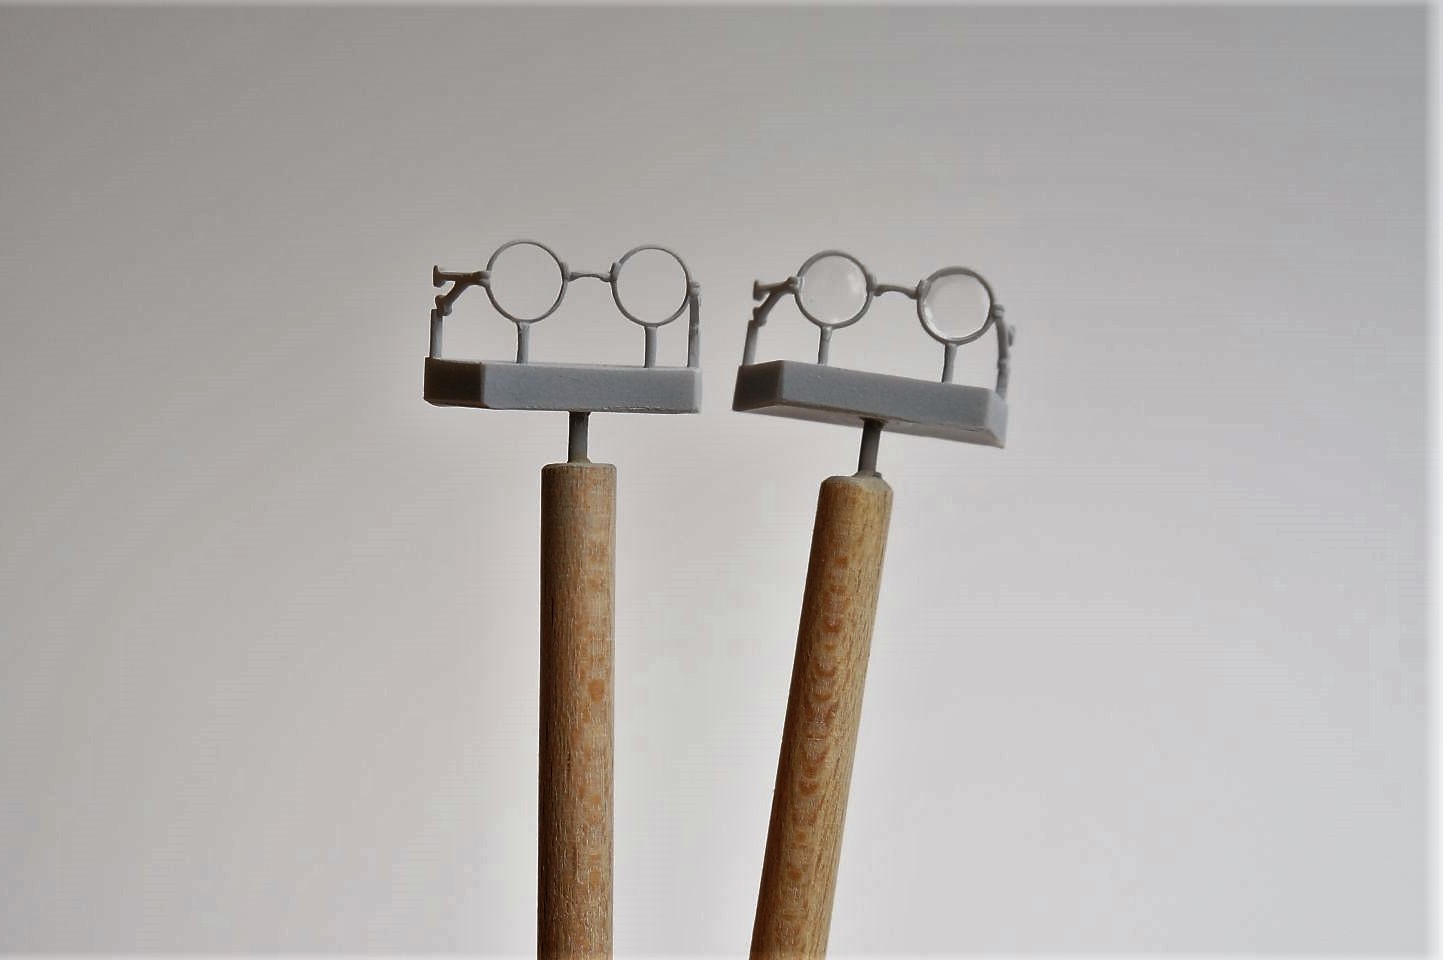
Gas Mask Spectacles / Gasmaskenbrille: The gas mask spectacles were specifically designed to be worn together with the mask and issued for front-line use to soldiers requiring vision aids. On the normal spectacles of the time, the side arms prevented the mask from fitting tightly against the face, allowing gas to enter. These glasses had short v-shaped double arms, hinged to the front, with adjustable cotton straps, which then looped around the ears securing the glasses in place.
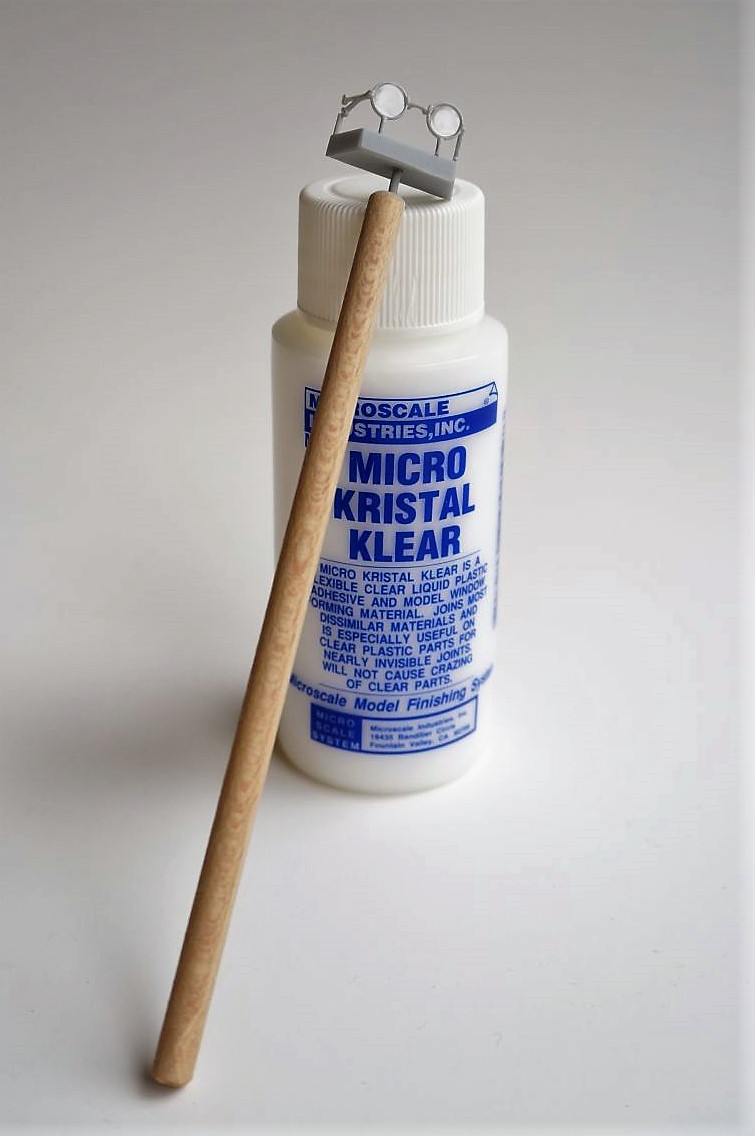
Notes from the Sculptor – I would suggest first mounting the glasses casting block on a small stick or similar, so as to avoid handling the top area. Remove the casting webs from within rings and v-shaped arms first, using a 0.5mm hand drill and a new light-weight (plastic) scalpel knife with a straight blade or similar. Final clean with fine sandpaper. Afterwards, remove the rest of web from underneath, leaving the 4 posts affixed to glasses. The 2 front posts under the rings can then be removed next after all traces of the casting web have been removed, making sure that the now free-hanging frame is supported by a finger when sanding. The glasses can now be painted / air-brushed.
It is also possible to add imitation glass lenses to the spectacles – here one could use Micro Kristal Klear to produce a clear film within the resin rings. I have added this to one of the spectacles below and left one without. The forward posts, directly under the rings would normally be removed beforehand – here I have left these on to increase support to these samples.
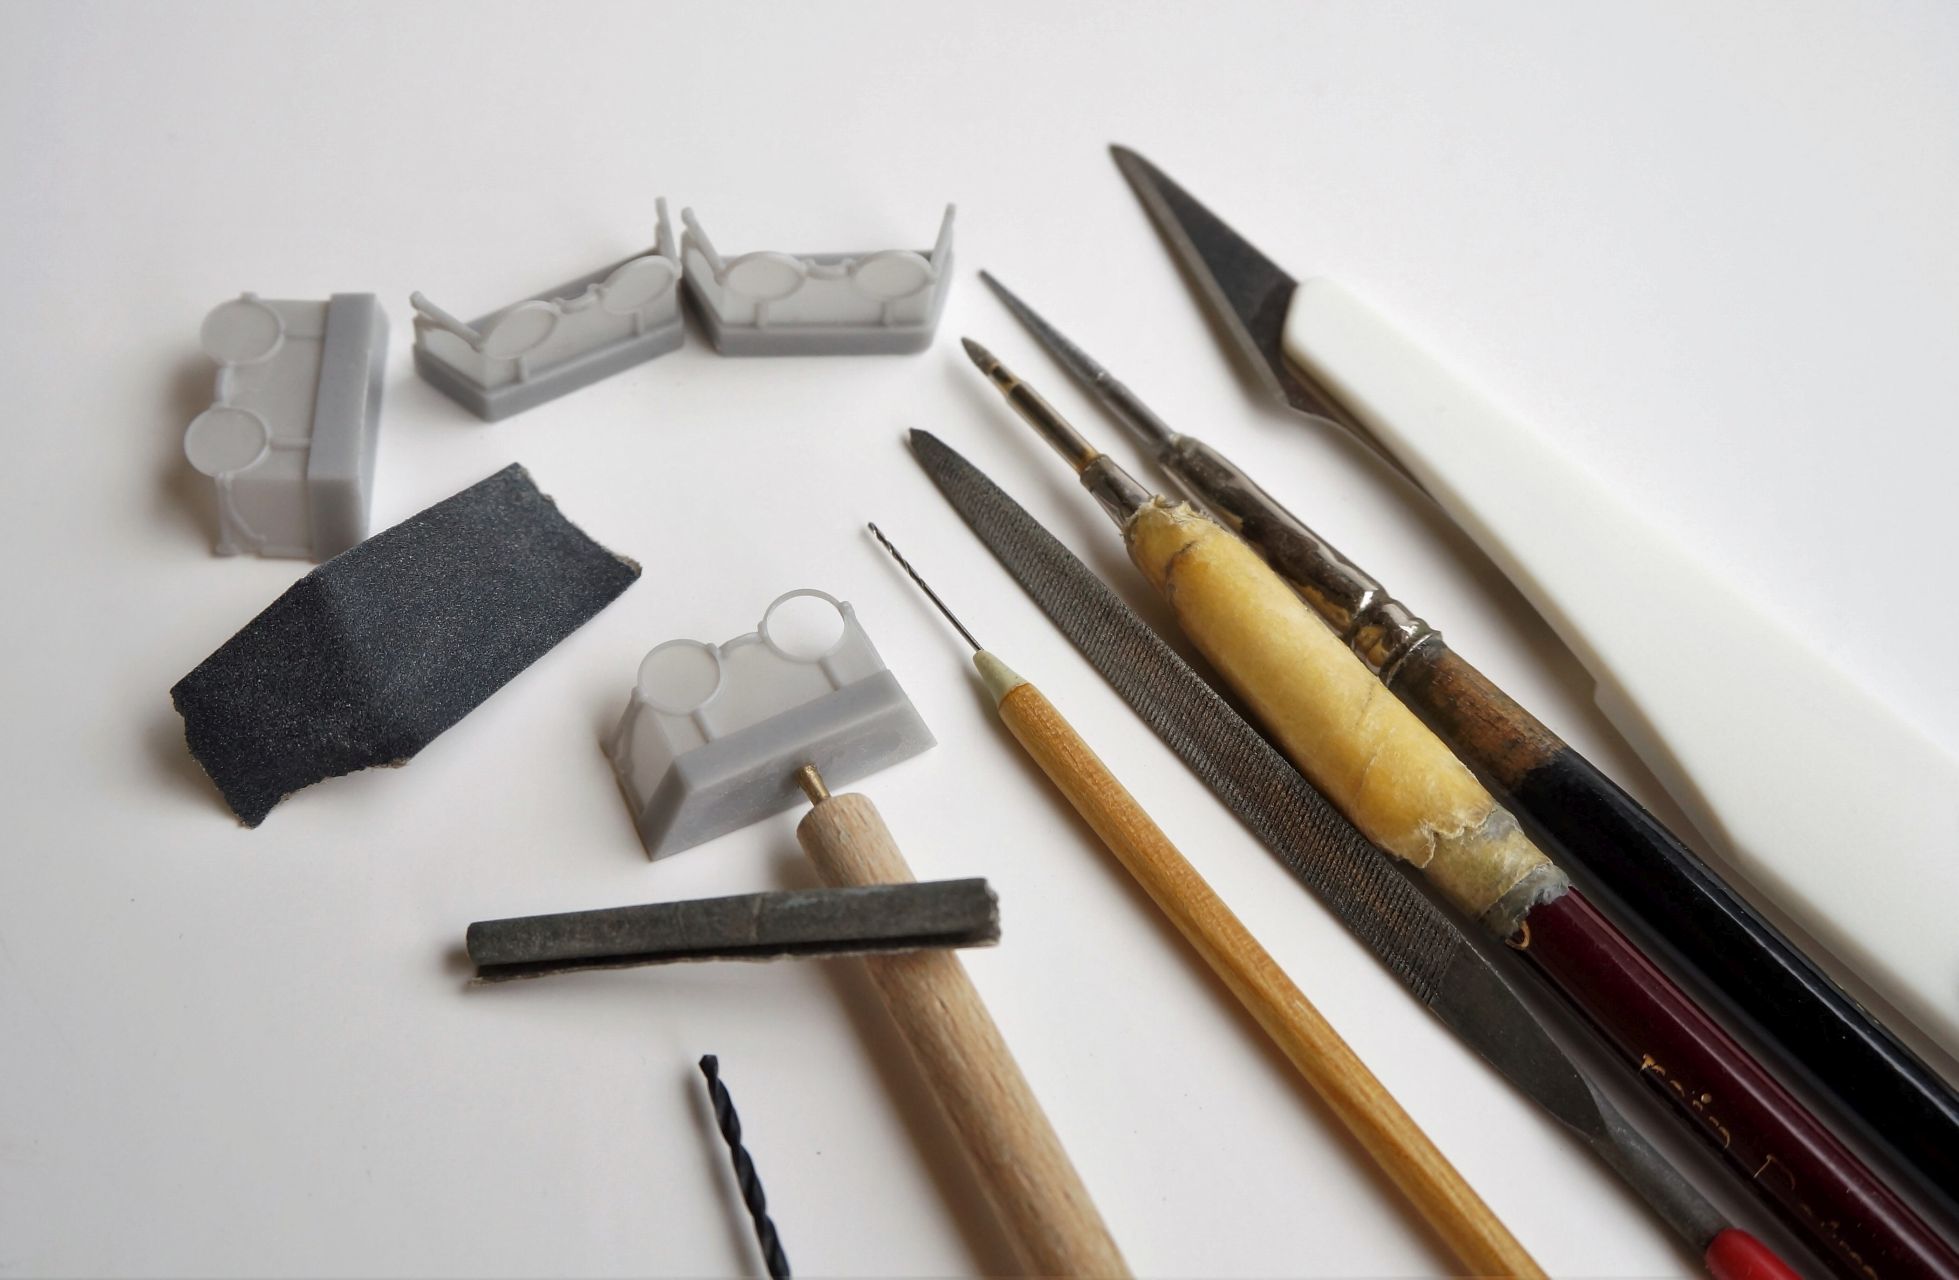
These are delicate items and I have made the V-shaped arms and nose connection part a little thicker than they would have normally been. One could thin-down these parts before the removal of casting web if required, but one should be extra careful not to break the arms off at the hinge areas. On the top 8 model photos at the beginning of this webpage, I thinned down the side V-shaped arms by carefully cutting / scraping down with the scalpel, after the spectacles were fixed to face.
Note: If extra glasses are required, then please contact me directly – I have spare sets.
Steel Helmet M16 / Stahlhelm M.16: This helmet, which first entered service in 1916 during the initial stages of the battle of Verdun was designed by Professor Friedrich Schwerd and made from high quality chrome-nickel steel. Weighing between 950 and 1200g, depending on size – heavier than the Allied helmets, but giving a better protection to the face, ears and neck. The horn venting bolts on each side enabled the fitting of an extra armoured shield over the helmet for sentries, MG troops, snipers or other particularly exposed / dangerous employment. This weighing around 2000g was seldom used; although a total of 50000 were supposedly produced.
Colour: first issued in field-grey, which would reflect in sun light and proved unsatisfactory. Various trials were carried out, but it was not until July 1918 that an official camouflage scheme in brown and green sharp-edged irregular patens, all outlined in black was introduced. These were carried out by unit maintenance workshops (other weapons and equipment, particularly artillery pieces and MGs were also rendered in the same way). It seems that helmets were re-painted by individuals or units in a variety of colour schemes before the official order and helmets with red-brown, ochre (brownish-yellow), green and blue-grey, all outlined in black were common. Helmets were also covered using the light brown sandbag material, or the issued helmet-covers, seen particularly in the later war period.
The M.17 & 18 helmets followed with only slight differences to the inside padding and chin strap fasteners. The last model to see service during the war, if only in small numbers was the M.18 Ohrenausschnitt, or Helmet M.18 with ear cut-outs, more commonly (and stubbornly) known as the Cavalry or Telegraph Helmet. The cut-outs were in fact a further design feature of the M.18 to improve the hearing ability of the wearer and avoid the hissing noise experienced by troops.
The vent bolts can be drilled out (just as in the original), using a 0.5mm hand drill, making sure that one comes out at the correct angle inside the helmet.
Chin Strap / Kinnriemen: The M16 helmet used the leather chin-straps, with brass slider buckles (later steel) originally supplied with the spiked helmets. These proved to be only partly suitable, as they would often become loose and slip down during wearing.
The chin strap will require a little adjustment / thinning down before fixing to helmet and head.
Tip: I thinned down the chin strap as far as possible, then fixed to the finished head & helmet. I then further thinned down the strap. This is not the ideal situation, especially when the head is already painted, but with a little care and repainting the outer parts of chin strap afterwards, one can achieve the best results and a realist look to this thin / fragile item.
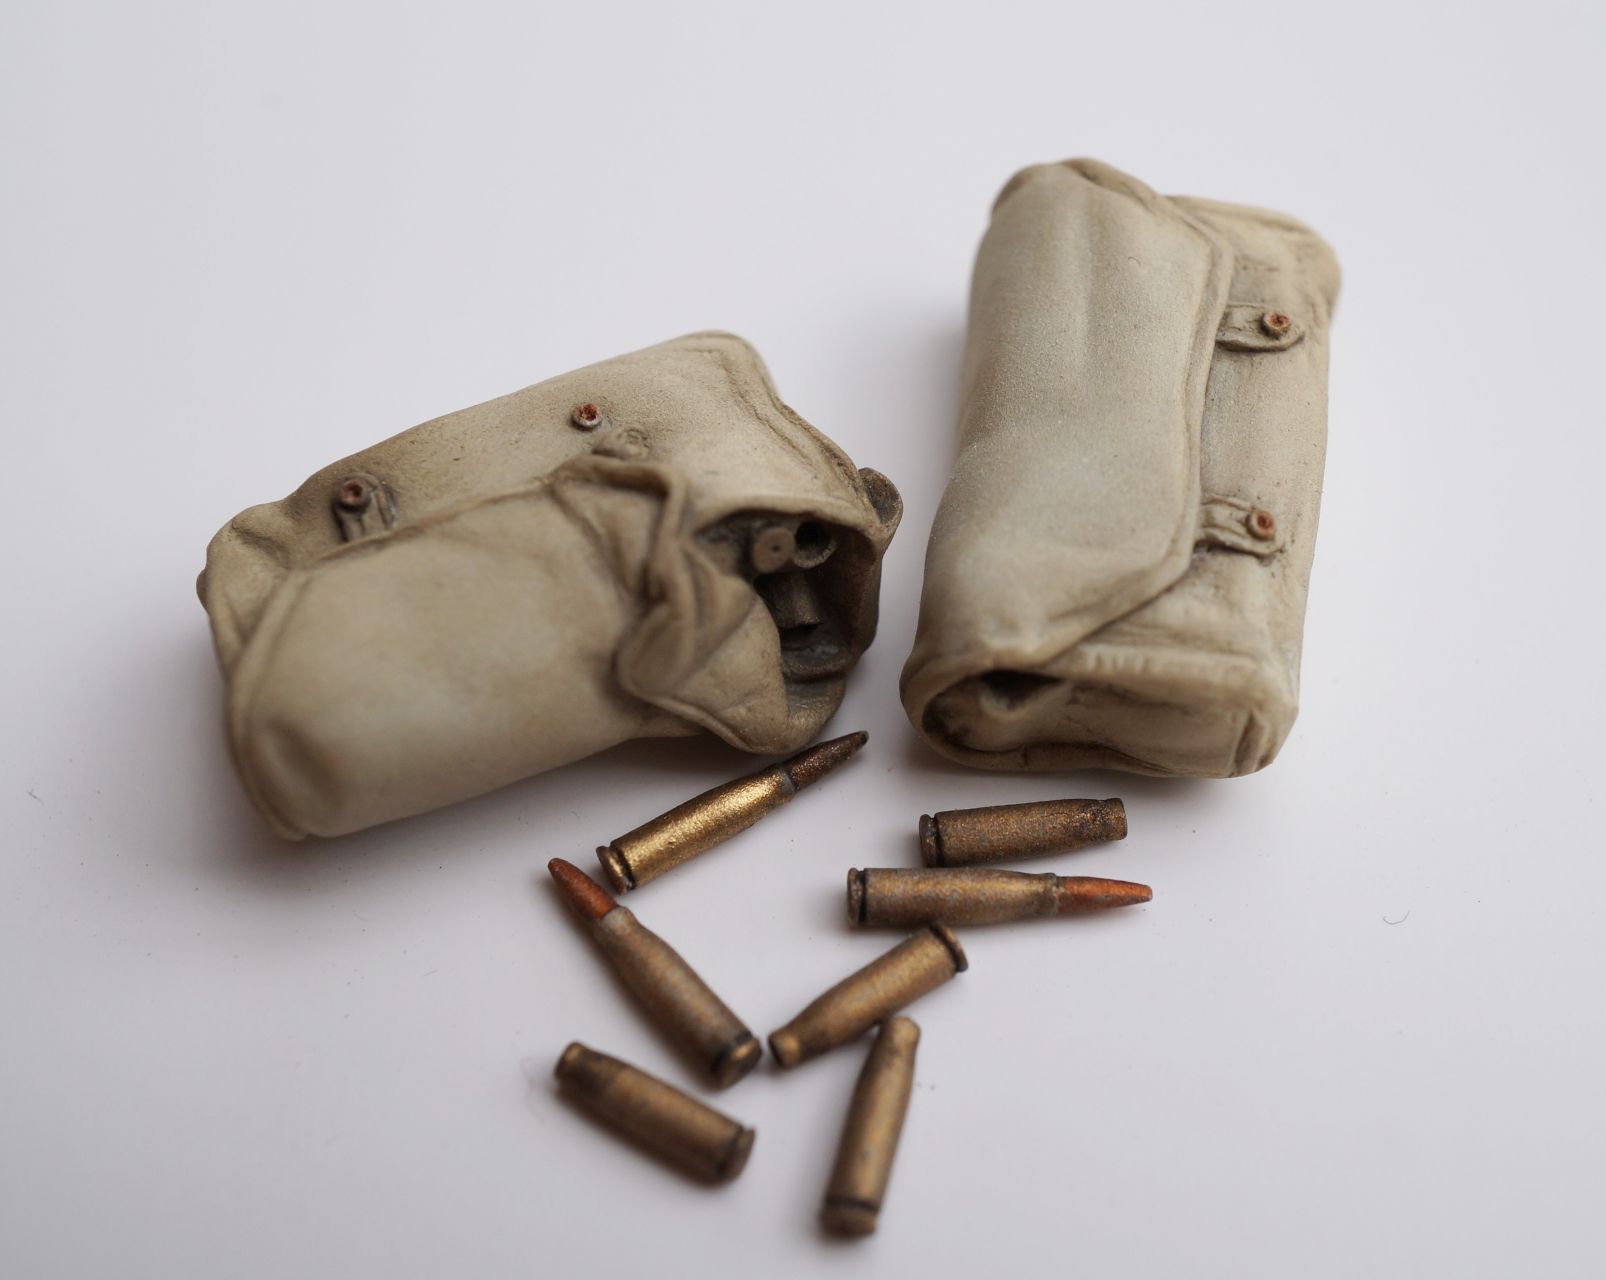
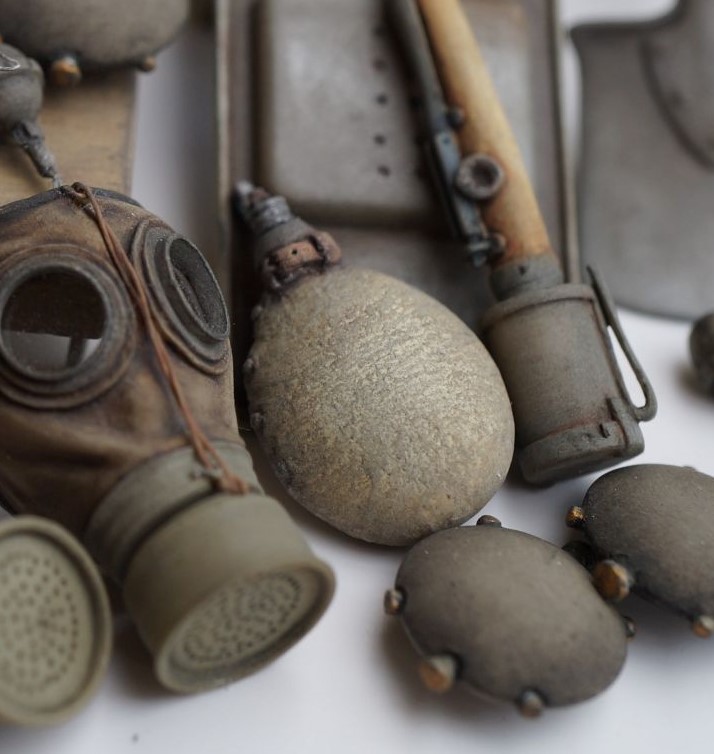
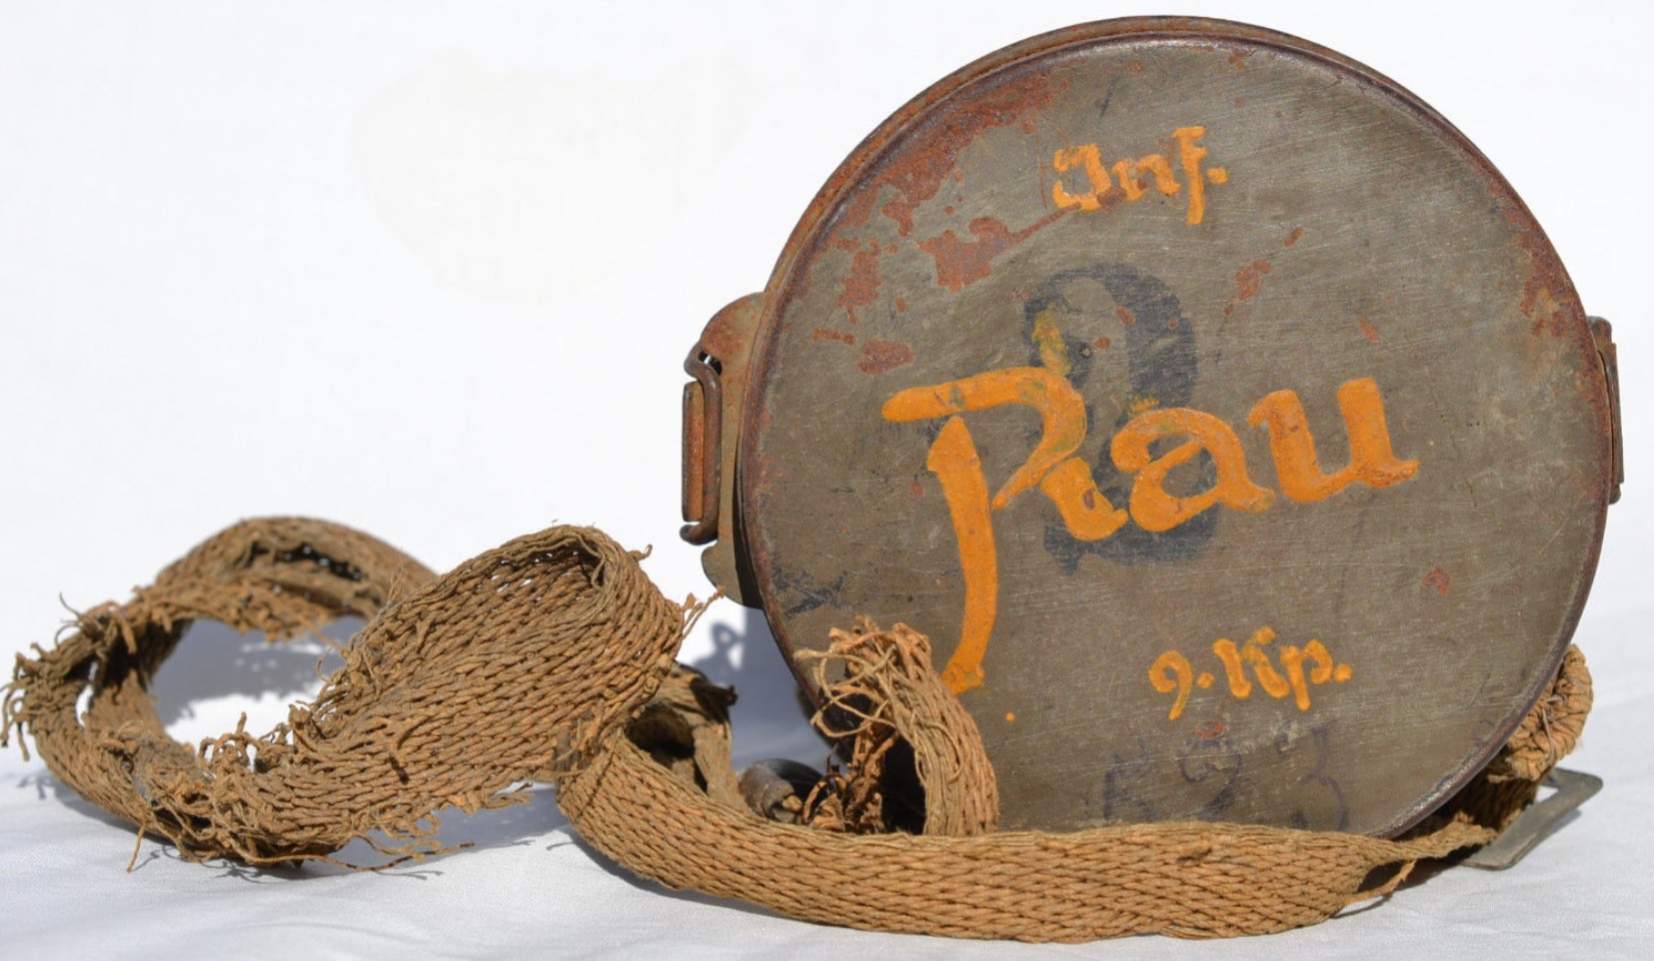
Water Bottle M1915/17 / Feldflasche M1915/17: The M15/17 Water Bottle was designed to replace the M07 version, produced now in tinned steel sheet and no longer in aluminium. The neck of the bottle was extended by approx. 3 cm and incorporated an indentation to allow for a better attachment of the leather harness. The cover was made from a field-grey, waterproofed cotton material, with 4 metal stud fasteners securing the slit at side. The snap-hook (carabiner) would normally be attached to the haversack belt loop ring fastener.
Note: Inside and in front of the snap-hook are casting webs – these should be removed before painting.
Gas Mask Tin M16 / Bereitschaftsbüchse M16: At the beginning of 1915, the early type gas masks were issued without any form of container or holder and were often placed within the haversack (bread bag) or in some cases kept in tins, which were fastened by string around the soldier’s neck. Later in 1915, the Canvas Gas Mask Holder, with dividing sections within was issued – Segeltuchtasche für Gasmaske M1915 – here the mask, filter unit and spare filter were kept in tins within and still had to be opened and attached when required. The holder was officially worn on the left side of belt, but is quite often seen at rear, next to the haversack.
In March 1916, the German War Ministry announced the distribution of a Gas Mask Tin, which held the ready for use mask with filter unit already attached. Until the issuing in sufficient numbers, the troops had to do with tins of different manufactures, including the existing canvas holders being modified to carry the mask with filter unit attached.
In June 1916 the Gas Mask Tin M16 / Bereitschaftsbüchse M16 was issued, together with a leather strap, later made from canvas for attachment around the neck. The bottom tin attachment loop could also be attached to a front tunic button, holding the tin in the standby position. If not in this position, the gas tin was kept as before within the canvas holder or slung around the back. Within the tin, the mask could be kept with filter unit attached and ready for use. The gas tins were used until the end of the war, but parallel the new and slightly higher M17 tins were being issued from mid-1917.
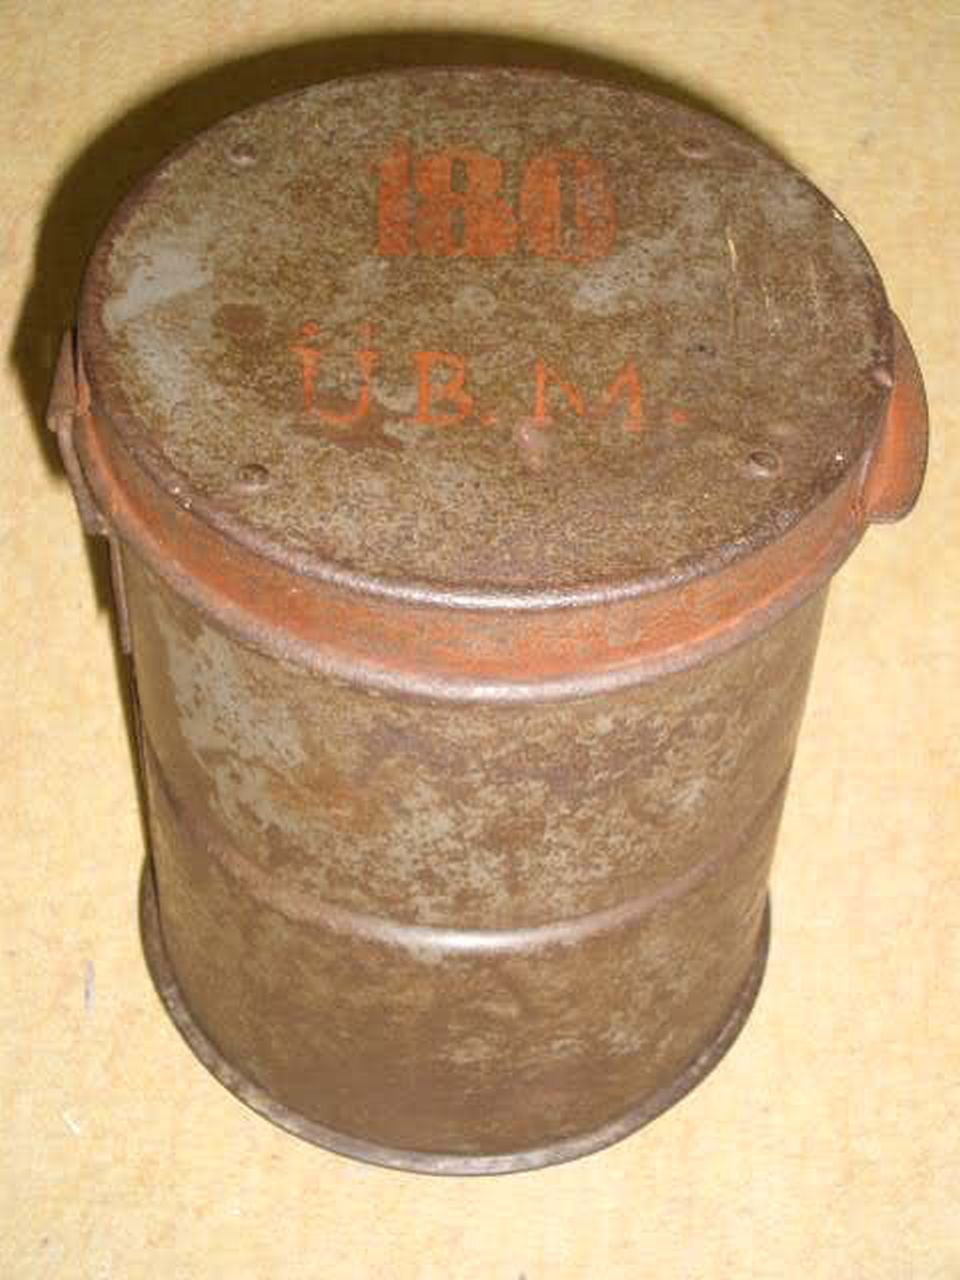
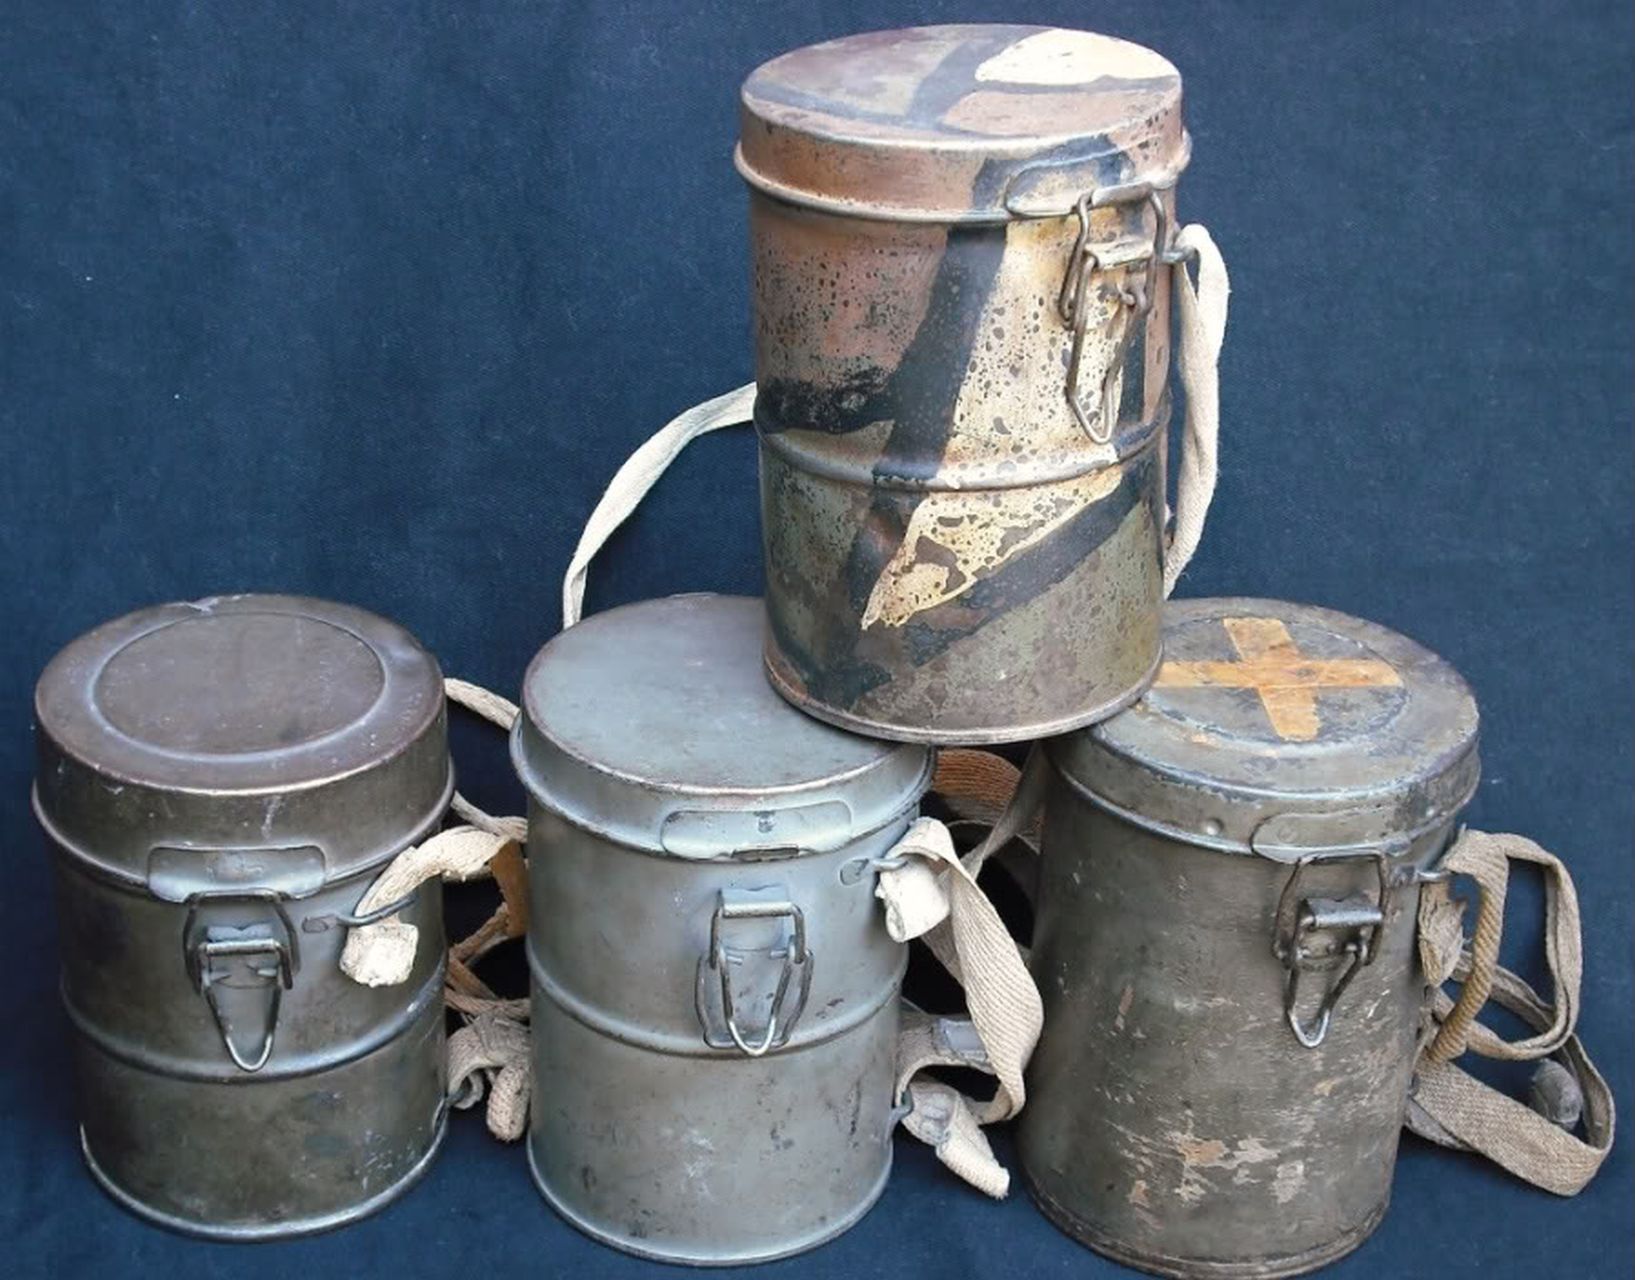
Colour: original items show a diversity of colours used on these tins, ranging from field-grey to dark or Khaki-green. The marking of these tins with owner’s name or unit etc. is seen now and then, particularly on the lid. Below are different examples of M16 and M17 tins. The tin with 180 ÜB.M. in red could mean Übungsmaske – Practice mask (?).
Brass Tube: The 6mm buffed diameter brass tube supplied is to mount the bust to a suitable stand. Under the bust, an appropriate hole has been modelled in a middle / forward position to allow the figure to be displayed. The hole will require to be drilled further into bust and is slightly larger than 6mm – this is to allow for a choice of positions / angles as required.
Notes from the Sculptor
I have attempted to produce a bust which is not only historically correct, but also fun to build and challenging to paint. The reproduction of the gas mask glasses in miniature and the muddle of neck cloth, neck band and shirt around the open collar, were just 2 of the more tricky areas to solve. Help has been given to me as always by WW1 collectors, enthusiast and modelling friends, not only on uniform and equipment research, but also in identifying the German units fighting in this particular area and time of the Passchendaele battles during 1917.
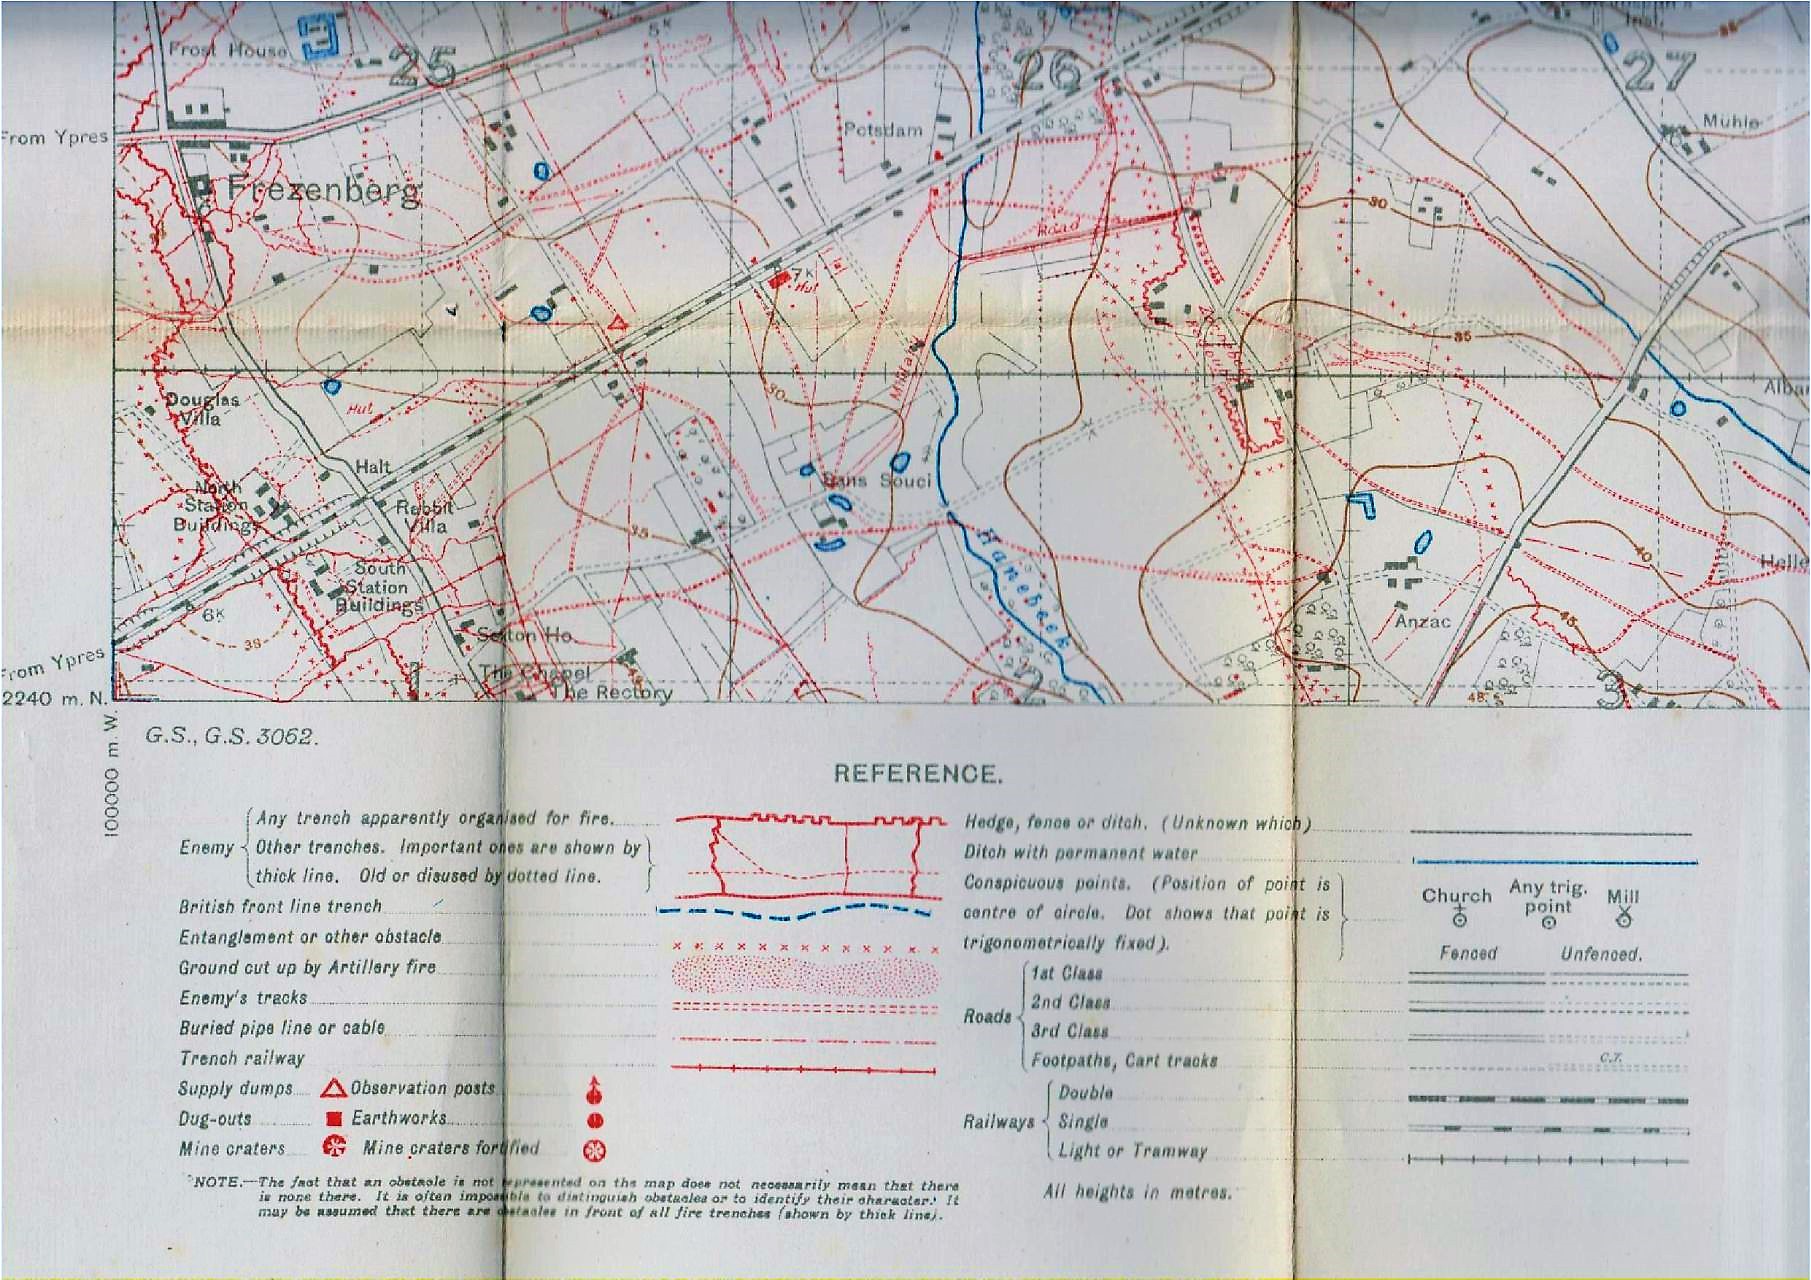
A Personal Touch
A personal touch to this bust is that during my research I came across the area of capture on one of my Grandfather’s trench maps. He served as an artillery officer on the Western Front and is the JSM logo. The town of Passchendaele is in the top right corner of the second photo, Vampire Farm (Vampir) at bottom left.

![]()
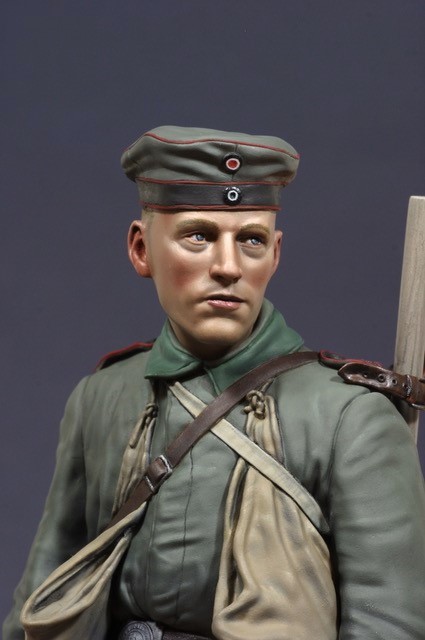
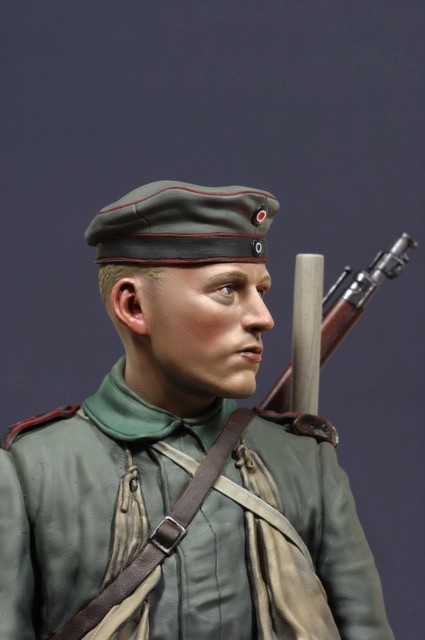
Above are the painted bust photos from David Lane


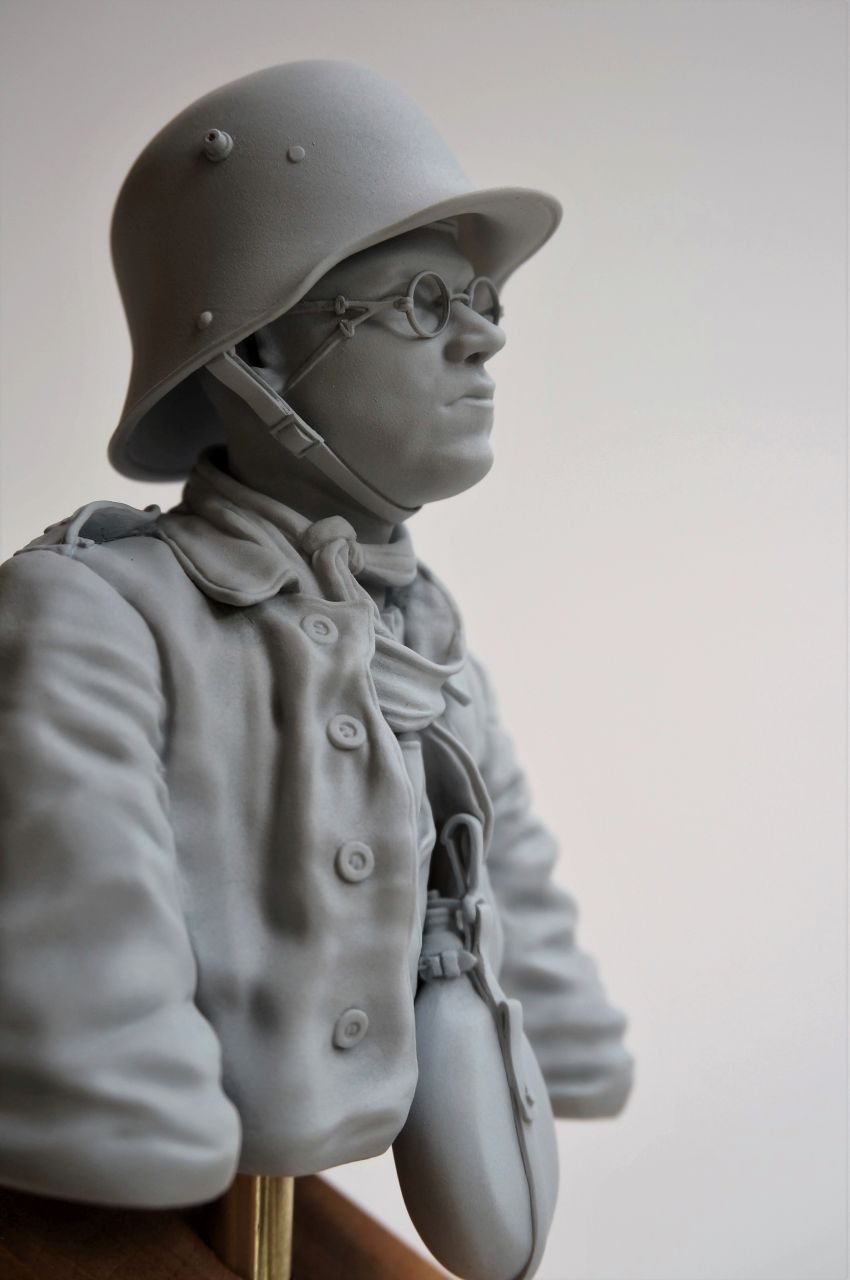
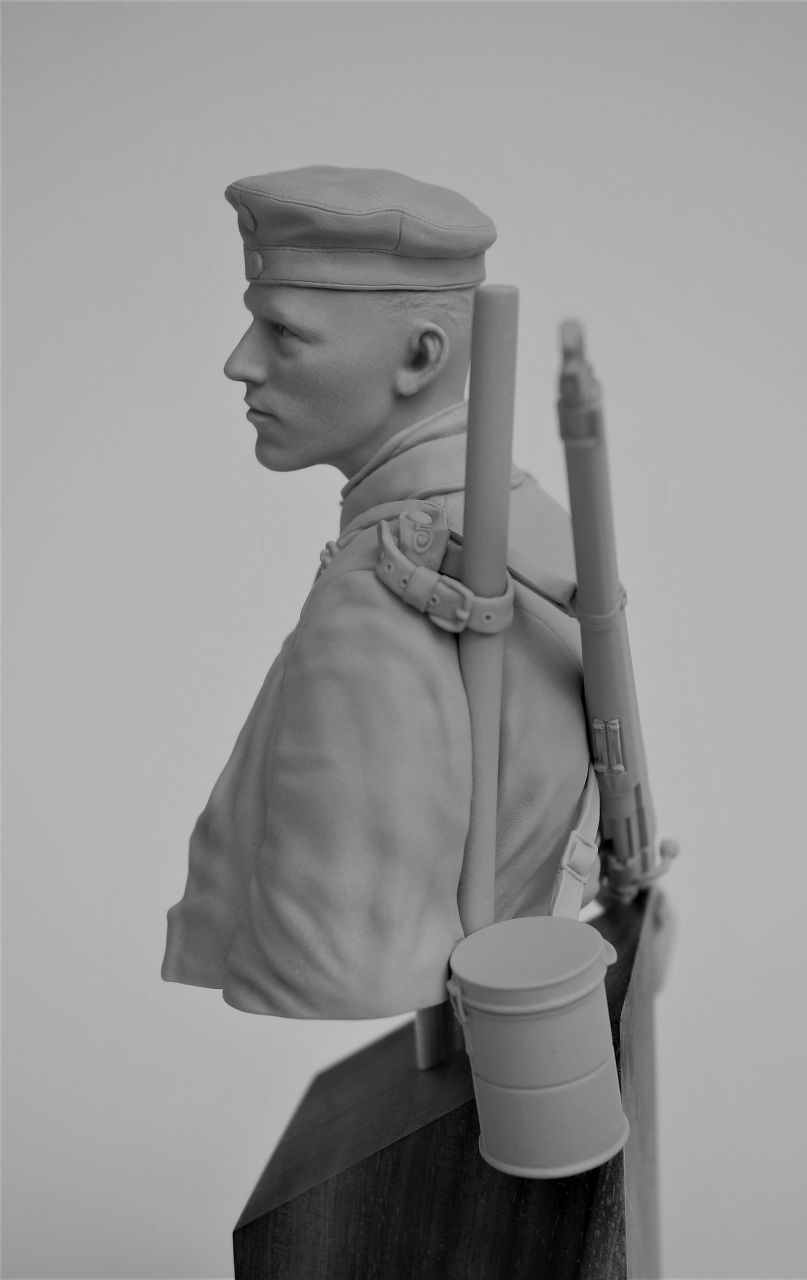
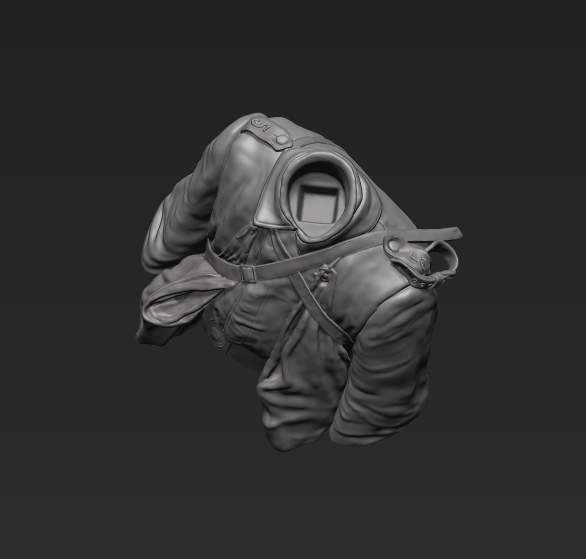
The photos above are of the actual parts within kit and the assembled resin bust, showing the alternative heads supplied. The photos below are snapshots from the 3D program used to create the master figure

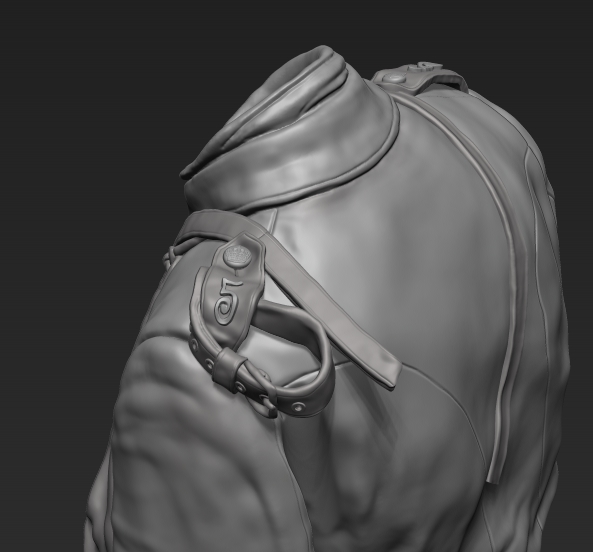
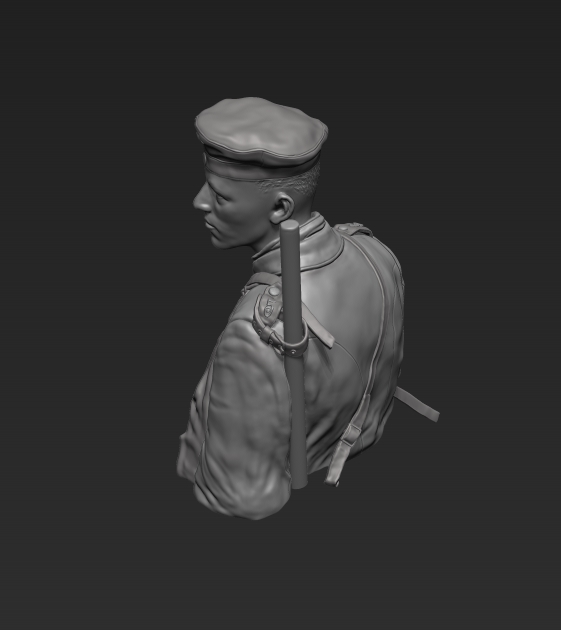
German Sapper Sturm-Btl. Nr. 5 (Rohr), 1916 – Dt. Pionier, Sturm-Btl. Nr. 5 (Rohr) 1916
- Scale / Maßstab: 1/10th
- Approx. height of bust / ca. Höhe Büste: 65mm
- Material: Resin (bust), 6mm Brass Tube (for bust mount) / Resin (Büste), 6mm Messing-Rohr (für Sockel montieren)
- Parts / Teile: 16
- Infosheet / Infoblatt: English
- Code / Artikel-Nr.: 31BST
- Attention: Not a toy. Model kit or model making accessories – not suitable for children under 14 years of age. / Achtung: Kein Spielzeug. Modellbauzubehör – nicht für Kinder unter 14 Jahren geeignet
GPSR Data / Angaben
- Manufacturer / Hersteller: Jon Smith Modellbau
- Responsible Person / Verantwortliche Person
- Address: Hannoverstr. 68, 29664 Walsrode, Germany
- Contact / Kontakt: info@jonsmith-modellbau.com
- Tel: +49 (0)5161 8255
Contents Bust / Inhalt Büste:
- Upper Body / Oberkörper
- Head for Helmet / Kopf für Stahlhelm
- 2nd Alternative Head with Prussian Field Cap M1910 / 2. Alternativ-Kopf mit Preußische Feldmütze für Mannschaften M1910
- Steel Helmet M1916 / Stahlhelm M1916
- Chin Strap / Kinnriemen
- 2 x Grenade Bags / 2 Stck. Tragebeutel für Handgranaten
- Gas Mask Tin M16 (early version) / Bereitschaftsbüchse M16 (alte Art)
- Gas Mask Tin Strap Section / Bereitschaftsbüchse-Riemen
- Pioneer Pickaxe (shaft only) / Pionier Kreuzhacke (nur Stiel)
- Utility Strap for Pickaxe Shaft / Riemen für Kreuzhacke Stiel
- Mauser Carbine 98 AZ with Muzzle Protector (now in 2 parts) / Mauserkarabiner 98 AZ mit Mündungsschoner (jetzt in 2 Teile)
- 2 x Sling Sections for 98 AZ / 2 Stck. Riemen für 98AZ
- 6mm Brass Tube (for bust mount) / 6mm Messing-Rohr (für Sockel montieren)
About this Bust
The bust depicts a young sapper of a German Pioneer unit, in this case the famous Storm Battalion No. 5 (Rohr). This experimental training unit, founded by Major Calsow in the spring of 1915 and later commanded by Hauptman Willy Rohr, formed the nucleus of the new infiltration assault tactics. Equipped with infantry support guns and large body shields, the originally named Sturmabteilung Calsow or SA Calsow was ordered to the front in June 1915 to counter an Allied attack, losing half its members by the time the unit was withdrawn from the front. Calsow was relieved of his command and Hauptmann Rohr took over the detachment from September, adding an MG and flame thrower platoon to the unit strength.
Now promoted, Major Rohr refined the unit’s tactics, discarding the heavy body shields in favour of speed and movement and replacing the cumbersome infantry support guns with new developed models, converted from captured Russian 76.2 fortress guns. The new assault tactics now employed, involved much smaller, independent squads, or Stoßtruppen, supported by heavier weapons, infiltrating the weaker areas within the enemy defences and bypassing strongpoints, to be cleared later by regular trooper. Enemy trench system would now be cleared (or rolled up) by Stormtroopers armed with stick grenades, protected by their own riflemen.
The new tactics called for a different approach to weapons and equipment. Shorter, more practical weapons were employed, such as carbines, pistols, clubs and trench-knifes. Assault equipment was reduced to the absolute minimum required and grenades, ammunition, water and entrenching tools were increased. A rational change in uniform took place, with lighter, ankle-length footwear, loose and simplified tunics being issued, allowing the officers and NCO to become undistinguishable from other troops.
As from December 1915, the battalion started training troops from other units and in February 1916 was transferred to the 5th Army and participated in the initial attacks in the Verdun offensive, leading other assault formations in the first wave. In April 1916, the detachment was increased from 2 to 4 pioneer companies and received the official name Sturm-Bataillon.
Attacks by these Stormtroopers were generally carried out by small units, rarely larger than battalion size. Meticulous planning after local reconnaissance, incl. the aid and reconstruction of life-size enemy defences behind the front, were characteristic of how these units worked.
Overlooked by many historians, is the objection against these Stormtrooper-Detachments amongst their own regular infantry regiments holding the front line. The Stormtroopers would show up for an attack and then move out of the area quickly again afterwards, at latest the next day, leaving behind an agitated enemy desiring revenge.
Extracts from the Infosheet with this Bust:
The German Soldier of 1917 and 1918. The German soldier in 1917/18 had changed somewhat from his comrades of 1914. Firstly, he would have been much younger – on average about 18/19 years of age after finishing training – NCOs a year or two older. His hair would have been kept cropped and as short as possible. The style of his uniform differed not only in quality but functionality as well, with many items of clothing and equipment produced in Ersatz material, or a combination of mixed dress. Infantry companies within the Front Line areas numbered on averaged 75 – 80 soldiers, some as low as 50 (a full company strength would be around 135 men), with the bulk of its fighting capacity and experience held by only 15 – 20 old sweats. As the war progressed more emphasis was put onto automatic weapons and as many as 4 MG 08/15s per Infantry Company were issued.
Field Service Dress Tunic M1915 / Feldbluse M1915: This was to replace the early M1907/10 and the simplified M1914 service dress tunics. All three were in fact worn alongside each other throughout the war. The Bluse was a radical change in the design of combat clothing, with trials before the war and the new experience gained at the Front producing a garment without the unnecessary elements of the earlier tunics, giving the German soldier a completely different, in some cases baggy appearance. Designed for all arms of the service and for all ranks (officers were allowed to acquire the Bluse in a better quality of material, but were not permitted to show difference in colour from the other ranks).
Colour: made out of a field grey material (the Light Infantry units, or Jäger and Schützen wore a green-grey version). All units had the turn down collar in resedagrün reed-green, exception being the Bavarians, who retained the field-grey material, piped on the outer edge (later only the front, vertical edges) in the State colours white / blue Rautenborte, a particular feature of Bavarian troops. The six front horn buttons to the Feldbluse were hidden behind a flap – these had an off-white colour. On early version of the tunic, the small shoulder strap buttons were kept in brass, later these were painted over in various colours, ranging from green to grey.


On the shoulder straps I have raised the battalion numbers somewhat more than would normally be the case – this is to allow for an easier painting application. With a bit of care and a thin knife blade, it is possible to hollow out the gaps underneath and to the rear of both shoulder straps. Here one can use the back end of a sharp knife and scrape away the resin. There is an additional small casting web underneath the end of collar at front of tunic – this should be removed before painting.
Belt M1895 / Koppel M1895: The original belts were issued in natural brown leather, the buckle in brass with a Neusilber / nickel silver inlay. From 1915, leather equipment was officially issued blackened, buckles painted over in grey or manufactured in steel with a grey finish.
I have designed the bust with the Prussian State emblem buckle – a crown and motto GOTT MIT UNS. The belt on the original photo seems slightly off-centre, with the buckle moved around to the right. That this is a Prussian soldier is indicated by the crown shown on the open tunic pocket button (not shown on bust).
Steel Helmet M16 / Stahlhelm M.16: This helmet, which first entered service in 1916 during the initial stages of the battle of Verdun was designed by Professor Friedrich Schwerd and made from high quality chrome-nickel steel. Weighing between 950 and 1200g, depending on size – heavier than the Allied helmets, but giving a better protection to the face, ears and neck. The horn venting bolts on each side enabled the fitting of an extra armoured shield over the helmet for sentries, MG troops, snipers or other particularly exposed / dangerous employment. This weighing around 2000g was seldom used; although a total of 50000 were supposedly produced.
Colour: first issued in field-grey, which would reflect in sun light and proved unsatisfactory. Various trials were carried out, but it was not until July 1918 that an official camouflage scheme in brown and green sharp-edged irregular patens, all outlined in black was introduced. These were carried out by unit maintenance workshops (other weapons and equipment, particularly artillery pieces and MGs were also rendered in the same way). It seems that helmets were re-painted by individuals or units in a variety of colour schemes before the official order and helmets with red-brown, ochre (brownish-yellow), green and blue-grey, all outlined in black were common. Helmets were also covered using the light brown sandbag material, or the issued helmet-covers, seen particularly in the later war period.
The M.17 & 18 helmets followed with only slight differences to the inside padding and chin strap fasteners. The last model to see service during the war, if only in small numbers was the M.18 Ohrenausschnitt, or Helmet M.18 with ear cut-outs, more commonly (and stubbornly) known as the Cavalry or Telegraph Helmet. The cut-outs were in fact a further design feature of the M.18 to improve the hearing ability of the wearer and avoid the hissing noise experienced by troops.
The vent bolts can be drilled out (just as in the original), using a 0.5mm hand drill, making sure that one comes out at the correct angle inside the helmet.
Chin Strap / Kinnriemen: The M16 helmet used the leather chin-straps, with brass slider buckles (later steel) originally supplied with the spiked helmets. These proved to be only partly suitable, as they would often become loose and slip down during wearing.
Gas Mask Tin M16 (early version) / Bereitschaftsbüchse M16 (alte Art): At the beginning of 1915, the early type gas masks were issued without any form of container or holder and were often placed within the haversack (bread bag) or in some cases kept in tins, which were fastened by string around the soldier’s neck. Later in 1915, the Canvas Gas Mask Holder, with dividing sections within was issued – Segeltuchtasche für Gasmaske M1915 – here the mask, filter unit and spare filter were kept in tins within and still had to be opened and attached when required. The holder was officially worn on the left side of belt, but is quite often seen at rear, next to the haversack.
In March 1916, the German War Ministry announced the distribution of a Gas Mask Tin, which held the ready for use mask with filter unit already attached. Until the issuing in sufficient numbers, the troops had to do with tins of different manufactures, including the existing canvas holders being modified to carry the mask with filter unit attached.
In June 1916 the Gas Mask Tin M16 / Bereitschaftsbüchse M16 was issued, together with a leather strap, later made from canvas for attachment around the neck. The bottom tin attachment loop could also be attached to a front tunic button, holding the tin in the standby position. If not in this position, the gas tin was kept as before within the canvas holder or slung around the back. Within the tin, the mask could be kept with filter unit attached and ready for use. The gas tins were used until the end of the war, but parallel the new and slightly higher M17 tins were being issued from mid-1917.
Colour: original items show a diversity of colours used on these tins, ranging from field-grey to dark or Khaki-green.
Studying the original photo, one notices that the gas tin is of a different version than the normal M16 types shown in many uniform / equipment books on this subject. This tin however seems not to be that uncommon when examining photos from this period. The main differences compared to the standard versions are the larger size, inward middle support or strengthening indentation (rather than outwards) and the simple hinge and fastening method.
On the model tin there is a seam running from top to bottom on the side – this is the overlap join when the tin was manufactured, distinctive on the original items. The area behind the 3 strap attachments has been filled out slightly for casting reasons – this can be removed if required. The position of the tin on outer, lower edge of bust means that it has little support on its own. I would suggest pinning this item to bust body for added adhesion.
Mauser Carbine 98 AZ / Mauserkarabiner 98 AZ: (more commonly known as the Kar. 98 AZ) AZ stands for Aufplanz- und Zusammensetzvorrichtung – or stacking hook – one could stand the carbines up in 3s linked to each other by means of the metal hook, at the end of the barrel. Although designated as a 2nd line weapon, designed for support troops, cavalry etc., many did end up being issued to Stormtrooper units. The Carbine 98 AZ, which was shorter and therefore easier to handle than the standard issued Gewehr 98 rifle used by the infantry proved just as useful. They both had about the same performance within the reduced ranges of trench warfare. A further advantage over the Gewher 98 was that the turn-downed bolt folded against the stock of the carbine with an added undercut into the wood, therefore reducing the danger of being snagged on uniforms and equipment etc. The bolt handle also had a chequered under surface to increase grip. The side-slug sling attachment allowed for a better handling when one was using their hands (cavalry, artillery) and not just marching.
Some examples of the Kar. 98 AZ show the indented finger grooves on the stock – these were a war-time modification, still seen on many of the post-war carbines, now found in museums and with collectors.
Unmistakable on the original photo is the muzzle protector attached to the end of carbine barrel, in front of the foresight. The front of the protector had a hinged cap, which could be lifted upwards if required in a hurry.
Brass Tube: The 6mm buffed diameter brass tube supplied is to mount the bust to a suitable stand. Under the bust, an appropriate hole has been modelled in a middle / forward position to allow the figure to be displayed. The hole will require to be drilled further into bust and is slightly larger than 6mm – this is to allow for a choice of positions / angles as required.
The photos below are snapshots from the 3D program used to create the master figure


And the painted version by David Lane:


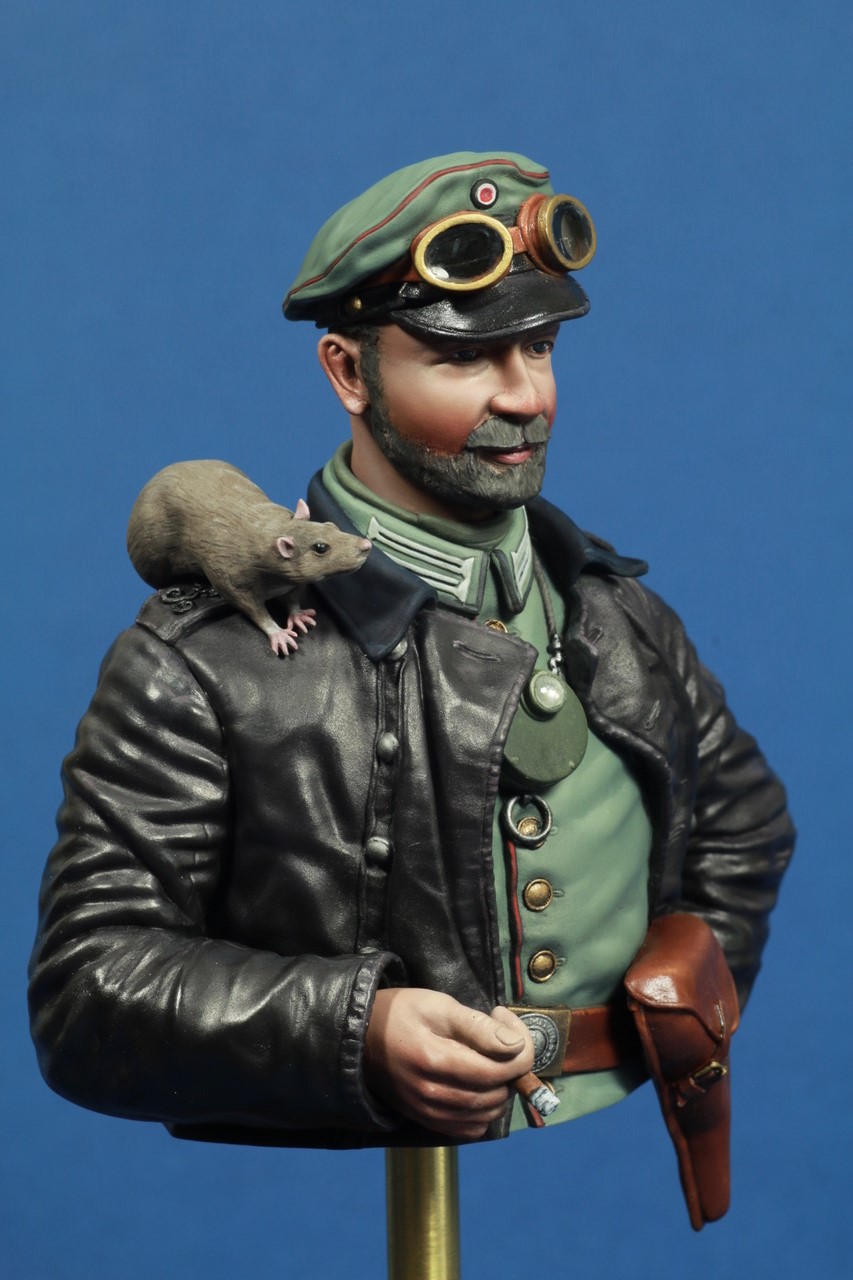
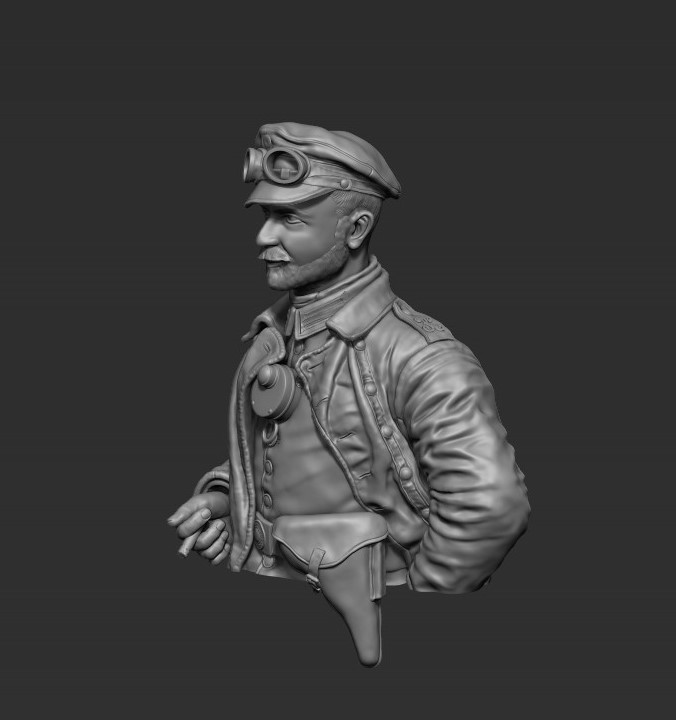
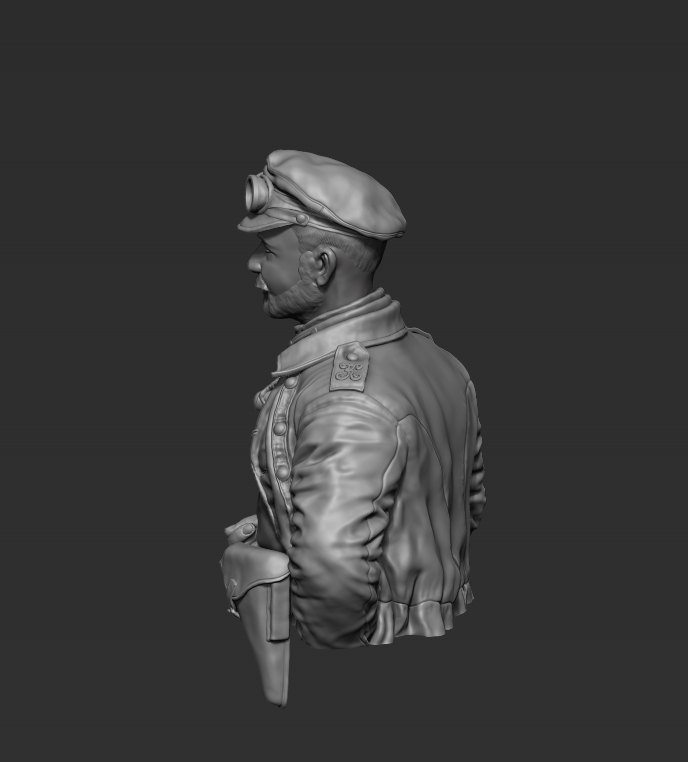
Prussian Motor Transport Corps Driver, 1915 – Pr. Kraftfahrer 1915
- Scale / Maßstab: 1/10th
- Approx. height of bust / ca. Höhe Büste: 75mm
- Material: Resin (bust), 6mm Brass Tube (for bust mount) / Resin (Büste), 6mm Messing-Rohr (für Sockel montieren)
- Parts / Teile: 12
- Infosheet / Infoblatt: English
- Code / Artikel-Nr.: 36BTH
- Attention: Not a toy. Model kit or model making accessories – not suitable for children under 14 years of age. / Achtung: Kein Spielzeug. Modellbauzubehör – nicht für Kinder unter 14 Jahren geeignet
GPSR Data / Angaben
- Manufacturer / Hersteller: Jon Smith Modellbau
- Responsible Person / Verantwortliche Person
- Address: Hannoverstr. 68, 29664 Walsrode, Germany
- Contact / Kontakt: info@jonsmith-modellbau.com
- Tel: +49 (0)5161 8255
Contents Bust / Inhalt Büste:
- Upper Body / Oberkörper
- Head for Top Hat / Kopf für Zylinder
- 2nd Alternative Head / 2. Alternativ-Kopf
- Right Arm / Rechte Arm
- Right Hand with Cigar / Rechte Hand mit Zigarre
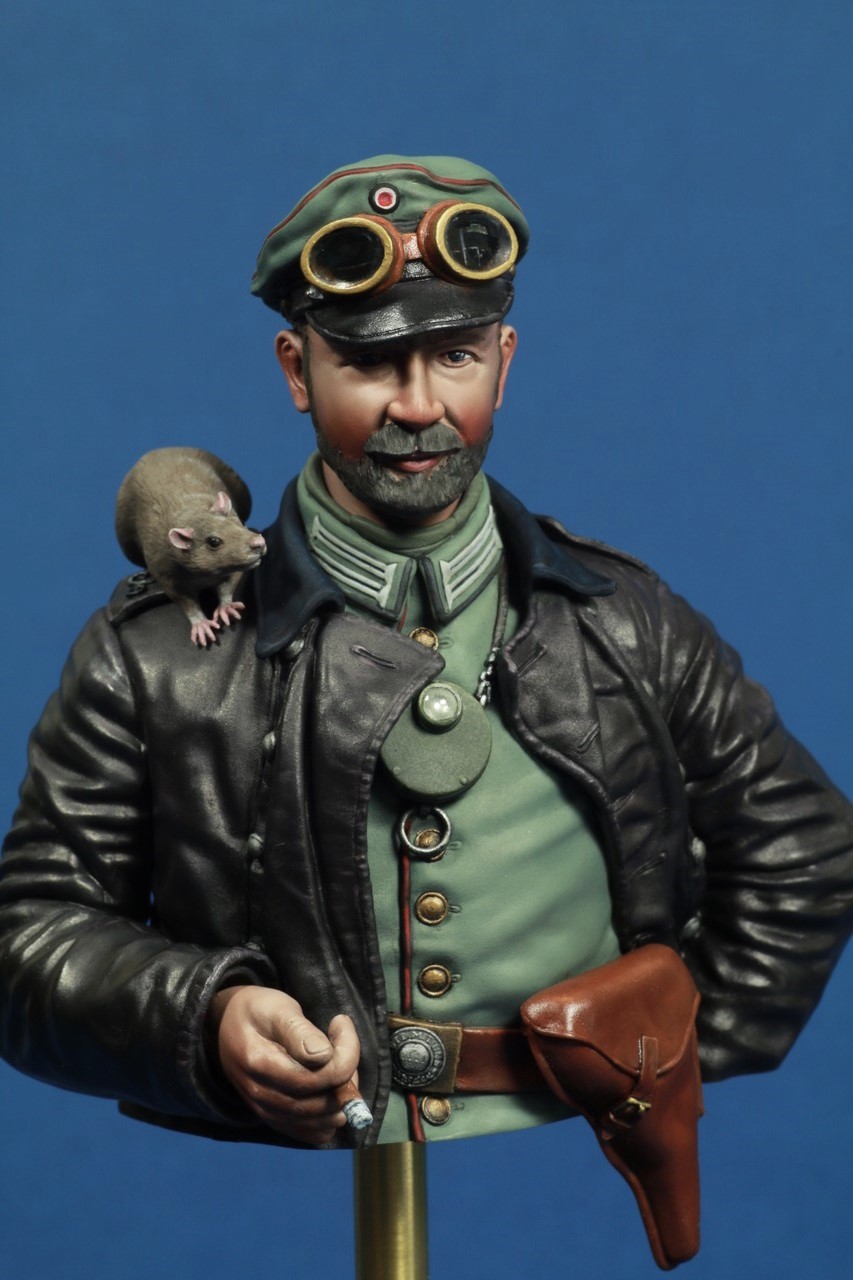
- Top Hat with Flying Goggles / Zylinder mit Fliegerbrille
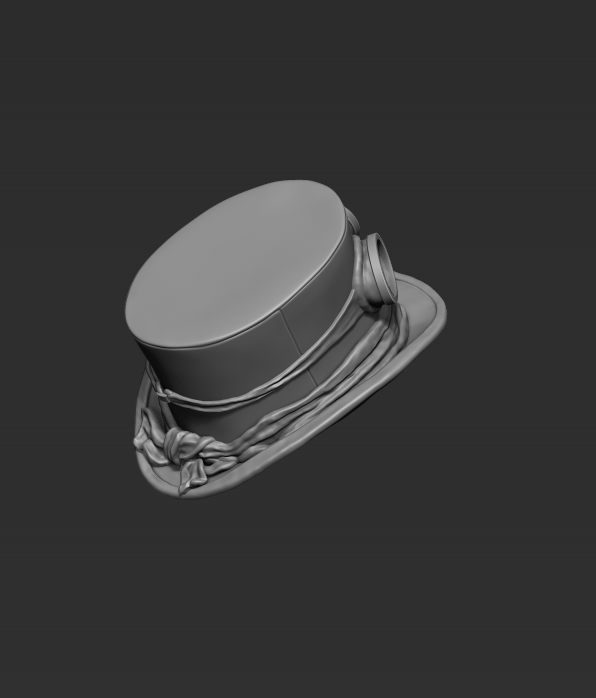
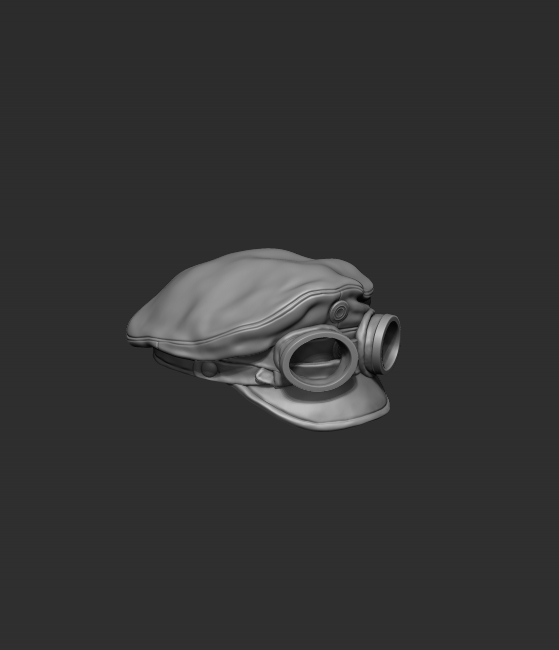
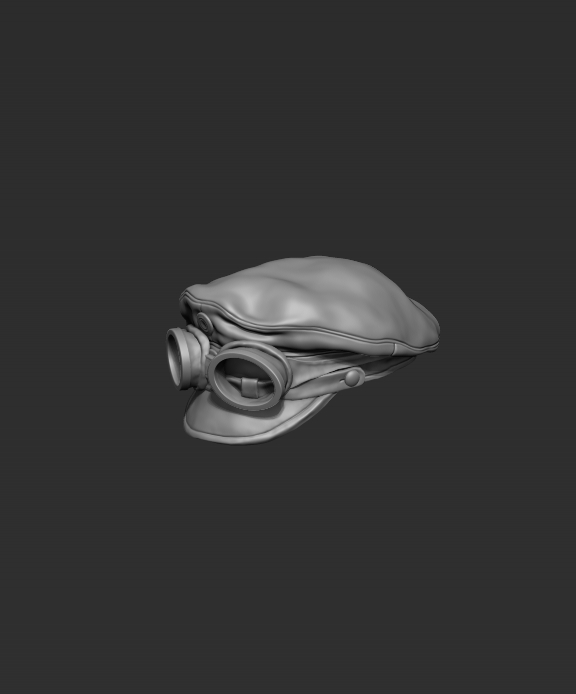
- Field Cap M1908 with Flying Goggles / Feldmütze M1908 mit Fliegerbrille
- Dinamo Flashlight / Magnet-Lampe
- Pistol 08 / Pistole 08
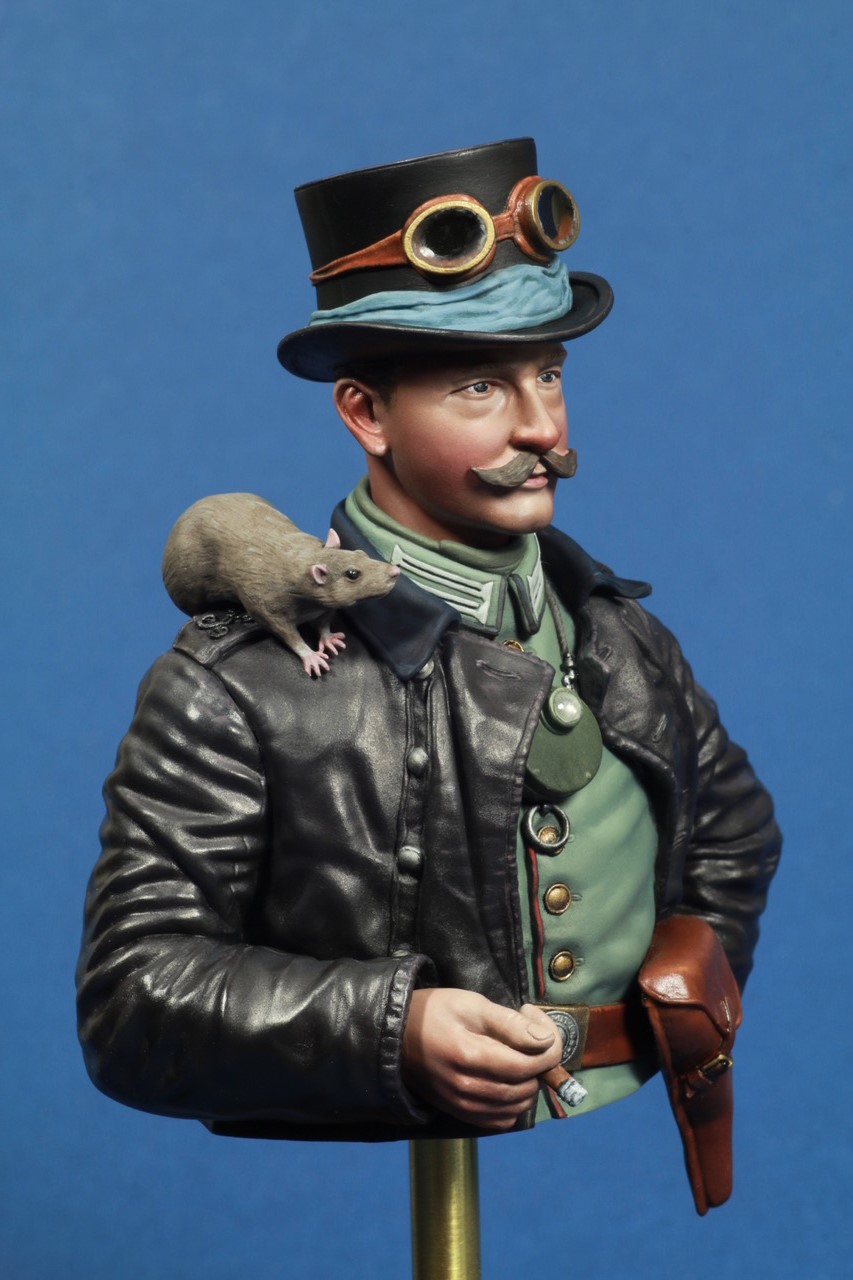
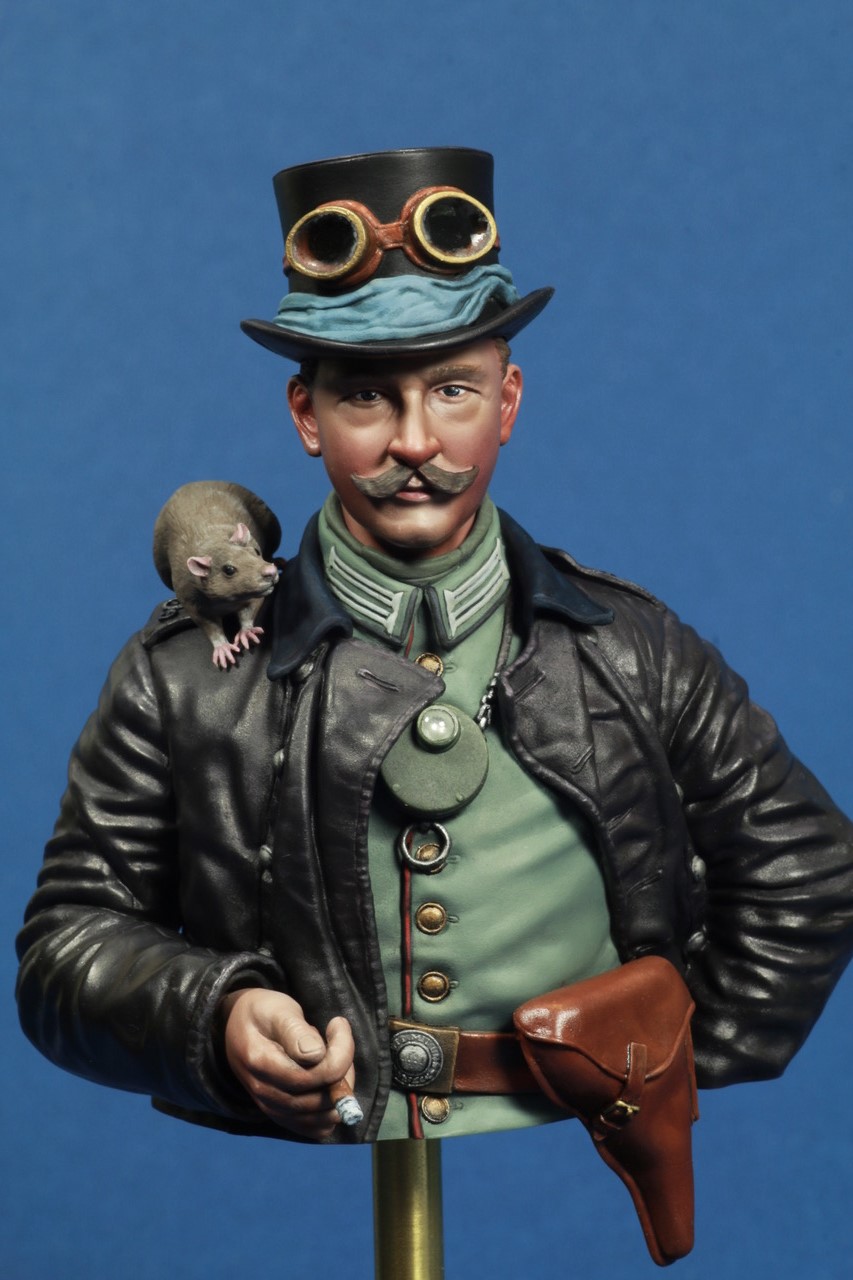
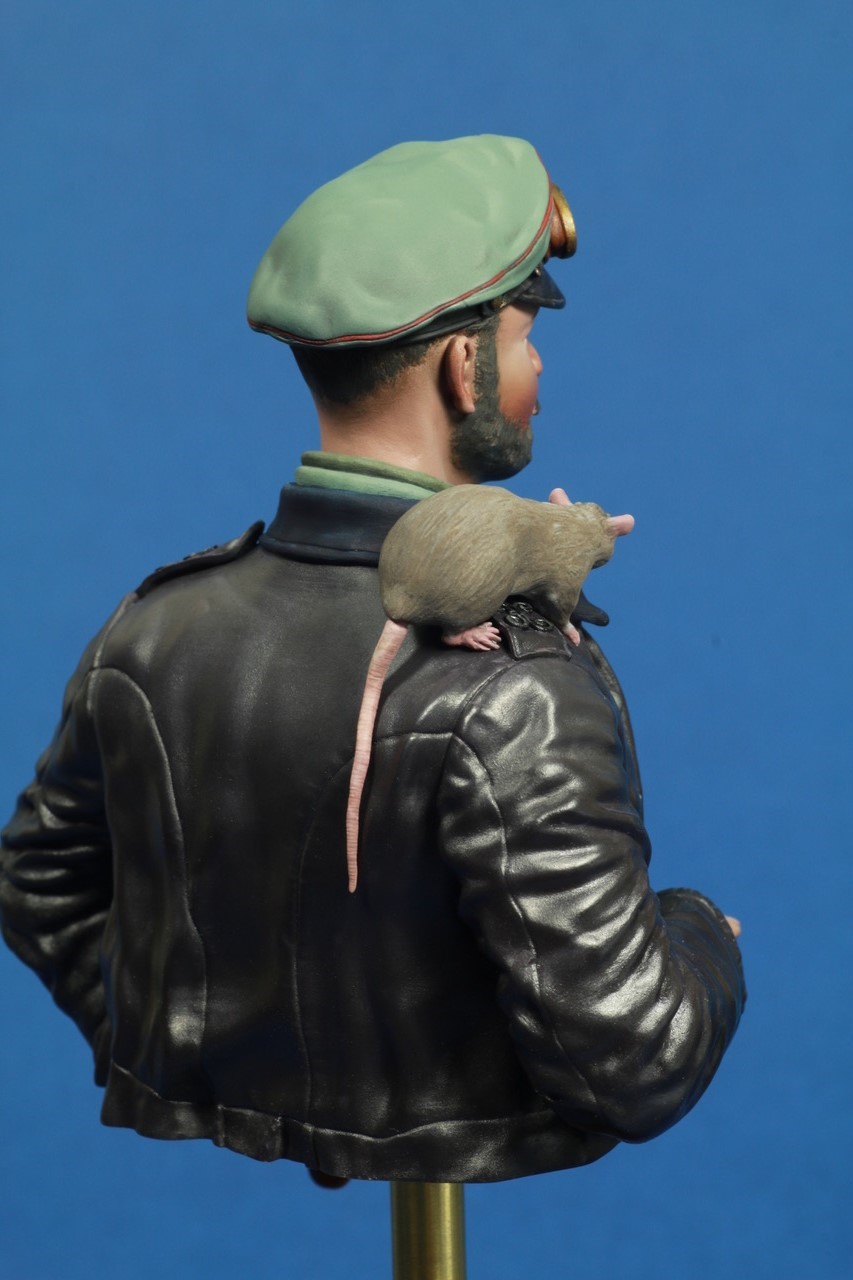
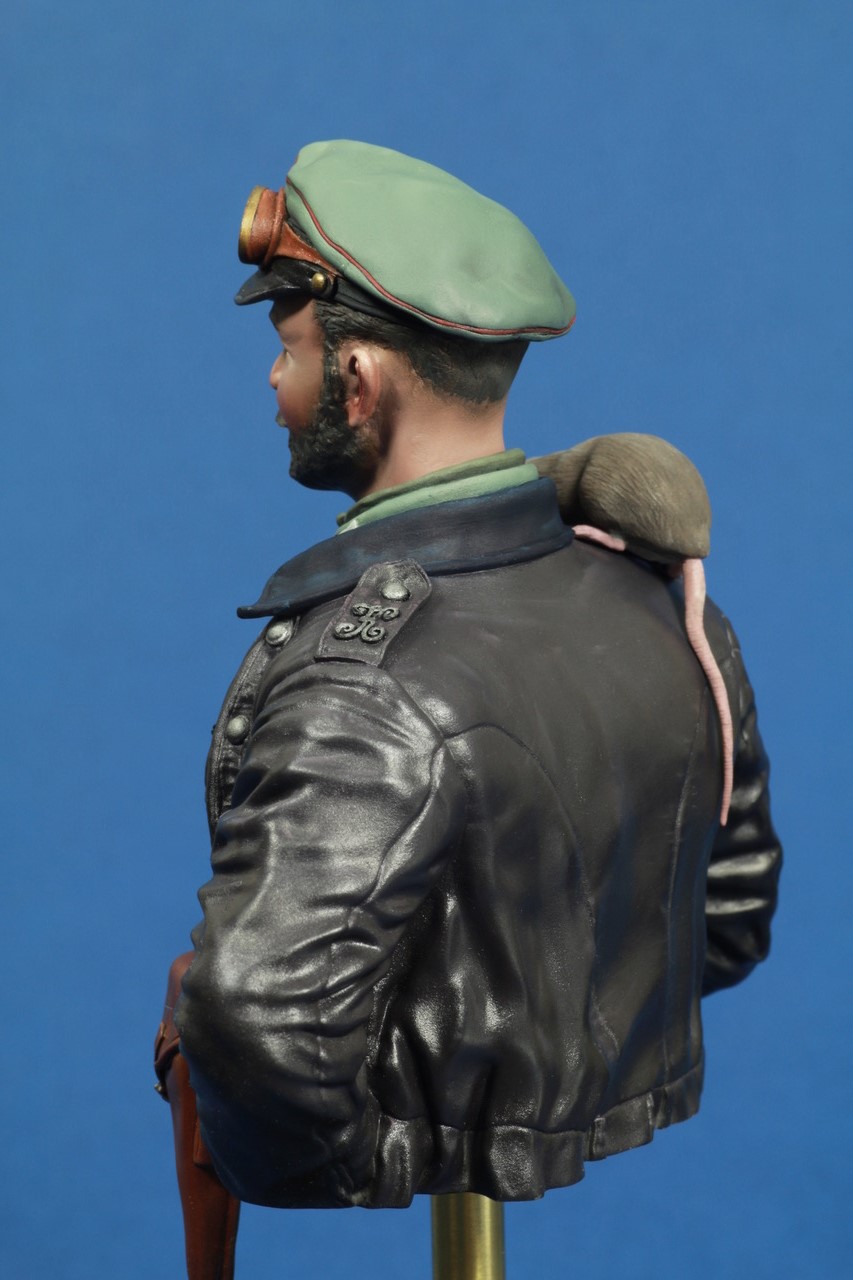
- Shoulder Rat / Schulter-Ratte
- Rat’s Tail / Rattenschwanz
- 6mm Brass Tube (for bust mount) / 6mm Messing-Rohr (für Sockel montieren)
The Shoulder Rat is an option.
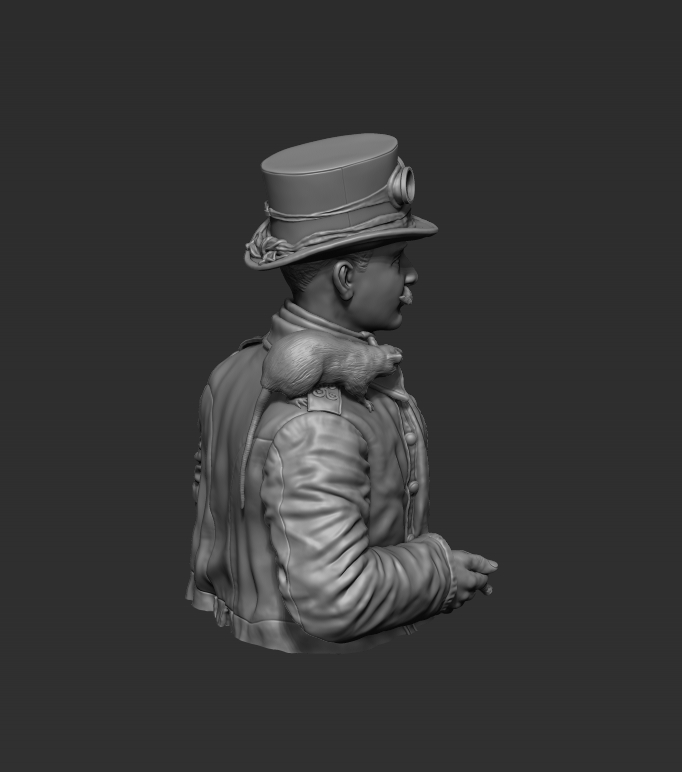

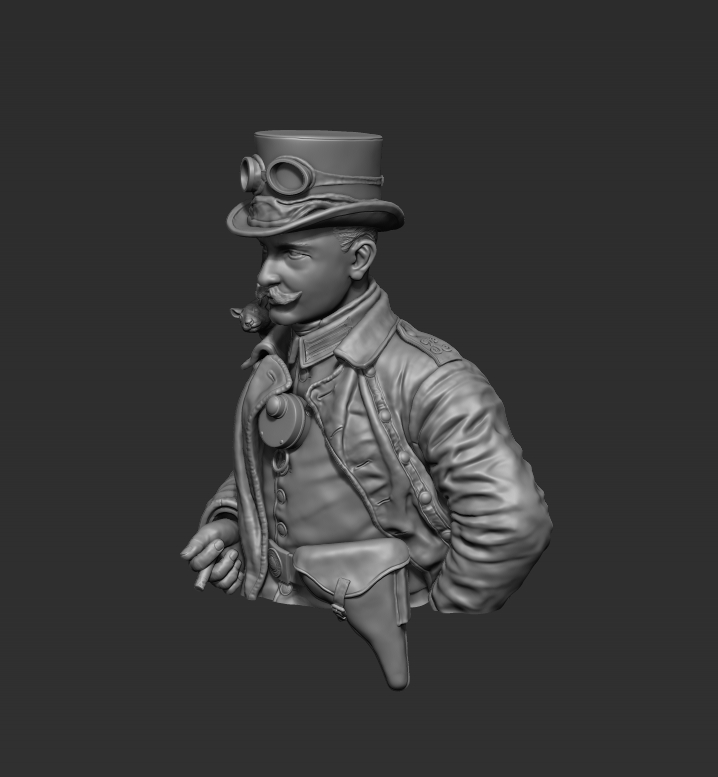

About this Bust
The bust depicts a member of the Prussian Motor Driver Battalion, or Kraftfahrer – ca. 1915. At the outbreak of the war in 1914 Prussia had just one Motor Driver Battalion and in the Bavaria State just a company. As opposed to the German Transport Units, or Train, which were solely equipped with horse-drawn vehicles and dealt with supply, the Motor Driver units were responsible for motorized transportation of all kinds and were also to take on patrolling and dispatch (messenger) duties. Within the first months of hostilities, the driver units were expanded so that by spring 1915 each Army Corps and independent Division had its own Kraftwagen-Kolonne, incl. a motor cycle unit.
During the autumn of 1917 over half of the newly appointed German Tank Unit’s personnel was formed from Motor Driver troops, many carrying out the more technical roles such as drivers and mechanics. On many photos of captured British tanks put into German service and their own A7v panzers, one can often see crewmen still wearing parts of their original leather Kraftfahrer uniforms.
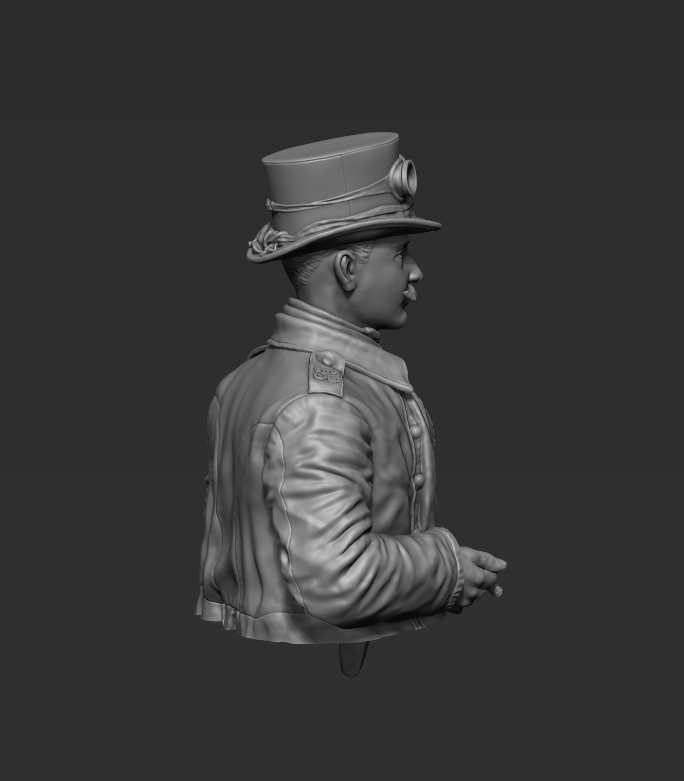
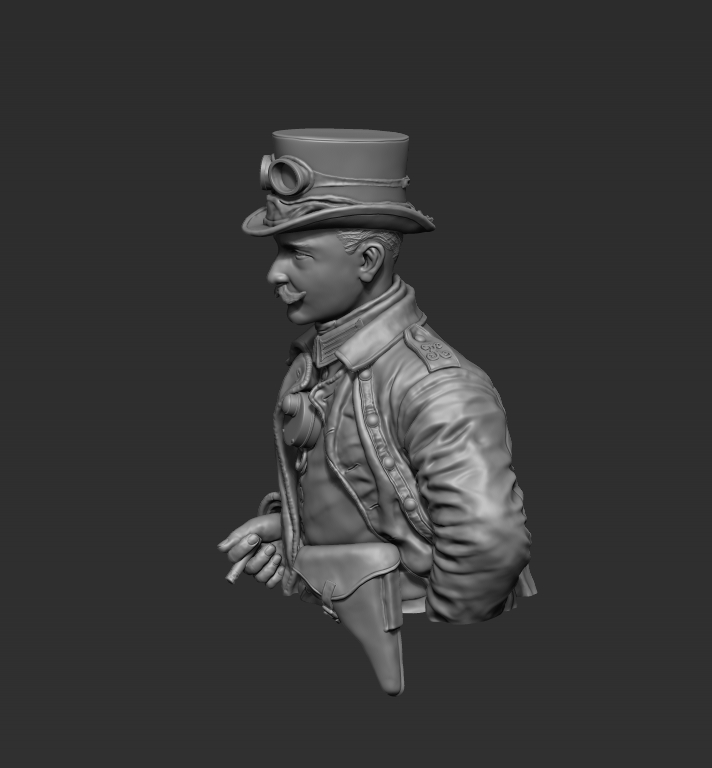
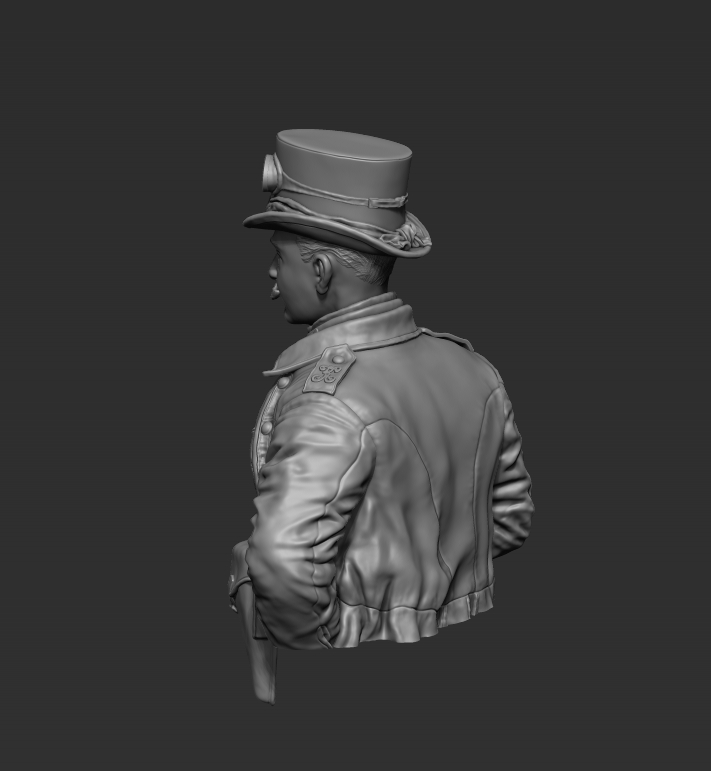
Top Hat (also known as a, beaver hat, chimney pot hat, high hat, silk hat, cylinder hat, or stove pipe hat): Worn from the latter part of the 18th to mid-20th century and generally associated with upper class, professional males for daytime and evening dress. Traditionally made from cheesecloth, linen, flannel and shellac, the shell being covered with a black silk plush (other fabrics were used in place of the expensive silk). The early types around 1830s were extremely tall, with the height reduced towards the end of the 19th century. The hatband was attached to the bottom of cylinder, which was later replaced by ribbed silk.
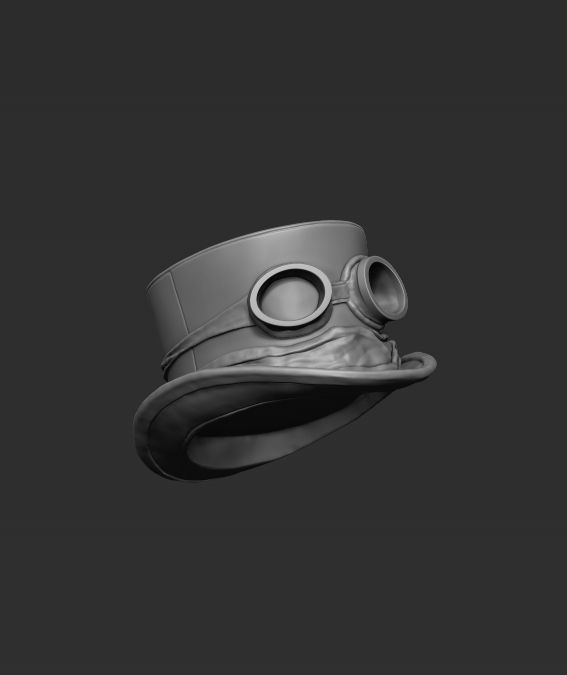

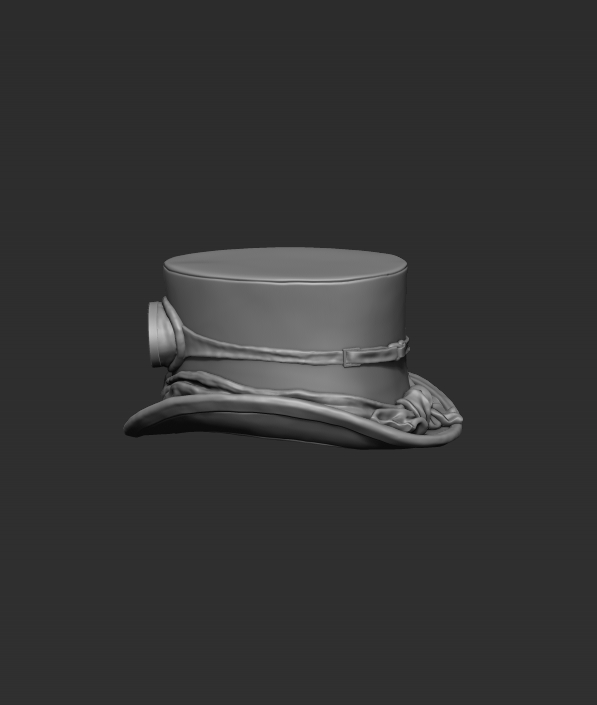
This is the only photograph that I have seen of the top hat combined with a World War 1 military uniform. One can only assume that the hat is being worn just for the group photograph. Traditionally, top hats were still being worn by coach drivers at the beginning of the 20th century in Germany, particularly in larger towns and cities, including the addition of coloured hat bands. Maybe he brought it along, or found in locally?
During the research and design stage of this figure project it was not possible to solve the mystery of the large cloth or hatband. There was a time when mourning bands were placed around top hats at funerals, hanging down at the rear in various lengths, although these were black in colour and comprised of much less cloth. A cloth cover or holder for the goggles may be the explanation, but here again I believe this is not the case as most of these items came in small leather bags. It could just be a piece of cloth added by the soldier for decoration purpose and offers a chance to brighten-up the otherwise darker / drab military colours of this figure subject. Any suggestions regarding this subject or about the figure would be very much welcomed.
Goggles / Fliegerbrille: The driving or flying goggles were standard issue to drivers, but as with the leather jackets and field caps, there were numinous versions.
It is also possible to add imitation glass lenses to the goggles after painting is completed. Here one could use Micro Kristal Klear, or similar products to produce a clear film within the outer resin rings. Alternatively, one can produce the glass lenses by using a clear plastic or similar.
Field Cap M1908 for Other Ranks / Dienstmütze mit Schirm für Mannschaften M1908: Issued to other ranks of the Train (Transport), Medical and Mountain units and was basically a Field Cap M1907 with a blackened leather visor and chin-strap added. The chinstrap at each side had black metal or grey painted buttons (in some instances Neusilber = copper, zinc & nickel). The cap band was in black with red piping above and on outer edge of top. From late 1915 early 1916, the peaks and chin-straps were issued in grey.
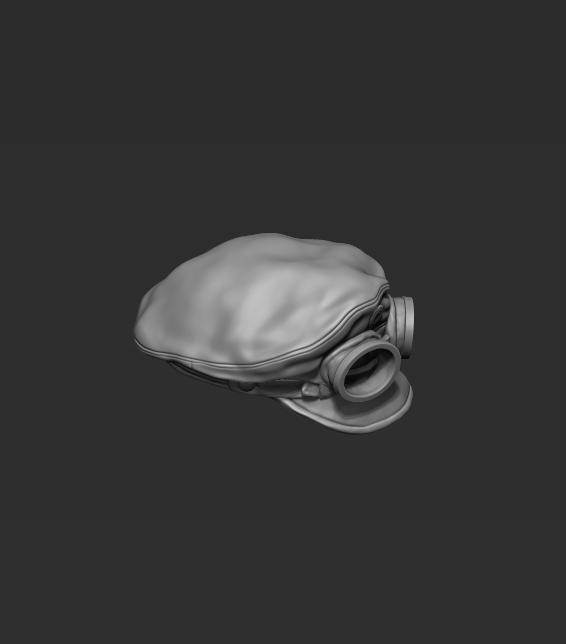
From spring 1917 onwards the peak and chinstrap were no longer made from leather, but an Ersatz material, either vulcanised fibre or treated card, both finished in a matt grey tone. In October 1918 is was decided to discontinue the M1908 cap and the visor and chin-strap were to be removed. This is one of the reasons why so few of these caps have survived today.
The two metal Kokarden badges at the front were – top: Die Reichsfarben: black, white and red (from outwards to the centre) and – bottom: Kokarde representing the state where the Unit was raised – e.g. Prussia – Preussen: black, white and black. Bavaria – Bayern: white, light blue and white. Brunswick – Braunschweig: blue, yellow and blue. Hessen – Hessen: white, red and white etc.
In many of the pre- and early war photographs one sees Driver Corps troops wearing the all leather field cap. I decided against this version as the bust and particularly the figure versions would be showing just too much leather.
Neck Band / Halsbinde M1914: Designed to soak up the sweat and at the same time keep the field service dress or overcoat collar clean. Between the overcoat collar and the neck on the figure one can make out the Neck Band M1914. This was the replacement to the M1907 Neck Cloth, a square piece of material, which produced problems when the wearer was marching, actually causing the garment to tighten up around the neck. The neck band on the other hand was smaller and not unlike a detachable shirt collar, with a semi-circle apron of material attached underneath. Colour: these neck bands varied in colour from grey, light- grey to grey- green.
Leather Jacket for Driver Corps M1907 / Lederanzug für Kraftfahrer M1907: Members of the Driver Corps were issued leather uniforms to protect the wearers against the elements whilst driving the often open vehicles of the time. There seems to be a number of differences to these leather jackets with variations principally to the collar, collar-insignia and type and number of buttons used. Most pre and early war photographs show the jackets with the white metal automobile patches on a dark-blue material collar, with nickel or new-silver buttons mounted to a supporting leather strip. Later versions are often without any patches on a blackened leather collar and either metal or larger, darker (possibly bone) buttons.
I have modelled the jacket as near as possible, or what can be determined from the original photograph. Here there is no collar-insignia to be seen on what could either be a leather or cloth collar.
The K on shoulder straps has been modelled slightly higher than would normally be the case. This to assist in the painting. There are also small casting webs placed under the collar and shoulder straps (between pointed end and collar), which can be removed / reduced before painting
Field Service Dress Tunic M1907/10 / Feldrock M1907/10: Underneath the leather jacket he wears the Field Service Dress Tunic M1907/10. This was the main field service dress issued to all foot troops during the first years of the war. It had depending on the unit or home state different variations of cuff and skirt design. Colour: made out of a dark grey material (Jäger, Maschinengewehr and Schützen units wore sometimes a green- grey version). It had a turn down collar, with eight nickel or Tombak (an alloy of copper and zinc, which had a matt bronze/yellow colour) buttons at the front. Although hidden underneath the jacket, the shoulder straps for the Transport Corps were piped (outlined) in grey, with the monogram, or number in red. Red piping also appeared along the front of the tunic, parallel to the buttons and along the skirt decorations at the rear. The outside edge of collar, and the cuffs were piped in black. The collar braid left and right are white with black in the centre of each chevron.
Belt M1895 / Koppel M1895: The original belts were issued in natural brown leather, the buckle in brass with a Neusilber / nickel silver inlay. From 1915, leather equipment was officially issued blackened, buckles painted over in grey or manufactured in steel with a grey finish.
Pistol 08 / P 08 (or Luger – the Germans never called this weapon the Luger – this is an anglicised name): The P 08 was first produced in 1900, with the German military taken it on in 1908 – hence the name Pistole 08. As a service pistol it had its drawbacks, mainly it was expensive, difficult to produce and susceptible to dirt. Colour of holster: blackened leather.
German Dynamo Flashlight / Magnet-Lampe: An interesting and clever device, although probably a little impractical when used other than illumining a map or something similar held directly in front of you. In practice, one sharp pull of the ring will keep the bulb lit for a number of seconds. The lamp had a metal casing, painted in a green, semi-gloss tone, a brown / grey cord for fixing around the wearer’s neck and a metal pull-ring underneath. The clear, convex glass lens covered the bulb.
The original photos shows this flashlight reflecting the light, hence it appears very shiny. The few original items that I have seen show them to be semi-gloss green. The lamp should fit without any adjustments on his chest and partly under the open leather jacket. Trial fitting would be advised, especially when coats of paint have been applied to the figure. One can ease fitting by removing the sharp bottom edge a little. Underneath the pull-ring one could remove some of the resin filling the gap between ring and tunic.
The Rat – Rattus norvegicus:

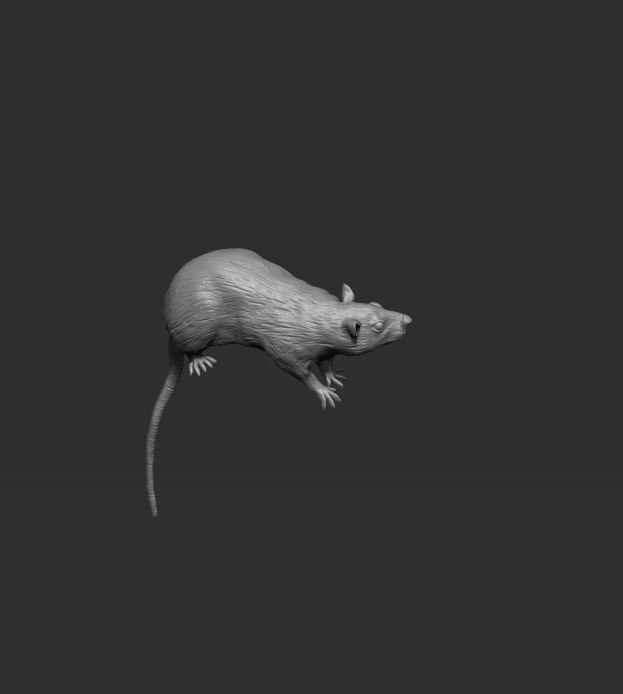
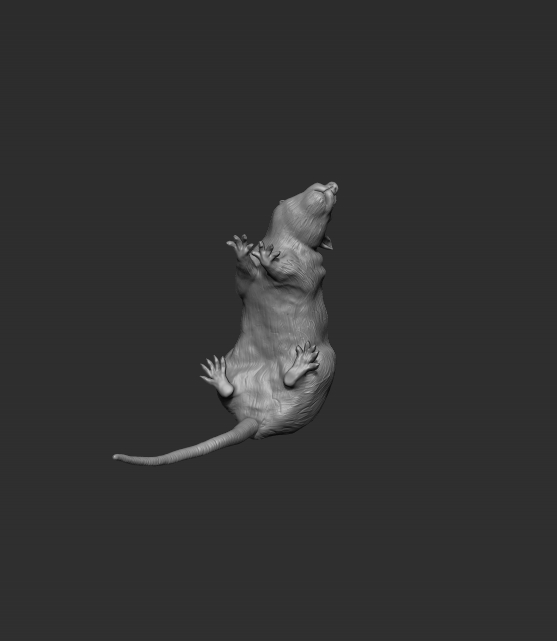
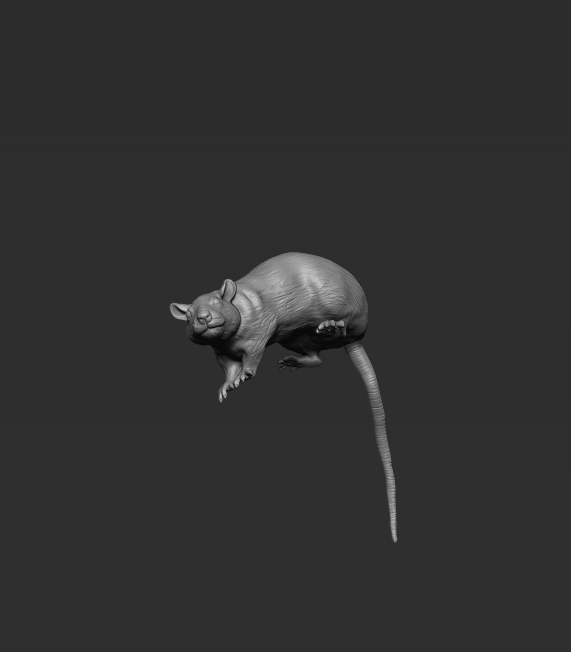
The Common Rat: Actually, when one talks about rats, then there are two best known rat species – the brown rat (Rattus norvegicus) and the black rat (Rattus rattus- also known as the ship rat, roof rat, and house rat). I have chosen to create a set of the larger of the two groups, the brown rat, which is the dominant rat in Europe and much of North America.
The Naming: Originally called the Hanover rat, the brown rat has had many different names throughout history, but is nowadays correctly called Norwegian rat or Norway rat (Latin: Rattus norvegicus). Why it was called this is not certain, as the brown rat did not originate from Norway, or at the time had any brown rat entered this country. Other names include common rat, street rat, sewer rat, brown Norway rat and wharf rat.
Description: These brown or grey rodents will average a body length of up to 25 cm, with a similar tail length. The male rat is larger than the female and can weigh around 300 – 350g, twice as much as the smaller black rat or Rattus rattus. Under good conditions, the brown rat can weigh up to 900 – 1000g, although this is seldom seen. The fir is coarse and usually brown or dark grey in colour, with the underside or belly area a much lighter, or light grey tone. The ears, feet, tip of nose and tail are without fir and will normally have a lighter colour. The eyes are nearly always black without any white showing.
A female rat may breed up to 6 – 7 times a year, with each litter numbering from 2 – 14. The Norway rat is fully grown in approx. 4 weeks and will live up to 3 years. The rats are found anywhere there are people, but particularly in urban areas – this is called commensalism, which means that one species helps another species, without any help in return.
The rat burrow (nest) consists of networks of tunnels and chambers, linked together with passageways. Here they will live together as a group or pack (sometimes called a colony). Rats will cache their food and store within the chambers. The burrows are found in ditches, cellars, sewers, barns, old buildings, woods and marchlands or just anywhere near a food supply (near humans). They will defend their burrow as a group against predators. The brown rat has exceptionally good hearing and is often found near water. They are good climbers, swimmers and have a strong sense of smell. They will normally hunt at night in packs.
The trench systems of the Great War on both sides offered the ideal living conditions for the Norway rat and there is much evidence from soldiers describing their co-habitants.
Predators: The natural predators of rats include the snake, fox, weasel, birds of prey, cat and dog. In the trenches during the Great War, apart from the soldiers, it was the dogs which helped to keep the rat population under control (or as best as possible under the circumstances). It seems that any of the terrier family were quite common as rat killers. There are also many photos of Jack Russells, particularly kept by German troops.
The rat on shoulder is purely my own idea and is not based on any WW1 photograph. Whilst researching for this figure, I had looked at various small items, or add-ons, which would enhance this project, without removing the focus from the figure. During the design stage I only came up with automobile accessories, such as tools, oil cans etc. The shoulder-rat was chosen as an unusual combination to an already odd character wearing the top hat. The rat is of cause optional, but if chosen, will fit (on bust and 1/16th full figure versions) over the right hand shoulder strap, the rear feet sitting slightly underneath and the tail hanging naturally down the back.
 An deutschsprachige Interessenten:
Sie können mich per eMail oder Telefon auch gerne auf deutsch kontaktieren. Ortsbesuch ist nach Absprache möglich.
An deutschsprachige Interessenten:
Sie können mich per eMail oder Telefon auch gerne auf deutsch kontaktieren. Ortsbesuch ist nach Absprache möglich.