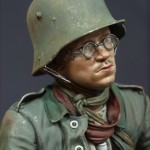
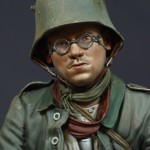
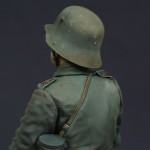
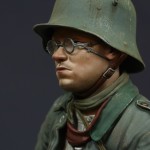
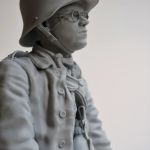
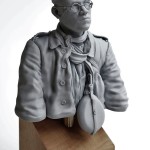
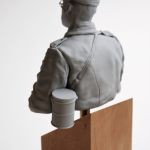
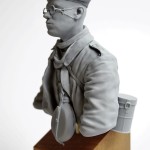
Above are the painted bust photos from David Lane
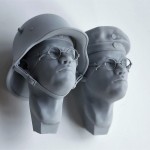
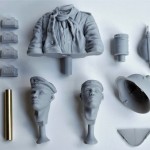
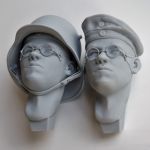
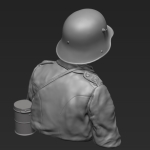
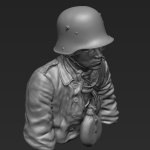
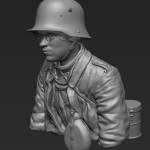
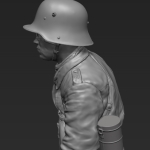
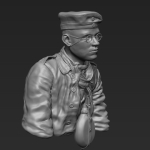
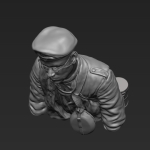
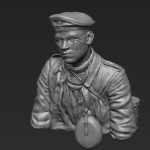
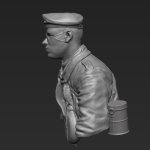
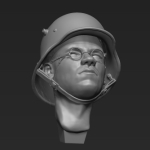
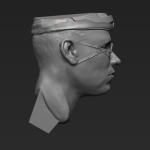
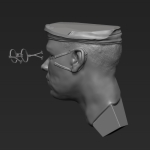
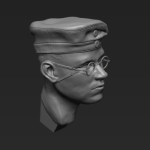
The 8 photos above are of the actual parts within kit and the assembled resin bust, showing the alternative heads supplied and gas mask spectacles attached to faces (without glass lenses). The photos below are snapshots from the 3D program used to create the master figure
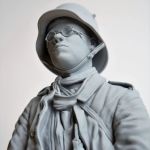
German Prisoner – Infantry Regiment No. 60, Passchendaele, September 1917 – Dt. kriegsgefangner IR60, Passchendaele, September 1917
- Scale / Maßstab: 1/10th
- Approx. height of bust / ca. Höhe Büste: 65mm
- Material: Resin (bust), 6mm Brass Tube (for bust mount) / Resin (Büste), 6mm Messing-Rohr (für Sockel montieren)
- Parts / Teile: 12
- Infosheet / Infoblatt: English
- Code / Artikel-Nr.: 30BGP
- Attention: Not a toy. Model kit or model making accessories – not suitable for children under 14 years of age. / Achtung: Kein Spielzeug. Modellbauzubehör – nicht für Kinder unter 14 Jahren geeignet
GPSR Data / Angaben
- Manufacturer / Hersteller: Jon Smith Modellbau
- Responsible Person / Verantwortliche Person
- Address: Hannoverstr. 68, 29664 Walsrode, Germany
- Contact / Kontakt: info@jonsmith-modellbau.com
- Tel: +49 (0)5161 8255
Contents Bust / Inhalt Büste:
- Upper Body / Oberkörper
- Head for Helmet / Kopf für Stahlhelm
- 2nd Alternative Head with Prussian Field Cap M1917 / 2. Alternativ-Kopf mit Preußische Einheitsmütze für Mannschaften M1917
- 4 Gas Mask Spectacles (2 for each head) / 4 Stck. Gasmaskenbrille (für jeden Kopf 2)
- Steel Helmet M1916 / Stahlhelm M1916
- Chin Strap / Kinnriemen
- Water Bottle M1915/17 / Feldflasche M15/17
- Gas Mask Tin M16 / Bereitschaftsbüchse M16
- 6mm Brass Tube (for bust mount) / 6mm Messing-Rohr (für Sockel montieren)
About this Bust
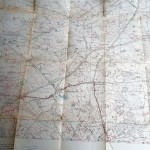
The bust depicts a young German infantryman taken prisoner by Scottish and South African troops in an attack on Vampire Farm, near Potijze, in September 1917 during the Battle of Menin Road Ridge. He belongs to the German 60th Infantry Regiment / Inf.-Regt. Markgraf Karl (7. Brandenburgisches) Nr. 60, which was part of the German 121st Infantry Division in positions around the town of Zonnebeke. The 60th IR was the northern unit of the 121st ID and had their companies in defensive positions in depth facing Ypres, running back approx. 3 Km in a rough line towards Passchendaele. The 7th RIR (Reserve Infantry Regiment) and 56th RIR made up the rest of the Division positioned to the south of the 60th IR. The place of capture at Vampire Farm was situated between the German defensive lines Wilhelm Stellung & Flandern 1 Stellung.
The original photograph shows the steel helmet sitting higher on the head than would normally be the case. One could assume that he is still wearing his field cap underneath, a not too uncommon situation practiced by German troops, particularly when being taken prisoner. If time allowed, then they would most certainly try and take a greatcoat, gas mask and water bottle with them. On a second photograph, taken at the same time, one can see the water bottle, attached to his opened field tunic (probably fixed to one of the button holes?). Also apparent on the photograph, is that his face, particularly around the mouth area is swollen, indicating a wound, or eventually some form of rough treatment during his capture.
Extracts from the Infosheet with this Bust:
Other Ranks Prussian Field Cap M1917 / Prueßische Einheitsfeldmütze für Mannschaften M1917: Made out of a field grey material. The band and piping were in Resedagrün reed-green for all units (earlier caps had a red band & piping for infantry). The two metal Kokarden badges at the front are – top: national colours Die Reichsfarben: black, white and red (from outwards to the centre) and – bottom: represents the German State where the unit was raised – e.g. Prussia – Preußen: black, white and black. Bavaria – Bayern: white, light blue and white etc. See table below.
From 1917 a new field M1917 cap was introduced with a green band for all arms, but both old and new types were worn alongside each other during the rest of the war. The field cap was worn extensively, both in the rear and front line areas, in all different shapes and styles. Interestingly it was commented by the Officer Commanding Sniper School in the British First Army area, how well the German field cap, with its floppy and uneven edges, blended in with its surroundings. (The first British caps were far larger and flatter on top, reflecting the light and hence attracting attention).
Notes from Sculptor – Judging by the height & position of steel helmet on head, I have guessed that the soldier is wearing his field cap underneath – not a too uncommon combination, which I have also seen on other photographs of this period.

Unofficial Scarf or Neck Cloth: May well have been acquired by himself locally and is tied with a knot at the front. Colour: judging by the original photograph, this could have been a green, red, brown or a grey shade, but seems slightly darker than the service dress tunic and neck band.
Neck Band / Einheitshalsbinde M1914: Hanging loosely, underneath the scarf is the neck band. Designed to soak up the sweat and at the same time keep the field service dress or overcoat collar clean. This was the replacement to the M1907 Neck Cloth, a square piece of material, which produced problems when the wearer was marching, actually causing the garment to tighten up around the neck. The neck band on the other hand was smaller and not unlike a detachable shirt collar, with a semi-circle apron of material attached underneath at the front.
Other Ranks Shirt / Hemd für Mannschaften: Looking at the original photograph of his open field tunic, one can make out a shirt and possibly a vest or similar garment underneath (on the bust, directly underneath the neck band). On the shirt collar and just visible is the small white horn button. At the beginning of the war, these shirts were issued in an off-white (or faded yellow tone). The photograph suggests a darker, maybe grey garment (this could have been a private shirt?).
Field Service Dress Tunic M1915 / Feldbluse M1915: This was to replace the early M1907/10 and the simplified M1914 service dress tunics. All three were in fact worn alongside each other throughout the war. The Bluse was a radical change in the design of combat clothing, with trials before the war and the new experience gained at the Front producing a garment without the unnecessary elements of the earlier tunics, giving the German soldier a completely different, in some cases baggy appearance. Designed for all arms of the service and for all ranks (officers were allowed to acquire the Bluse in a better quality of material, but were not permitted to show difference in colour from the other ranks).
Colour: made out of a field grey material (the Light Infantry units, or Jäger and Schützen wore a green-grey version). All units had the turn down collar in resedagrün reed-green, exception being the Bavarians, who retained the field-grey material, piped on the outer edge (later only the front, vertical edges) in the State colours white / blue Rautenborte, a particular feature of Bavarian troops. The six front horn buttons to the Feldbluse were normally hidden behind a flap – these had an off-white colour. On early version of the tunic, the small shoulder strap buttons were kept in brass, later these were painted over in various colours, ranging from green to grey.
Notes from Sculptor – On the shoulder straps I have raised the regimental numbers somewhat more than would normally be the case – this is to allow for an easier painting application. With a bit of care and a thin knife blade, it is possible to hollow out the gaps underneath and to the rear of both shoulder straps. Here one can use the back end of a sharp knife and scrape away the resin. There are also small casting webs underneath the ends of collar at front of tunic – these should be removed before painting.
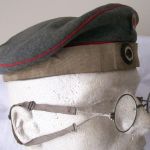
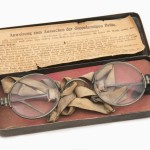
Gas Mask Spectacles / Gasmaskenbrille: The gas mask spectacles were specifically designed to be worn together with the mask and issued for front-line use to soldiers requiring vision aids. On the normal spectacles of the time, the side arms prevented the mask from fitting tightly against the face, allowing gas to enter. These glasses had short v-shaped double arms, hinged to the front, with adjustable cotton straps, which then looped around the ears securing the glasses in place.
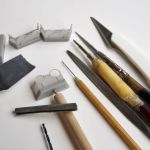
Notes from the Sculptor – I would suggest first mounting the glasses casting block on a small stick or similar, so as to avoid handling the top area. Remove the casting webs from within rings and v-shaped arms first, using a 0.5mm hand drill and a new light-weight (plastic) scalpel knife with a straight blade or similar. Final clean with fine sandpaper. Afterwards, remove the rest of web from underneath, leaving the 4 posts affixed to glasses. The 2 front posts under the rings can then be removed next after all traces of the casting web have been removed, making sure that the now free-hanging frame is supported by a finger when sanding. The glasses can now be painted / air-brushed.
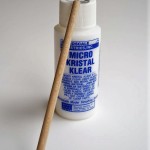
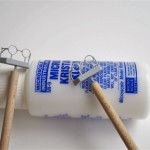
It is also possible to add imitation glass lenses to the spectacles – here one could use Micro Kristal Klear to produce a clear film within the resin rings. I have added this to one of the spectacles below and left one without. The forward posts, directly under the rings would normally be removed beforehand – here I have left these on to increase support to these samples.
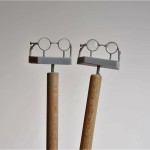
These are delicate items and I have made the V-shaped arms and nose connection part a little thicker than they would have normally been. One could thin-down these parts before the removal of casting web if required, but one should be extra careful not to break the arms off at the hinge areas. On the top 8 model photos at the beginning of this webpage, I thinned down the side V-shaped arms by carefully cutting / scraping down with the scalpel, after the spectacles were fixed to face.
Note: If extra glasses are required, then please contact me directly – I have spare sets.
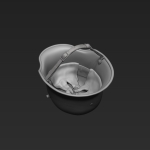
Steel Helmet M16 / Stahlhelm M.16: This helmet, which first entered service in 1916 during the initial stages of the battle of Verdun was designed by Professor Friedrich Schwerd and made from high quality chrome-nickel steel. Weighing between 950 and 1200g, depending on size – heavier than the Allied helmets, but giving a better protection to the face, ears and neck. The horn venting bolts on each side enabled the fitting of an extra armoured shield over the helmet for sentries, MG troops, snipers or other particularly exposed / dangerous employment. This weighing around 2000g was seldom used; although a total of 50000 were supposedly produced.
Colour: first issued in field-grey, which would reflect in sun light and proved unsatisfactory. Various trials were carried out, but it was not until July 1918 that an official camouflage scheme in brown and green sharp-edged irregular patens, all outlined in black was introduced. These were carried out by unit maintenance workshops (other weapons and equipment, particularly artillery pieces and MGs were also rendered in the same way). It seems that helmets were re-painted by individuals or units in a variety of colour schemes before the official order and helmets with red-brown, ochre (brownish-yellow), green and blue-grey, all outlined in black were common. Helmets were also covered using the light brown sandbag material, or the issued helmet-covers, seen particularly in the later war period.
The M.17 & 18 helmets followed with only slight differences to the inside padding and chin strap fasteners. The last model to see service during the war, if only in small numbers was the M.18 Ohrenausschnitt, or Helmet M.18 with ear cut-outs, more commonly (and stubbornly) known as the Cavalry or Telegraph Helmet. The cut-outs were in fact a further design feature of the M.18 to improve the hearing ability of the wearer and avoid the hissing noise experienced by troops.
The vent bolts can be drilled out (just as in the original), using a 0.5mm hand drill, making sure that one comes out at the correct angle inside the helmet.
Chin Strap / Kinnriemen: The M16 helmet used the leather chin-straps, with brass slider buckles (later steel) originally supplied with the spiked helmets. These proved to be only partly suitable, as they would often become loose and slip down during wearing.
The chin strap will require a little adjustment / thinning down before fixing to helmet and head.
Tip: I thinned down the chin strap as far as possible, then fixed to the finished head & helmet. I then further thinned down the strap. This is not the ideal situation, especially when the head is already painted, but with a little care and repainting the outer parts of chin strap afterwards, one can achieve the best results and a realist look to this thin / fragile item.
Water Bottle M1915/17 / Feldflasche M1915/17: The M15/17 Water Bottle was designed to replace the M07 version, produced now in tinned steel sheet and no longer in aluminium. The neck of the bottle was extended by approx. 3 cm and incorporated an indentation to allow for a better attachment of the leather harness. The cover was made from a field-grey, waterproofed cotton material, with 4 metal stud fasteners securing the slit at side. The snap-hook (carabiner) would normally be attached to the haversack belt loop ring fastener.
Note: Inside and in front of the snap-hook are casting webs – these should be removed before painting.
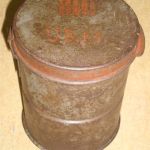
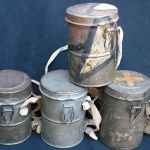
Gas Mask Tin M16 / Bereitschaftsbüchse M16: At the beginning of 1915, the early type gas masks were issued without any form of container or holder and were often placed within the haversack (bread bag) or in some cases kept in tins, which were fastened by string around the soldier’s neck. Later in 1915, the Canvas Gas Mask Holder, with dividing sections within was issued – Segeltuchtasche für Gasmaske M1915 – here the mask, filter unit and spare filter were kept in tins within and still had to be opened and attached when required. The holder was officially worn on the left side of belt, but is quite often seen at rear, next to the haversack.
In March 1916, the German War Ministry announced the distribution of a Gas Mask Tin, which held the ready for use mask with filter unit already attached. Until the issuing in sufficient numbers, the troops had to do with tins of different manufactures, including the existing canvas holders being modified to carry the mask with filter unit attached.
In June 1916 the Gas Mask Tin M16 / Bereitschaftsbüchse M16 was issued, together with a leather strap, later made from canvas for attachment around the neck. The bottom tin attachment loop could also be attached to a front tunic button, holding the tin in the standby position. If not in this position, the gas tin was kept as before within the canvas holder or slung around the back. Within the tin, the mask could be kept with filter unit attached and ready for use. The gas tins were used until the end of the war, but parallel the new and slightly higher M17 tins were being issued from mid-1917.
Colour: original items show a diversity of colours used on these tins, ranging from field-grey to dark or Khaki-green. The marking of these tins with owner’s name or unit etc. is seen now and then, particularly on the lid. Below are different examples of M16 and M17 tins. The tin with 180 ÜB.M. in red could mean Übungsmaske – Practice mask (?).
Brass Tube: The 6mm buffed diameter brass tube supplied is to mount the bust to a suitable stand. Under the bust, an appropriate hole has been modelled in a middle / forward position to allow the figure to be displayed. The hole will require to be drilled further into bust and is slightly larger than 6mm – this is to allow for a choice of positions / angles as required.
Notes from the Sculptor
I have attempted to produce a bust which is not only historically correct, but also fun to build and challenging to paint. The reproduction of the gas mask glasses in miniature and the muddle of neck cloth, neck band and shirt around the open collar, were just 2 of the more tricky areas to solve. Help has been given to me as always by WW1 collectors, enthusiast and modelling friends, not only on uniform and equipment research, but also in identifying the German units fighting in this particular area and time of the Passchendaele battles during 1917.
A Personal Touch
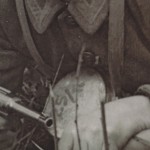
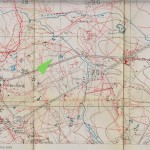
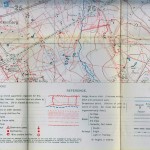
A personal touch to this bust is that during my research I came across the area of capture on one of my Grandfather’s trench maps. He served as an artillery officer on the Western Front and is the JSM logo. The town of Passchendaele is in the top right corner of the second photo, Vampire Farm (Vampir) at bottom left.

 An deutschsprachige Interessenten:
Sie können mich per eMail oder Telefon auch gerne auf deutsch kontaktieren. Ortsbesuch ist nach Absprache möglich.
An deutschsprachige Interessenten:
Sie können mich per eMail oder Telefon auch gerne auf deutsch kontaktieren. Ortsbesuch ist nach Absprache möglich.